Index
Speaking of tracks...
Tracks are a set of training courses or tracks that allow you to acquire certain expertise as you complete them successfully.
They may have other tracks, training courses or subjects as requirements and, in this case, you cannot register until you complete all of its requirements successfully.
The training courses that make up the track can also be defined as requirements for its other training courses.
You can define a pre-test for a track and indicate whether it will be a passing criterion, i.e. if the student can pass the track by taking only the pre-test, without having to watch all the content.
Just as the pre-test, you can also define a post-test for the track and a required score to pass it. When you do not define a post-test for the track, after finishing all its items, the student completes the registration successfully.
A track can be associated to a class as a topic item, in that case, the parameterization settings defined in the class take precedence.
Tracks may also include a reaction evaluation – such as a satisfaction survey – and a certificate, to be issued to the student when they finish the course successfully.
Create new track
01. After clicking New, Track where the track will be created, click Add – located in the lower left corner of the image – to add an image for the track.
02. Find and select the image of your choosing.
The maximum size allowed for the image is 4 MB.
03. In the pop-up window, define image crop.
04. Click Save.
To delete the added image, just click the Delete icon – in the lower right corner of the image.
05. Enter the required track information.
Required information:
Acronym
Track acronym.
Name
Track name.
Status
Current status of the track. Available options are:
- Available: when it is selected, the track becomes available in the catalog, allowing registrations and its association to topic items in classes;
- Obsolete: when it is selected, the track is in the process of discontinuation, but registrations and its association to topic items in classes are still allowed;
- Under conclusion: when selected, neither registration in tracks nor its association to class topic items is allowed. As the track is given that status, active registrations remain active, and the student can access the track as usual. For the other users that have at least reading permission on the track, it will only be displayed in the catalog if the option Allow viewing training courses and tracks that are under conclusion from Learning settings is set to Yes;
Archived: when selected, it is not possible to request registration in the track. To the students who are currently registered, the track is still displayed and they remain registered, but they can no longer access its content. For the other users that have at least reading permission on the track, it will only be displayed in the catalog if the option Allow viewing archived training courses and tracks from Learning settings is set to Yes.
Author
Track author’s name.
Class hours (in minutes)
Track duration in minutes.
Theme
Theme or area of knowledge to which the track belongs.
Purpose
Description of track purposes.
06. Click the Content and evaluations tab.
07. In Pre-test, click the Search icon to relate a pre-test to the track.
08. In the pop-up window, find and select the evaluation to be the track pre-test.
You can find the evaluation that you want by using the Search field – in the upper right corner of the window – or by paging through evaluations – arrows located in the lower right corner.
09. Click on Add.
To delete the evaluation added as pre-test, simply click Delete, next to the Search icon.
10. Define the other required information for the pre-test.
Required information:
Pass the pre-test
When it is checked, the student passes the pre-test automatically, i.e. if they achieve the set passing score, they will pass it without having to watch the track content.
Pre-test passing score
Score required for the student to pass the track, taking only the pre-test. This field is only displayed when the field “Pass the pre-test” is checked.
Fail the pre-test
When it is checked, the student fails the pre-test automatically, i.e. if they achieve a score lower than the failing score set, they automatically fail the track and cannot watch its content without first obtaining the necessary knowledge to take this track.
Pre-test failing score
Score that the student is required to exceed not to fail the track, taking only the pre-test. This field is only displayed when the field “Fail the pre-test” is checked.
Pre-test is mandatory
When it is checked, taking the pre-test is mandatory to continue the track.
11. In Track items, click New item to add training courses or other tracks to make up this track.
12. In the pop-up window, find and select the track or training course that is related to this track.
To find the item, use the search field – located in the upper right corner of the window – or page through the items – arrows located in the lower right corner.
You can also select more than one item at once.
13. Define whether the requirements for the selected item should be added to the track.
Do you wish to add training course requirements to the track?
When it is checked, the requirements for the selected item are added to the track, becoming its items.
When it is checked, the requirements for the selected item are added to the track, becoming its items.
14. Click on Add.
15. After you finish adding all the items, click Close.
To delete an item added to the track, simply click the Delete icon, located to the right of the line corresponding to the item.
16. In the Mandatory? column, define the track items that must necessarily be performed.
17. Click the Track item settings icon – located next to the Mandatory? column.
18. In the pop-up window, enter the order in which to display the item to the student when they perform the track and, among the other track items, check the ones to be the requirements for them to view that item.
You can configure each item added to the track.
19. Click on Save.
20. In Track cost, view the total cost of the items and enter the specific cost of the track.
Total cost of track items
It displays the sum of the cost of the items added to the track.
Cost
Specific cost of the track is deducted from the account to which the student is related, upon registration. This cost may be different from the total cost of the track items
For example: if the sum of the cost of the track items is 50, you can consider that the cost of the track will be 30, since all these items will be performed at one go within the track, as if they were a “package”. That is, performing the items separately has a higher cost than performing all of them within the track.
21. In Post-test, click the Search icon to relate a post-test to the track.
22. In the pop-up window, find and select the evaluation to be the track post-test.
You can find the evaluation that you want by using the Search field – in the upper right corner of the window – or by paging through evaluations – arrows located in the lower right corner.
23. Click on Add.
To delete the evaluation added as post-test, simply click Delete, next to the search icon.
24. Add the score required for passing the post-test.
Passing score
Minimum score the student must achieve to pass the post-test. It must be between 0 and 100, and separated by a dot if it is a decimal.
Example: 50.5
This field is only displayed after you select a post-test.
25. In Reaction evaluation, click the Search icon to relate a reaction evaluation to the track.
26. In the pop-up window, find and select the evaluation to be the track reaction evaluation.
You can find the evaluation that you want by using the Search field – in the upper right corner of the window – or by paging through evaluations – arrows located in the lower right corner.
27. Click on Add.
To delete the evaluation added as reaction evaluation simply click Delete, next to the search icon.
28. Click the Additional information tab.
29. Select the certificate to be issued to the student when they finish the track successfully.
30. In Skills, click Add skill if you want to relate skills to the track.
31. In the pop-up window, find and select the skill that the student will acquire as they finish the track successfully.
You can find the skill that you want by using the Search field – in the upper right corner of the window – or paging through skills – arrows located in the lower right corner.
You can also select more than one skill at once.
32. Click on Add.
33. After you finish adding all the skills, click Close.
To delete a skill added to the track, simply click the Delete icon, to the right of the line corresponding to the skill.
34. In the Minimum (0) and Maximum scores (100) columns, enter the corresponding scores for the skill that the student can acquire after finishing the track successfully.
The score must be between 0 and 100.
Those values establish how many points the student will receive in this skill, based on the proportional difference between their final grade and the minimum grade to pass the track. Go to Skills for examples and details on the calculation.
35. Enter the track syllabus and its target audience.
36. In Requirements, click New requirement if you want to define requirements for the track.
37. In the pop-up window, find and select the track, subject or training course to be the requirement to do this track.
To find the item, use the search field – located in the upper right corner of the window – or page through the items – arrows located in the lower right corner.
You can also select more than one item at once.
38. Click on Add.
39. After you finish adding all the requirements, click Close.
To delete a requirement added to the track, simply click the Delete icon, located to the right of the line corresponding to the requirement.
40. Click on the Security tab.
41. Define whether the track should inherit the permissions from its parent folder.
Available options are:
Inherit permissions
When it is selected, the permissions and restrictions assigned to the track will be the same as its parent folder. Even when the track inherits the permissions, you can define other specific permissions or restrictions for it, in addition to those already inherited.
Not inherit permissions
When it is selected, the permissions and restrictions of the parent folder are not assigned to the track.
Use default
When selected, it considers what was set in the option “Inherit tracks and training permissions automatically” from Learning settings in the Control Panel.
42. In Permissions, click Add if you want to define track access permissions.
43. In the pop-up window, find and select the user, user group, class or subject to which you wish to assign permissions.
To find the item, use the search field – located in the upper right corner of the window – or page through the items – arrows located in the lower right corner.
You can also select more than one item at once.
44. Click Add.
45. In the Level column – next to the added item –select the option that establishes the permission level to be assigned to it.
Available options are:
- Reading;
- Execution;
- Writing;
- Modification;
- Deletion;
- Complete.
For detailed information regarding each permission option, go to Catalog permissions and restrictions.
To edit the permission on an added item, simply select the new option to be assigned to it in the Level column.
To delete an added item, simply click the Delete icon – located in the line corresponding to the item and to the right of the Level column.
46. In Restrictions, click Add if you want to define track access restrictions.
47. In the pop-up window, find and select the user, user group, class or subject to which you wish to assign restrictions.
To find the item, use the search field – located in the upper right corner of the window – or page through the items – arrows located in the lower right corner.
You can also select more than one item at once.
48. Click Add.
49. In the Level column – next to the entered item –select the option that establishes the restriction level to be assigned to it.
Available options are:
- Reading;
- Execution;
- Writing;
- Modification;
- Deletion;
- Complete.
For detailed information regarding each restriction option, go to Catalog permissions and restrictions.
To edit the restriction on an entered item, simply select the new option to be assigned to it in the Level column.
To delete an added item, simply click the Delete icon – located in the line corresponding to the item and to the right of the Level column.
50. Click Save to confirm the creation of the track; or Cancel if you want to cancel the process.
Edit track
Only users that have, at least, modification permission on the track are allowed to perform this action.
01. In the catalog, access the location where the track is.
02. Click the Edit icon, located to the right of the track name.
03. Change the information of your choice. For more details about the displayed fields, see the basic path.
04. Click Save or Cancel if you want to discard the changes made.
Copy track
Only users that have, at least, writing permission on the target folder are allowed to perform this action.
01. In the catalog, access the location where the track is.
02. Click the Copy icon, located to the right of the track name.
You can also click Copy after accessing the track, clicking the arrow next to Edit, located in the upper right corner of the window.
03. In the Search field in the pop-up window, enter the name of the folder to which to copy the track.
04. On the pop-up list, select the folder to which to copy the track.
05. Click Copy.
When you click this option, the copy of the track is created in the selected folder, provided that you have the required permissions to perform this action.
Move track
Only users that have, at least, deletion permission on the folder containing the track, and modification permission on the target folder are allowed to perform this action.
01. In the catalog, access the location where the track is.
02. Click the Move icon, located to the right of the track name.
You can also click Move after accessing the track, clicking the arrow next to Edit, in the upper right corner of the window.
03. In the Search field in the pop-up window, enter the name of the folder to which to move the track.
04. On the pop-up list, select the folder to which to move the track.
05. Click Move.
When you click this option, the copy of the track is moved to the selected folder, if you have the required permissions to perform this action.
Delete track
Only users that have, at least, deletion permission on the folder containing the track are allowed to perform this action.
01. In the catalog, access the location where the track is.
02. Click the Delete icon, located to the right of the track name.
You can also click Delete after accessing the track, clicking the arrow next to Edit, in the upper right corner of the window.
03. In the pop-up message, click Yes to confirm the deletion of the track; or No if you want to cancel the action.
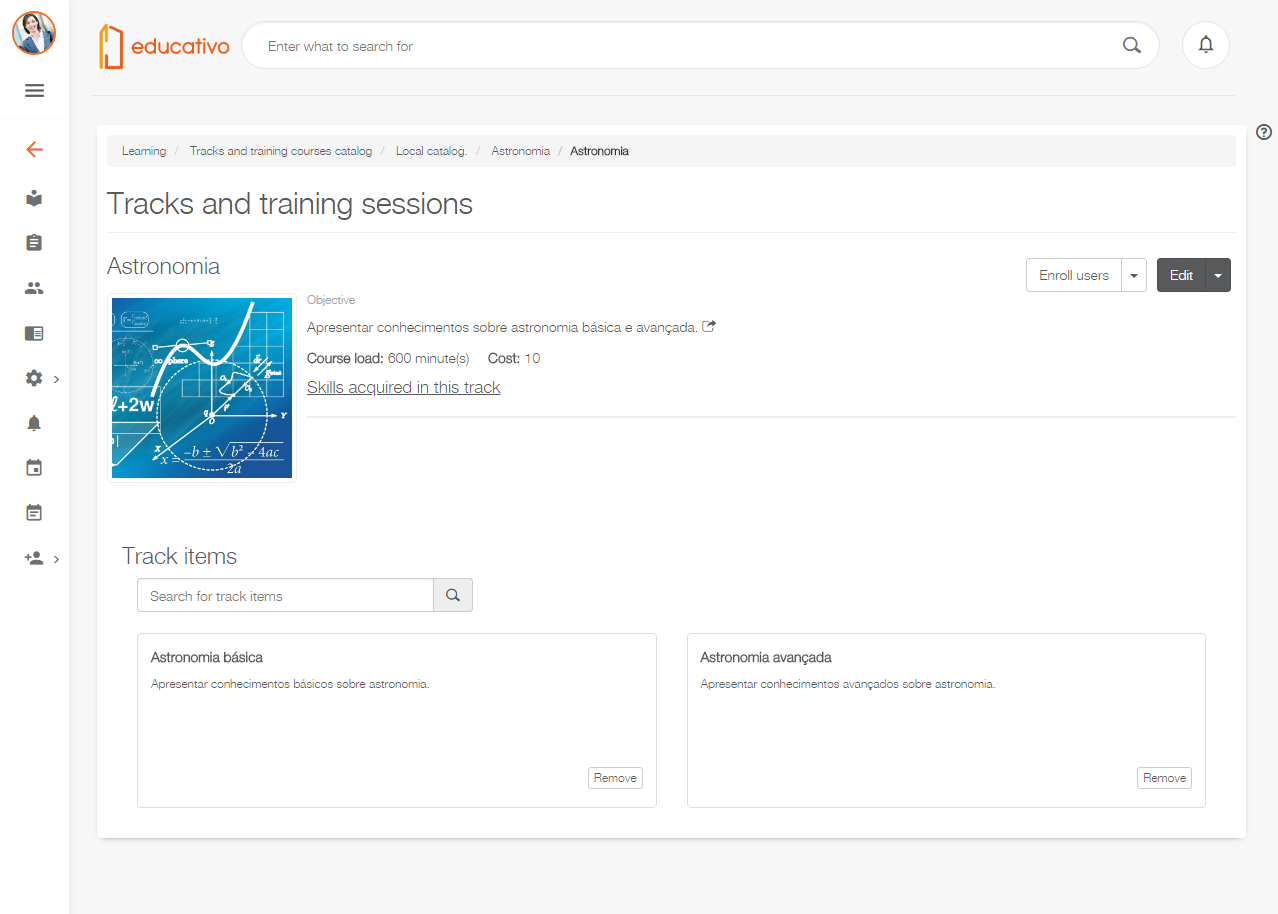
View track items and information
To view the track content, users must have, at least, reading permission defined for them.
01. In the catalog, go to the track containing the information and items that you want to view. To access the track, you can find it by either browsing the catalog or entering its URL directly on the browser.
02. In the pop-up window, view the general information and the items that make up the track.
03. Click the icon next to the purpose of the track in order to view its additional information, that is, its syllabus and target audience. After viewing it, click Close to return to the main window.
04. Click Track requirements and view the items to be completed before you can start the track. After viewing it, click Close to return to the main window.
This option is only displayed when the track has requirements.
05. Click Skills acquired in this track and view the skills that the student will acquire after finishing the track successfully.
This option is only displayed when the track has skills related to it.
Find track item
This search allows you to filter the items within the track.
01. In the catalog, go to the track containing the item that you want to find. To access the track, you can find it by either browsing the catalog or entering its URL directly on the browser.
02. Enter the item name in the Search field, in the upper right corner.
03. View the search result.
Register users in a track
For a user to register other users, in the permissions in the Control Panel – feature Learning - Registrations, the option Register all users has to be active.
01. In the catalog, go to the track in which to register the users. To access the track, you can find it by either browsing the catalog or entering its URL directly on the browser.
02. Click Register users, located in the upper right corner.
03. In the pop-up window, click Yes to confirm it.
Upon confirmation, it displays a window that allows you to register users. For more information about available actions, go to Register users.
Self-register in a track
For users to self-register, they are required to have, at least, active execution permission on the track.
01. In the catalog, they have to go to the track in which they want to register. To access the track, you can find it by either browsing the catalog or entering its URL directly on the browser.
02. Click Request registration, located in the upper right corner.
When the user has permission to register other users, the displayed option will be Register users. In this case, click the arrow next to it to view the option Request registration.
When you click Request registration, if the track has no requirements or if it does but the student has already completed them, the registration request is automatically approved or submitted for the person in charge’s approval when the account to which the user is associated requires registration request approval. If there are requirements that have not been successfully completed by the student, they will be displayed and the registration will not be requested, since the student is required to complete them first.
As a student is effectively registered in a track, they are also automatically registered in all the training courses that make it up, except for the training courses that have requirements. In those training courses, the student will only be automatically registered if they meet all requirements. If they do not, they need to complete the requirements first and then request registration in them manually.
Cancel track registration request
If a user wants to cancel their registration request, they are required to have active permission to cancel registrations in tracks defined in the Control Panel permissions – feature: Learning - Registrations; option: Cancel registration in training course/tracks.
01. In the catalog, access the track from which the registration request will be canceled. To access the track, you can find it by either browsing the catalog or entering its URL directly on the browser.
02. Click Cancel registration request, located in the upper right corner.
When the user has permission to register other users, the displayed option will be Register users. In this case, click the arrow next to it to view the option Cancel request registration.
03. In the pop-up window, click Yes to confirm registration request cancellation; or No if you want to cancel the action.
Upon confirmation, the registration request is canceled.
Cancel track registration
If a user wants to cancel their registration, they are required to have active permission to cancel registrations in tracks defined in the Control Panel permissions – feature: Learning - Registrations; option: Cancel registration in training course/tracks.
01. In the catalog, go to the track whose registration will be canceled. To access the track, you can find it by either browsing the catalog or entering its URL directly on the browser.
02. Click Cancel registration, located in the upper right corner.
When the user has permission to register other users, the displayed option will be Register users. In this case, click the arrow next to it to view the option Cancel registration.
03. In the pop-up window, click Yes to confirm registration cancellation; or No if you want to cancel the action.
Upon confirmation, the registration is canceled and the user can no longer access the track.
This option is also displayed in the student’s learning plan. For more information on how to cancel registration from the learning plan, go to My learning.
Add track to your wish list
01. In the catalog, go to the track you want to add to the wish list. To access the track, you can find it by either browsing the catalog or entering its URL directly on the browser.
02. Click the arrow next to Request registration, located in the upper right corner.
When the user has permission to register other users, instead of Request registration, the displayed option will be Register users.
03. Click Add to wish list.
04. In the pop-up message, click Yes to confirm adding the track to your wish list; or No if you want to cancel the action.
Upon confirmation, the track is added to the student’s wish list.
The added tracks can be viewed on the Wish list widget, which can be added to platform pages so that users can view the items they added to their wish list, that is, items in which they intend to register at a later date. For information about the widget, go to Wish list, and for information about adding widgets to pages, go to Add pages.
Delete track from your wish list
01. In the catalog, go to the track to be deleted from the wish list. To access the track, you can find it by either browsing the catalog or entering its URL directly on the browser.
02. Click the arrow next to Request registration, located in the upper right corner.
When the user has permission to register other users, instead of Request registration, the displayed option will be Register users.
03. Click Delete from the wish list.
04. In the pop-up message, click Yes to confirm the deletion of the track from the wish list; or No if you want to cancel the action.
Upon confirmation, the track is deleted from the student’s wish list.
Please note!
This documentation is valid as of the 1.6.3 – Snowflake update. Previous updates may contain different information than what you see on your platform.
Visão Geral
Import HTML Content
Conteúdo das Ferramentas
Tarefas