Index
Speaking of class...
Classes are part of the monitored learning environment and student groups that are part of a term of a given period of time or permanent with the goal of attending a particular subject. They are structures linked to subjects in which students can enroll.
A class can have one or more teachers as well as well as one or more tutors. It may also have a responsible person, who does not necessarily have to be a teacher or a tutor.
When creating a class for a discipline, a community is automatically created for it to promote the integration and dissemination of knowledge among students, teachers and coordinator. The community can be used to share subject matters, questions, explanations, suggestions, among so many other options that make learning collaborative and more efficient. Students will be added to the community as members when their enrollment in the class is approved. The community coordinator is the class coordinator and the people in charge are the moderators. The class community is only disabled when the class is deleted or finished.
Understand!
Do you want to understand how to calculate topic grades for a class? Go to Calculating topic grades for classes and learn all about it.
Create new class
01. After clicking New, Class in the subject in which to create the class, enter the required information in the General information tab.
Required information:
Name
Name of the class.
Number of seats
Number of registrations allowed in the class.
Registration validity dates
Dates that the effective registration remains active in the class. To set registration validity to undetermined, simply enter zero (0) in this field. Registrations that are not completed by the student within the validity period are automatically canceled by a default routine that runs periodically on the platform. For more information, go to Cancel expired class registrations.
Cost
Cost of the subject in credits, which are deducted from the account that the user is associated to, if it is a credit account.
Start type
Class term start type Available options:
- Access: when selected, class term starts counting from its first access.
- Registration: when selected, class term starts counting from its first registration.
Start date for registration
Date from which it is possible to register in this class.
End date for registration
Deadline for registration in that class.
Start date of the class
Start date of class activities.
End date of the class
End date of class activities.
It does not allow ending without reaching a minimum score
When checked, the student cannot complete the course without achieving the minimum passing score for the subject.
Waiting list
When checked, the class allows a waiting list in case there are no more seats.
Display inactive topics and topic items in the catalog
When checked, the topics and topic items are displayed in the catalog even after being deactivated. They are not displayed to the students of the class.
Template class
Template class on which the class will be based. When using a template class, all topics in the class are replaced by topics from the template class.
Description
Details of the class, its activities and knowledge, among other important information.
Communities
When the use is enabled, a community is created for the class in which students and tutors/teachers can share knowledge, questions, and suggestions, among others. The community will be created automatically; there is no need to perform any additional settings. The course subject coordinator will be its administrator and the responsible persons will be its moderators. Students will be added to the community as members when their registration is approved in the class. The community will have the same name, description and image as the course subject, and be a hidden community to be disabled when the class is deleted; or it will be edited and the use of communities will be disabled.
When you enable the use of communities and a class does not have a community, one is created for it. The same occurs if the class had a community that had been disabled. When editing it and enabling the use of communities again, the community is reactivated. Also, disabling the use of communities while editing a class that has a community will disable the existing community.
02. In Reaction evaluation, click the Search icon to add a reaction evaluation for the class.
03. In the pop-up window, find and select the evaluation to be associated to the class as a reaction evaluation.
You can find the evaluation that you want by using the Search field – in the upper right corner of the window – or by paging through evaluations – arrows located in the lower right corner.
04. Click Add.
To delete the added evaluation, simply click Delete, next to the Search icon.
05. Define whether the reaction evaluation is mandatory.
When checked, the Reaction evaluation is mandatory and the student is required to take it to complete their registration.
06. Click the Person in charge tab.
07. Click the Search icon, located next to the Class coordinator field.
The class coordinator will also be the administrator of the community that will be created for the class.
If this field is not filled out, the class coordinator and the community administrator will be the coordinator of the subject to which the class belongs.
08. In the pop-up window, find and select the user to be responsible for coordinating the class.
You can find the user that you want by using the Search field – located in the upper right corner of the window – or paging through users – arrows located in the lower right corner.
09. Click Add.
10. In People in charge of the class, click Add people in charge to add a tutor for the class.
The people in charge will be the moderators of the community that will be created for the class.
11. In the pop-up window, find and select the user to be responsible for all or some tasks in the class.
You can find the user that you want by using the Search field – located in the upper right corner of the window – or paging through users – arrows located in the lower right corner. You can also find the user by the name or a skill they have. Select an option from the ones located at the top of the window.
You can also select more than one user at once.
12. Click Add.
13. After finishing adding all the people in charge, click Close.
To delete the person in charge of the class, select them and click Delete.
When deleting a person in charge, they are deleted from the class community. If this person in charge is a student of the class, they remain in the community as a member, losing only the moderation responsibility.
14. To assign responsibilities to an added user, simply click Edit permissions, located to the right corner of the table corresponding to the user.
15. In Permissions, check the options that establish the responsibilities of the user in question.
Available options:
- Approve attempts: when checked, the tutor can unblock students who have already exceeded the limit of attempts on class topic items;
- Grade activities: when checked, the tutor can grade the activities performed by that class and delivered via the system;
- Manual score: when checked, the tutor can manually assign grades to topic items whose score type for that class is Manual;
- Manage waiting list: when checked, the tutor can organize and manage the class’ waiting lists;
- My classes: when checked, the tutor can view information related to the students registered in this class, such as their progress in topics and topic items;
- Manually ending classes: when checked, the tutor can end that class, ending all activities associate with it.
- Class management: when checked, the tutor can graphically follow students’ progress in class topics;
- Adjust class grades: when checked, the tutor can adjust the grades of the students registered in that class;
- Change the status of registration: when checked, the tutor can change the status of student registration in this class, that is, can pass students or not;
- Schedule events and forum: when checked, the tutor can schedule events and forums for students of the classes of this course subject.
- Grade evaluations: when checked, the tutor can grade evaluations regarding class topic items as long as they contain open-ended questions. It also allows the tutor to view the history of evaluations of all students in the class.
You can check or uncheck all options at once by using the options Select All or Delete All, located in the right upper corner of the permissions table.
Click Close to close the table showing the person in charge’s permissions.
16. Click the Security tab.
17. Define whether the class should inherit the permissions of the subject to which it belongs.
Available options:
Inherits permissions
When selected, the permissions and restrictions assigned to the class will be the same as the subject to which it belongs. Even when the class inherits the permissions, it is possible to set other specific permissions or restrictions for it, in addition to those already inherited.
Does not inherit permissions
When selected, the permissions and restrictions of the subject are not assigned to the class.
18. In Permissions, click Add to define access permissions for the class.
19. In the pop-up window, find and select the user, user group, class or course subject to which to assign permissions.
To find the item, use the search field – located in the upper right corner of the window – or page through the items – arrows located in the lower right corner.
It is also possible to select more than one item at once.
20. Click Add.
21. In the Level column – next to the added item –select the option that establishes the permission level to be assigned to it.
Available options:
- Reading;
- Execution;
- Writing;
- Modification;
- Deletion;
- Complete.
For detailed information regarding each permission option, go to Catalog permissions and restrictions.
To edit the permission on an added item, simply select the new option to be assigned to it in the Level column.
To delete an added item, simply click the Delete icon – located in the line corresponding to the item and to the right of the Level column.
22. In Restrictions, click Add to define restrictions to access the course subject.
23. In the pop-up window, find and select the user, user group, class or course subject to which to assign restrictions.
To find the item, use the search field – located in the upper right corner of the window – or page through the items – arrows located in the lower right corner.
It is also possible to select more than one item at once.24. Click Add.
25. In the Level column – next to the added item – select the option which establishes the restriction level to be assigned to it.
Available options:
- Reading;
- Execution;
- Writing;
- Modification;
- Deletion;
- Complete.
For detailed information regarding each restriction option, go to Catalog permissions and restrictions.
To edit the restriction on an added item, simply select the new option to be assigned to it in the Level column.
To delete an added item, simply click the Delete icon – located in the line corresponding to the item and to the right of the Level column.
26. Click Save; or Cancel to quit creating the class.
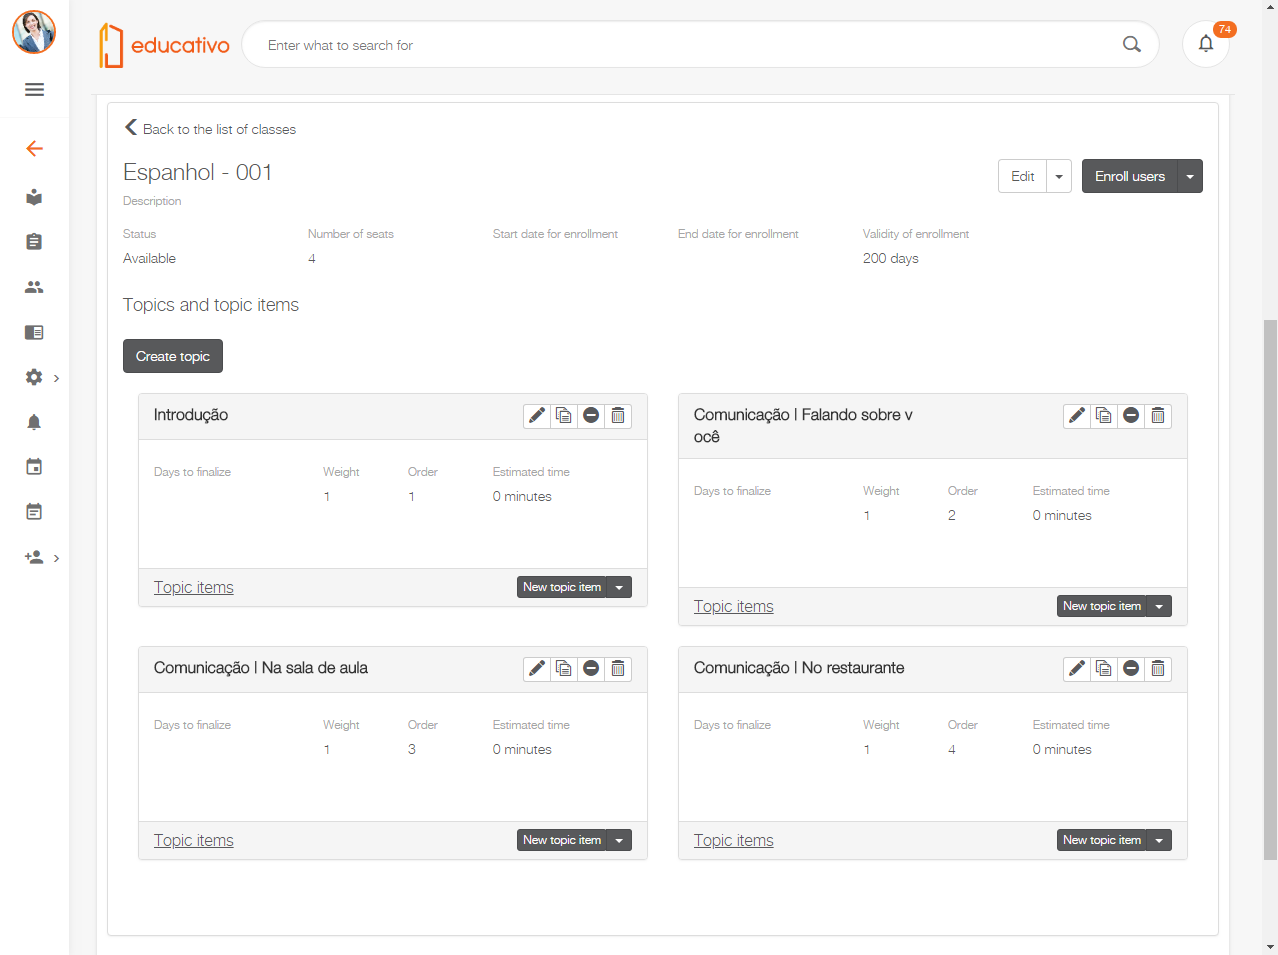
View class
01. In the course subjects and classes catalog, find and access the subject to which the class belongs.
02. In the Classes area, find and access the class.
03. View the general information, topics and topic items that make up the class.
To view class topic items, simply click Topic items, located in the lower left corner of the table corresponding to the topic.
To view the other classes of the subject in question, click Go back to the list of classes, located in the upper right corner of the table corresponding to the class.
Edit class
Only users that have, at least, modification permission on the class are allowed to perform this action.
01. In the catalog, access the subject to which the class belongs.
02. In the Classes area, find the class to be edited and click the icon Edit, located in the lower-right corner of the table corresponding to the class.
You can also click this option after accessing the class to view it. In this case, it is located in the upper right corner of the table containing class details.
03. Change the information of your choice. Information about the displayed fields can be obtained from the basic path.
04. Click Save; or Cancel to discard the changes made, if desired.
Copy class
Only users that have, at least, writing permission on the destination subject are allowed to perform this action.
Copying a class that uses a template class is not allowed.
01. In the catalog, access the subject to which the class belongs.
02. In the Classes area, find the class to be copied and click Copy, located in the lower-right corner of the table corresponding to the class.
You can also click this option after accessing the class to view it. In this case, it is necessary to click the arrow next to Edit, located in the upper right corner of the table containing class details, and then click Copy.
03. In the pop-up window, find and select the subject to which to move the class.
It is possible to find a subject by using the Search field – in the upper right corner of the window – or by paging through the subjects – arrows located in the lower right corner.
04. Click Copy.
When clicking this option, a copy of the class is created in the selected subject.
Delete class
Only users that have, at least, deletion permission on the subject to which the class belongs are allowed to perform this action.
01. In the catalog, access the subject to which the class belongs.
02. In the Classes area, find the class to be deleted and click the icon Delete, located in the lower-right corner of the table corresponding to the class.
You can also click this option after accessing the class to view it. In this case, it is necessary to click the arrow next to Edit, located in the upper right corner of the table containing class details, and then click Delete.
03. In the message displayed, click Yes to confirm the deletion of the class or No to quit the action, if desired.
When deleting a class, its community is disabled.
Access class community
This action can only be performed in classes that have communities, that is, if the class does not have any, the option Access community is not displayed.
01. Access the class whose community you want to view.
To access the class, simply find the subject to which it belongs and click its name in the Classes area of the subject.
02. Click Access community, located in the upper right corner of the table containing class details.
03. View the exclusive community of the class.
The community of the class can also be accessed directly via the Communities item, located in the main menu, when the student is enrolled in the class.
Enroll users in the class
That option is displayed only to those that have the permission to enrol users defined in the Control Panel permissions - feature: Learning - Enrollments; option: Enroll all users active.
01. Access the class in which users will be enrolled.
To access the class, simply find the subject to which it belongs and click its name in the Classes area of the subject.
02. Click Enroll users, located in the upper right corner of the table containing class details.
03. In the message displayed, click Yes to confirm the action.
When pressing this option, the displayed window allows you to enroll users. More information about available actions can be obtained in Enroll users.
Enroll in class
For users to enroll, they are required to have, at least, execution permission on the class.
01. Access the class in which you wish to enroll.
To access the class, simply find the subject to which it belongs and click its name in the Classes area of the subject.
02. Click on the arrow located to the right of Enroll users.
This step is not necessary if the user does not have permission to enroll other users. In this case, only the option Request enrollment is displayed.
03. Click Request enrollment.
When pressing this option, the enrollment request is automatically approved or submitted for approval by the person in charge, whenever the student’s account requires enrollment request approval.
Cancel request for enrollment in the class
For a user to cancel their enrollment request, they are required to have the permission to cancel enrollments in classes defined in the Control Panel permissions – feature: Learning - Enrollments; option: Cancel enrollment in classes active.
01. Access the class from which the enrollment request will be canceled.
To access the class, simply find the subject to which it belongs and click its name in the Classes area of the subject.
02. Click on the arrow located to the right of Enroll users.
This step is not necessary if the user does not have permission to enroll other users. In this case, only the option Cancel enrollment request is displayed.
03. Click Cancel enrollment request.
When pressing this option, the enrollment request is canceled.
Cancel enrollment in class
For a user to cancel their enrollment, they are required to have the permission to cancel enrollments in classes defined in the Control Panel permissions – feature: Learning - Enrollments; option: Cancel enrollment in classes active.
01. Access the class from which the enrollment will be canceled.
To access the class, simply find the subject to which it belongs and click its name in the Classes area of the subject.
02. Click on the arrow located to the right of Enroll users.
This step is not necessary if the user does not have permission to enroll other users. In this case, only the option Cancel enrollment is displayed.
03. Click Cancel enrollment.
When pressing this option, the enrollment is canceled.
This option is also displayed in the student's learning plan. More information on how to cancel enrollment from the learning plan can be found in Start
Request to be added to a class waiting list
This option is only displayed if the Waiting list option is checked in the class registration.
01. Access the class in which you want to enroll although there are no more open seats.
To access the class, simply find the subject to which it belongs and click its name in the Classes area of the subject.
02. Click on the arrow located to the right of Enroll users.
This step is not necessary if the user does not have permission to enroll other users. In this case, only the option Waiting list is displayed.
03. Click Waiting list.
When pressing this option, the enrollment request is automatically included in the class waiting list and fulfilled whenever a new seat becomes available. More information is available in Waiting list.
Leave a class waiting list
01. Access the class whose waiting list you wish to leave.
To access the class, simply find the subject to which it belongs and click its name in the Classes area of the subject.
02. Click on the arrow located to the right of Enroll users.
This step is not necessary if the user does not have permission to enroll other users. In this case, only the option Exist waiting list is displayed.
03. Click Leave waiting list.
When pressing this option, the enrollment request is removed from the respective class’ waiting list.
Create topic for class
Only users that have, at least, writing permission on the class are allowed to perform this action.
01. Access the class for which the topic will be created.
To access the class, simply find the subject to which it belongs and click its name in the Classes area of the subject.
02. In the Topics and class topic items area, click Create topic.
When pressing this option, the window to include topics is displayed. More information on available actions can be found in Topic.
Please note!
This documentation is valid as of the 1.6.4 – Waterdrop update. If you use a previous update, it may contain different information than what you see on your platform.
Visão Geral
Import HTML Content
Conteúdo das Ferramentas
Tarefas