Histórico da Página
Índice
...
Index:
| Índice | |||||||
|---|---|---|---|---|---|---|---|
|
|
Consideraciones Generales
La información contenida en este documento tiene el objetivo de demostrar cómo realizar la integración entre Fluig y aplicaciones externas. Para una comprensión completa de esta información, algunos conocimientos se consideran requisitos previos, incluyendo entre ellos:
General Considerations
The information contained in this document is intended to demonstrate how to perform the integration between Fluig and external applications. In order to have a full understanding of this information, some knowledge is considered a prerequisite, including:
- Overview of Fluig product
- Overview of system integration
- Visión general del producto Fluig
- Visión general de la integración de sistemas
- JavaScript
- WebServices
- SOAP
Progress® 4GL
- Progress® Open App Server
- Progress® Open Client for Java
- Datasets (TOTVS Fluig Platform)
- Java™
- Apache Flex®
En varias partes de este documento se presentarán fragmentos de código en diferentes lenguajes de programación, con el fin de demostrar el uso de las capacidades de integración de Fluig. Sin embargo, este documento no pretende capacitar al lector en el uso de estas tecnologías más allá de los fines anteriormente descritos, siendo responsabilidad del lector buscar información en profundidad sobre estos lenguajes.
Con el fin de facilitar la comprensión de la información que se presenta y la simulación de los conceptos presentados, los ejemplos citados en este documento utilizan la funcionalidad de Datasets como un ejemplo del uso de las capacidades de integración del producto. Sin embargo, es importante señalar que otros puntos del producto tienen disponibles las mismas características de integración existentes en los Datasets, especialmente las personalizaciones de procesos y formularios.
Visión General
Aunque empíricos, todas las empresas tienen procesos de negocio que permiten que la empresa cumpla con su objetivo, ya sea la prestación de un servicio, la producción de bienes materiales o el comercio de mercancías. Una empresa posee una infinidad de procesos, así cada persona en la organización participa obligatoriamente en al menos uno de estos procesos, y todos ellos comparten información entre sí en algún momento. Los procesos pueden ser formales (como la contratación de un profesional) o informales (como un incentivo para la innovación), críticos (facturación) o satélites (control de envío de tarjetas de cumpleaños).
Con la llegada de las tecnologías de Sistema de Información, varios sistemas comenzaron a apoyar estos procesos de negocio, en especial aquellos considerados más críticos para la operación de la empresa. El mejor ejemplo de ello es la adopción de los sistemas ERP que ofrecen soporte a los procesos de varias áreas de la empresa.
Fluig pretende ser una plataforma agnóstica de gestión de procesos, documentos e identidades a través de una interfaz de comunicación colaborativa. Esto se puede percibir en mayor o menor grado en cada una de sus funcionalidades, desde las más simples (como la colaboración) hasta las más complejas (como DM y BPM).
No obstante, parte de estos procesos dependen en gran medida de los sistemas de información ya existentes en la empresa y por esta razón, la arquitectura de Fluig está diseñada para permitir la integración a estos sistemas, permitiendo que los procesos modelados tengan mayor valor agregado.
Fluig permite tanto el acceso por el producto a los sistemas externos (para consultar o alimentar la información) como también posibilita que otros sistemas se conecten para consultar información o para ejecutar operaciones de transacción.
El principal canal de integración del producto es a través de WebServices, que se están convirtiendo en el estándar más común de integración con cualquier aplicación. A través de ellos, se puede tener acceso a las funcionalidades de Fluig y ofrecer acceso por medio del producto a aplicaciones externas. Este documento dedica una sección específica a la integración a través de WebServices.
La otra forma de integración es a través de llamadas a Progress® Open AppServer, que se recomienda para usuarios que necesitan integrar Fluig con aplicaciones desarrolladas en esta plataforma.
WebServices
In several parts of this document, code snippets will be presented in different programming languages in order to show the use of TOTVS Fluig Platform integration resources. However, this document does not intend to empower the reader to use these technologies beyond the above-described purpose, the reader being responsible for searching for more detailed information on these languages.
With the intent of making it easier to understand the information presented and simulation of the concepts presented, the examples mentioned in this document use the Dataset feature as an example of the use of the product integration resources. However, it is important to note that other points of the product have the same integration characteristics available as those existing in Datasets, especially customizations of forms and processes.
Overview
Although empirical, every company has business processes that enable the company to fulfill its objective, whether it is the provision of a service, the production of products or trading goods. A company has a multitude of processes, with each person in the organization being part of at least one of these processes, and all of them exchange information with each other at some point. The processes can be formal (such as hiring a professional) or informal (such as an incentive to innovation), critical (billing) or satellite (birthday card send control).
With the advent of Information System technologies, several systems began to provide support for these business processes, especially those considered most critical to company operation. The best example of this is the use of ERP systems that support the processes in various company areas.
TOTVS Fluig Platform has the objective of being an agnostic platform that manages processes, documents and identities through one collaborative communication interface. This can be realized to a greater or lesser degree in every one of its features, from the most simple (such as collaboration) to the more complex (such as DM and BPM).
However, part of these processes have a high reliance on existing information systems in the company and, therefore, TOTVS Fluig Platform's architecture is designed to enable integration with these systems, allowing the modeled processes to have higher added value.
TOTVS Fluig Platform allows both access through the product to external systems (to query or feed information) and enables other systems to connect to query information or to run transactional operations.

The main product integration channel is through WebServices, which are becoming the most common standard for integration with any application. Through it, you can have access to TOTVS Fluig Platform features and provide access through the product to external applications. This document has a specific section on integration through WebServices.
The other form of integration is through calls to Progress® Open AppServer and is recommended for users who need to integrate TOTVS Fluig Platform with applications developed in that platform.
WebServices
Integration through WebServices uses the SOAP protocol and, since it is an open standard, allows systems developed in entirely different platforms, such as Java™La integración a través de WebServices utiliza el protocolo SOAP y, al ser un estándar abierto, permite que sistemas desarrollados en plataformas completamente diferentes como Java ™, Microsoft® .Net, C, C++, PHP, Ruby, Pearl, Python, entre otras, puedan intercambiar información entre sí de manera transparente.
Acceso a WebServices de Fluig
among others, to exchange information with each other in a seamless way.
Accessing Fluig WebServices
Fluig provides a set of WebServices that allow access to product information or running tasks, such as starting process requests. For the list of WebServices available, go toFluig ofrece un conjunto de WebServices que permiten el acceso a la información del producto o la ejecución de tareas, como por ejemplo iniciar solicitudes de procesos. Para tener la lista de los WebServices disponibles, ingrese a:
| Sem Formato |
|---|
http://<host>:<porta>/webdesk/services |
Cada link que se muestra dirige el navegador a la URL de WSDL del servicio. Each link provided directs the browser to the service WSDL URL. The WSDL (Web Servicio Service Description Language) tiene la descripción del servicio en formato XML y lo utilizan las herramientas de desarrollo para crear componentes que representarán este servicio.has the service description in XML format and is used by development tools to create components that will represent this service.
| Nota |
|---|
Watch out for each type of attribute that is expected, for example, the expirationDate attribute of the DocumentDto[] object is a date, however, each language interprets it differently, see some examples below |
| Nota |
Tenga en cuenta que cada tipo de atributo que se espera, por ejemplo el atributo expirationDate del objeto DocumentDto[] es una fecha, pero cada lenguaje lo interpreta de manera diferente, vea a continuación algunos ejemplos:
|
...
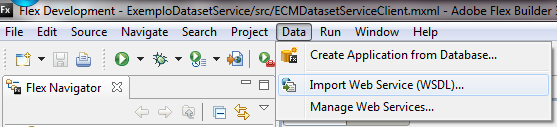
Via Apache Flex®
Al igual que la mayoría de las herramientas de desarrolloAs the vast majority of development tools, Apache Flex® permite crear stubs para acceder a web services. Estos stubs encapsulan todas las operaciones de empaquetado y desempaquetado de la información del estándar XML para los tipos nativos de la plataforma.
Utilice el paso a paso para visualizar el proceso de creación de los stubs para un servicio ofrecido por Fluig:
allows you to create stubs to access to web services. These stubs include all the packing and unpacking operations of XML standard information for the platform native types.
Use the step-by-step to view the process of creating stubs for a service provided by Fluig:
| Deck of Cards | ||||||||||||||||||||||||||||||||||||||||||||||||||||||||||
|---|---|---|---|---|---|---|---|---|---|---|---|---|---|---|---|---|---|---|---|---|---|---|---|---|---|---|---|---|---|---|---|---|---|---|---|---|---|---|---|---|---|---|---|---|---|---|---|---|---|---|---|---|---|---|---|---|---|---|
| ||||||||||||||||||||||||||||||||||||||||||||||||||||||||||
| Deck of Cards | ||||||||||||||||||||||||||||||||||||||||||||||||||||||||||
| ||||||||||||||||||||||||||||||||||||||||||||||||||||||||||
|


| Informações |
|---|
For the example below, we used the |
| Informações |
Para el ejemplo que se presenta a continuación, se utilizó IDE Adobe® Flex™ Builder™ 3.0 con with Flex® SDK 3.2. Para otras versiones de IDE y/o SDK, el proceso de creación de los stubs puede sufrir algunas variaciones. |
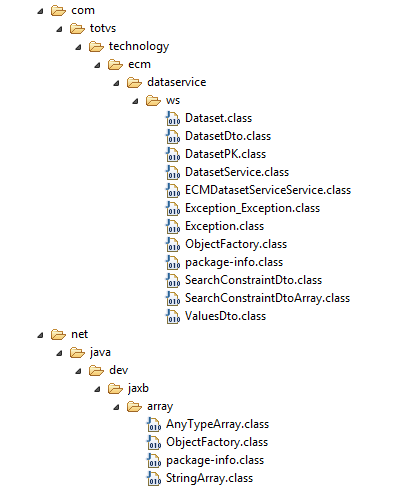
El siguiente fragmento de código presenta un ejemplo de invocación de WebService de acceso a los Datasets de Fluig:
For other versions of IDE and/or SDK, the process for creating stubs can undergo some variations. |
The code snippet below shows an example of the Fluig Dataset access WebService being called:
| Bloco de código | |||||||||||
|---|---|---|---|---|---|---|---|---|---|---|---|
| |||||||||||
| |||||||||||
<?xml version="1.0" encoding="utf-8"?>
<mx:Application xmlns:mx="http://www.adobe.com/2006/mxml" layout="absolute" creationComplete="{this.start()}">
	<mx:Script>
		<![CDATA[
			import generated.webservices.ValuesDto;
			import generated.webservices.DatasetDto;
			import generated.webservices.GetDatasetResultEvent;
			import generated.webservices.SearchConstraintDtoArray;
			import generated.webservices.StringArray;
			import generated.webservices.ECMDatasetServiceService;
			import mx.rpc.events.FaultEvent;
			import mx.collections.ArrayCollection;

			//CreaCreates unaan instanciainstance deof stubthe deservice accesoaccess al servicioStub
			private var ds:ECMDatasetServiceService = new ECMDatasetServiceService();
			public function start() : void {
				//CreaCreates tiposassistant auxiliarestypes quethat sewill utilizaránbe enused laon llamadathe deservice serviciocalled
				var fields:StringArray = new StringArray();
				var constraints:SearchConstraintDtoArray = new SearchConstraintDtoArray();
				var order:StringArray = new StringArray();
				//Define las funciones para tratamiento de la devoluciónDefines the functions for treating return
				ds.addEventListener(GetDatasetResultEvent.GetDataset_RESULT, resultGetDataset);
				ds.addEventListener(FaultEvent.FAULT,faultGetDataset);

				//invocainvokes elthe métodoservice getDataset del serviciomethod
				ds.getDataset("adm", 1, "adm", constraints, order, fields, "colleague");
			}

			//TratamientoTreatment deof losdata datosreturned devueltosfrom porthe elinvoked servicio invocadoservice.
			public function resultGetDataset(ev:GetDatasetResultEvent) : void {
				//RecuperaRecovers laservice devoluciónreturn delin servicio,the enform formaof de una DatasetDto
				var dataset:DatasetDto = ev.result as DatasetDto;
				//InstalaMounts unaa string conwith todosall losthe datosdataset del datasetdata
				var line:String = "";

				//EncabezadoHeader conwith elthe nombrename deof losthe camposfields
				var columnsArray:ArrayCollection = new ArrayCollection(dataset.columns);
				for (var j:int = 0; j < columnsArray.length; j++) {
					line += columnsArray.getItemAt(j) + "\t";
				}
				//LíneaData de datosline
				var valuesArray:ArrayCollection = new ArrayCollection(dataset.values);
				for (var j:int = 0; j < valuesArray.length; j++) {
					var row:ValuesDto = valuesArray.getItemAt(j) as ValuesDto;
					line += "\n" + j + ":";

					for (var i:int = 0; i < row.length; i++) {
						line += row.getItemAt(i) + "\t";
					}
				}

				//MuestraShows lathe string creadacreated enin una textarea enin lathe pantallascreen
				this.sysout.text = line;
			}

			public function faultGetDataset(ev:FaultEvent) : void {
				this.sysout.text = ev.fault.faultString;
			}
		]]>
	</mx:Script>
	<mx:TextArea id="sysout" name="sysout" width="100%" height="100%"
		paddingBottom="5" paddingLeft="5" paddingRight="5" paddingTop="5"/>
</mx:Application> |
| Nota | |||||||||||||||||
|---|---|---|---|---|---|---|---|---|---|---|---|---|---|---|---|---|---|
Flex® has a bug that prevents proper functioning of services that work with multidimensional arrays of data, as in the above example, where an array (of Dataset lines) of array (of the columns of each record) is returned. To work around this problem, you must change the class generated by Flex™ Builder™, which will encapsulate the multidimensional array. In the above example, this class is the DatasetDto, which should be changed (line 11) as shown in the example below:
Existe un bug de Flex® que impide el funcionamiento correcto de servicios que trabajan con matrices multidimensionales de datos, como en el ejemplo anterior, donde se devuelve un array (de líneas del Dataset) de array (de las columnas de cada registro). Para solucionar este problema, es necesario cambiar la clase generada por Flex™ Builder™ que encapsulará el array multidimensional. En el ejemplo anterior, esta clase es DatasetDto, que deberá cambiarse (línea 11) como se muestra en el siguiente ejemplo:
Otros servicios que no trabajan con arrays multidimensionales no exigen cambios en el código generado. |
Via Java™
Existen muchas implementaciones de uso de WebServices en Java ™ y en este ejemplo vamos a utilizar las bibliotecas disponibles en Java ™ 7.
Other services that do not work with multidimensional arrays do not require changes in the generated code. |
Via Java™
There are many implementations of WebServices use in Java™ and, in this example, we will use the libraries available in Java™ 7.
As in the previous example, in Apache Flex®, the first step is to use the WSDL address for generating Java™ stubs. The command below provides an example of how to generate these Del mismo modo que en el ejemplo anterior, en Apache Flex®, el primer paso consiste en utilizar la dirección WSDL para generar los stubs en Java ™. El siguiente comando presenta un ejemplo de cómo generar estos stubs:
| Sem Formato |
|---|
wsimport -d <output_directory> <wsdl_url> |
A través de este comando se generan los stubs en el directorio de destino Through this command, the stubs are generated in the target directory (output_directory), según la descripción del archivo wsdl as described in the wsdl file (wsdl_url).
A partir de los stubs generados, se puede consumir el WebService como se muestra en el siguiente ejemplo:
From the generated stubs, it is possible to consume the WebService as in the example below:
| Bloco de código | |||||||||||
|---|---|---|---|---|---|---|---|---|---|---|---|
| |||||||||||
| |||||||||||
package com.fluig.examples; import javax.xml.ws.BindingProvider; import net.java.dev.jaxb.array.StringArray; import com.totvs.technology.ecm.dataservice.ws.DatasetDto; import com.totvs.technology.ecm.dataservice.ws.DatasetService; import com.totvs.technology.ecm.dataservice.ws.ECMDatasetServiceService; import com.totvs.technology.ecm.dataservice.ws.SearchConstraintDtoArray; import com.totvs.technology.ecm.dataservice.ws.ValuesDto; /* * ClaseClass parato invocarinvoke serviciothe DatasetService service */ public class ECMDatasetServiceClient { //InstanciaInstantiates DatasetServiceService. private ECMDatasetServiceService ecmDatasetServiceService = new ECMDatasetServiceService(); private DatasetService service = ecmDatasetServiceService.getDatasetServicePort(); //Inicia ejecución de la clase/Starts class execution public static void main(String[] args) { ECMDatasetServiceClient client = new ECMDatasetServiceClient(); //ConfiguraConfigures accesoaccess ato WebServices. BindingProvider bp = (BindingProvider) client.service; bp.getRequestContext().put(BindingProvider.ENDPOINT_ADDRESS_PROPERTY, "http://localhost:8080/webdesk/ECMDatasetService"); try { client.getDataset(); } catch (Exception e) { e.printStackTrace(); } } public void getDataset() throws Exception { //CreaCreates losthe parámetrosparameters utilizadosused enin lathe llamadacall int companyId = 1; String username = "adm"; String password = "adm"; String name = "colleague"; StringArray fields = new StringArray(); SearchConstraintDtoArray constraints = new SearchConstraintDtoArray(); StringArray order = new StringArray(); //InvocaInvokes elthe serviciodataset de datasetservice DatasetDto result = service.getDataset( companyId, username, password, name, fields, constraints, order); //PresentaDisplays elthe encabezadoheader for (String columnName : result.getColumns()) { System.out.print(columnName + "\t"); } System.out.println(); //PresentaDisplays lasthe líneasdataset del datasetlines for (ValuesDto row : result.getValues()) { for (Object value : row.getValue()) { System.out.print(value + "\t"); } System.out.println(); } } } |
| Nota | |||||||||||||||||
|---|---|---|---|---|---|---|---|---|---|---|---|---|---|---|---|---|---|
When using WebServices via Java™, you must pay attention to the type of each attribute and to the type of return of the WebService. For example, for values of the date type, you should use the XMLGregorianCalendar class:
Al utilizar los WebServices vía Java ™, se debe prestar atención al tipo de cada atributo y al tipo de devolución de WebService. Por ejemplo, para valores del tipofecha se debe utilizar la clase XMLGregorianCalendar:
|
...
Via Progress® 4GL
Al igual que en los ejemplos anteriores, el primer paso para consumir un Webservice en Progress® es utilizar una utilidad que leerá la dirección WSDL y generará la información necesaria para su acceso. A diferencia de Java™ y Flex®, Progress® no genera objetos de stub, pero sí una documentación sobre cómo consumir los servicios descritos en el archivo WSDL. Aunque en algunas situaciones es posible utilizar los tipos nativos de Progress® como parámetros, dependiendo del tipo de dato utilizado es necesario manipular el XML SOAP para extraer o enviar una información.
So, as in the previous examples, the first step to use a Webservice in Progress® is to use a utility that will read the ESDL address and generate the required information for accessing it. Different from Java™ and Flex®, Progress® does not generate stub objects, but only a documentation on how to consume the services described in the WSDL file. Although in some situations you can use the Progress® native types as parameters, depending on the data type used, you need to handle the SOAP XML to extract or send information.
To generate the documentation for a service, you must use the bprowsdldoc utility as in the example belowPara generar la documentación de un servicio, se debe utilizar la utilidad bprowsdldoc como en el siguiente ejemplo:
| Sem Formato |
|---|
bprowsdldoc <URL_TO_WSDL> |
Mediante la ejecución de esta utilidad se generarán algunos archivos HTML con la información sobre la forma de consumir el servicio. Esta documentación proporciona información y ejemplos de cómo llevar a cabo la conexión con el servicio y cómo utilizar los métodos y datatypes del servicio.
El siguiente código presenta un ejemplo de cómo consumir el servicio:
With the execution of this utility, some HTML files will be generated with information on how to use the service. This documentation provides information and examples on how to perform the connection with the services and use the service methods and datatypes.
The code below shows an example of how to use the service:
| Bloco de código | |||||||||||
|---|---|---|---|---|---|---|---|---|---|---|---|
| |||||||||||
| |||||||||||
/* PartePart I - Invocar oCall WebService */ DEFINE VARIABLE hWebService AS HANDLE NO-UNDO. DEFINE VARIABLE hDatasetService AS HANDLE NO-UNDO. DEFINE VARIABLE cFields AS CHARACTER EXTENT 0 NO-UNDO. DEFINE VARIABLE cOrder AS CHARACTER EXTENT 0 NO-UNDO. DEFINE VARIABLE cDataset AS LONGCHAR NO-UNDO. DEFINE TEMP-TABLE item NO-UNDO NAMESPACE-URI "" FIELD contraintType AS CHARACTER FIELD fieldName AS CHARACTER FIELD finalValue AS CHARACTER FIELD initialValue AS CHARACTER. DEFINE DATASET dConstraints NAMESPACE-URI "http://ws.dataservice.ecm.technology.totvs.com/" FOR item. CREATE SERVER hWebService. hWebService:CONNECT("-WSDL 'http://localhost:8080/webdesk/ECMDatasetService?wsdl'"). RUN DatasetService SET hDatasetService ON hWebService. RUN getDataset IN hDatasetService(INPUT 1, INPUT "adm", INPUT "adm", INPUT "colleague", INPUT cFields, INPUT DATASET dConstraints, INPUT cOrder, OUTPUT cDataset). DELETE OBJECT hDatasetService. hWebService:DISCONNECT(). DELETE OBJECT hWebService. /* PartePart II - Faz o parser doParse XML eand criarcreate uma arquivotext textofile separadoseparated porby tabulacaotabs */ DEFINE VARIABLE iCount AS INTEGER NO-UNDO. DEFINE VARIABLE iCount2 AS INTEGER NO-UNDO. DEFINE VARIABLE hDoc AS HANDLE NO-UNDO. DEFINE VARIABLE hRoot AS HANDLE NO-UNDO. DEFINE VARIABLE hValues AS HANDLE NO-UNDO. DEFINE VARIABLE hEntry AS HANDLE NO-UNDO. DEFINE VARIABLE hText AS HANDLE NO-UNDO. DEFINE VARIABLE cValue AS CHARACTER NO-UNDO. OUTPUT TO c:\dataset.txt. CREATE X-DOCUMENT hDoc. CREATE X-NODEREF hRoot. CREATE X-NODEREF hEntry. CREATE X-NODEREF hText. CREATE X-NODEREF hValues. hDoc:LOAD("longchar", cDataset, FALSE). hDoc:GET-DOCUMENT-ELEMENT(hRoot). /* Goes Percorrethrough asthe colunascolumns <columns> */ DO iCount = 1 TO hRoot:NUM-CHILDREN WITH 20 DOWN: hRoot:GET-CHILD(hEntry, iCount). IF hEntry:NAME <> "columns" THEN NEXT. hEntry:GET-CHILD(hText, 1). PUT UNFORMATTED hText:NODE-VALUE "~t". DOWN. END. PUT UNFORMATTED SKIP. /* Goes Percorrethrough osthe registrosrecords <values> */ DO iCount = 1 TO hRoot:NUM-CHILDREN WITH 20 DOWN: hRoot:GET-CHILD(hValues, iCount). IF hValues:NAME <> "values" THEN NEXT. /* PercorreGoes through osthe camposfields <value> */ DO iCount2 = 1 TO hValues:NUM-CHILDREN: hValues:GET-CHILD(hEntry, iCount2). IF hEntry:NUM-CHILDREN = 0 THEN cValue = "". ELSE DO: hEntry:GET-CHILD(hText, 1). cValue = hText:NODE-VALUE. END. PUT UNFORMATTED cValue "~t". END. PUT UNFORMATTED SKIP. END. OUTPUT CLOSE. DELETE OBJECT hValues. DELETE OBJECT hText. DELETE OBJECT hEntry. DELETE OBJECT hRoot. DELETE OBJECT hDoc. |
...
Accessing WebServices
...
from Fluig
Fluig allows call to third-party WebServices through the Fluig Studio Service View Service registration.
In order to add a new WebService, you need to click the Add Service option by opening the New Service wizard and providing the Fluig server where the service will be added, an identifier code for it, its description, the WSDL URL ans its type (in this case, WebService). In the example below, you will use a public WebService to query to the periodic table, whose WSDL address is permite realizar llamadas a WebServices de terceros a través del registro de Servicios en la visualización de Servicios de Fluig Studio.Para agregar un nuevo WebService, es necesario ingresar a la opción Incluir Servicio, abriendo el asistente Nuevo Servicio, e informar al servidor de Fluig donde se agregará el servicio, un código identificador para él, su descripción, la URL para WSDL y su tipo (en este caso WebService). En el siguiente ejemplo, se utilizará un WebService público para consultar la tabla periódica, cuya dirección de WSDL es http://www.webservicex.com/periodictable.asmx?wsdl.

Basado en esta información, Fluig extraerá la información sobre el WebService informado y finalizará el registro de este servicio.
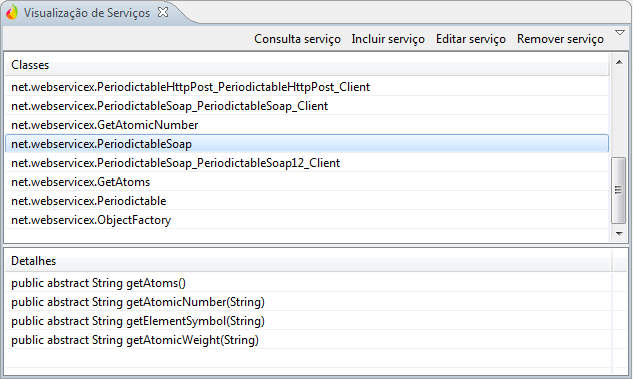
Una vez que el servicio está registrado, se pueden ver las clases y métodos disponibles en este servicio y que se utilizarán en los códigos JavaScript que lo usarán. La siguiente pantalla presenta un ejemplo de visualización de WebService.
Los servicios agregados en Fluig se pueden instanciar y utilizar en los puntos donde el producto permite personalización utilizando JavaScript, como en scripts para eventos globales, eventos de procesos, eventos de definición de formulario o Datasets. En el siguiente ejemplo se creará un Dataset que usará este servicio para traer los datos de la tabla periódica.
El siguiente código presenta una implementación de ejemplo del uso de un servicio en la construcción de un Dataset:
Based on this information, Fluig will extract the provided WebService information and will finish the registration of this service.
Once the service is registered, you can view the classes and methods available in this service and which will be used in the JavaScript code that will use it. The screen below shows an example of a WebService view.
Services added to Fluig can be instantiated and used where the product allows for customization using JavaScript, as in the scripts for global events, process events, form definition events or Datasets. In the following example, you will create a Dataset that will use this service to get the periodic table data.
The code below shows a sample implementation of the use of a service in the construction of a Dataset:
| Bloco de código | ||||||||||
|---|---|---|---|---|---|---|---|---|---|---|
| ||||||||||
| Bloco de código | ||||||||||
| ||||||||||
function createDataset(fields, constraints, sortFields) {
	//CreaCreates elthe dataset
	var dataset = DatasetBuilder.newDataset();
	dataset.addColumn("elementName");
	// Connects Conectathe elservice servicioand ysearches buscafor losthe librosbooks
	var periodicService = ServiceManager.getService('PeriodicTable');
	var serviceHelper = periodicService.getBean();
	var serviceLocator = serviceHelper.instantiate('net.webservicex.Periodictable');
	var service = serviceLocator.getPeriodictableSoap();
	//InvocaInvokes elthe servicioservice
	try {
		var result = service.getAtoms();
		var NewDataSet = new XML(result);
		for each(element in NewDataSet.Table) {
			dataset.addRow(new Array(element.ElementName.toString()));
		}
	} catch(erro) {
		dataset.addRow(new Array(erro));
	}
	return dataset;
} |
El primer paso para invocar el servicio es solicitar a Fluig que cargue el servicio, a partir del método The first step to call the service is to request Fluig to load the service, from the ServiceManager.getService ('PeriodicTable '). El valor informado como parámetro debe ser el código utilizado cuando se registró el servicio.
Cuando el servicio se haya cargado, se utiliza el método getBean() para devolver una utilidad para acceder a las clases del servicio, a través del método instantiate. A través de esta utilidad, se pueden instanciar las clases disponibles, que se encuentran en el registro del Servicio (como se puede ver en la imagen anterior).
Después de que se haya instanciado el objeto utilidad del servicio, las clases se deben instanciar y los métodos que se deben invocar depende de cada WebService utilizado y, deben recurrir a su documentación para obtener más información.
Para el servicio de la tabla periódica es necesario realizar los siguientes pasos:
method. The value passed as a parameter must be the code used when the services was registered.
Once the service has been loaded, the getBean() method is used to return a utility for access to the service classes through the instantiate method. Through this utility, it is possible to instantiate the classes available and that are listed in the Service registration (as in image above).
Once you have instantiated the service utility object, the classes that must be instantiated and the methods that should be invoked depend on each WebService used, and you must check its documentation for more information.
For the periodic table service, you need to perform the following steps:
| Bloco de código | ||||||||
|---|---|---|---|---|---|---|---|---|
| ||||||||
| Bloco de código | ||||||||
| ||||||||
var serviceLocator = serviceHelper.instantiate('net.webservicex.Periodictable');
var service = serviceLocator.getPeriodictableSoap();
var result = service.getAtoms(); |
DondeWhere:
Paso Step 1: Instanciar la clase Instantiate the net.webservicex.Periodictable para tener acceso al localizador del servicio class to have access to the locator service;
- Paso Step 2: Invocar el método getPeriodictableSoap para instanciar el servicio;Paso 3: Invocar el método getAtoms para tener la lista de los elementos.
En el caso de este servicio, el método getAtoms devuelve una string que contiene un XML con la lista de todos los elementos, como se muestra en el siguiente ejemplo:
- Call the getPeriodictableSoap method to instantiate the service;
- Step 3: Call the getAtoms method to get the element list.
In the case of this service, the getAtoms method returns a string containing an XML with the list of all elements, according to the example below:
| Bloco de código | ||||||||
|---|---|---|---|---|---|---|---|---|
| Bloco de código | theme | Eclipse|||||||
| ||||||||
<NewDataSet> <Table> <ElementName>Actinium</ElementName> </Table> <Table> <ElementName>Aluminium</ElementName> </Table> ... </NewDataSet> |
Para recorrer el XML y extraer los datos disponibles, se utilizan las funcionalidades de tratamiento de XML de JavaScript que facilita la manipulación de datos de este tipo. Para más información sobre esta funcionalidad, ingrese a In order to go through the XML and extract the available data, the features for handling JavaScript XML are used, which makes it easier to handle this type of data. For more information on this feature, go to: http://www.ecma-international.org/publications/standards/Ecma-357.htm o or http://www.xml.com/pub/a/2007/11/28/introducing-e4x.html.
El siguiente ejemplo presenta el código utilizado para recorrer el XML devueltoThe example below presents the code used to go through the XML returned:
| Bloco de código | ||||||||||
|---|---|---|---|---|---|---|---|---|---|---|
| ||||||||||
var NewDataSet = new XML(result);
for each(element in NewDataSet.Table) {
	dataset.addRow(new Array(element.ElementName.toString()));
} |
Una vez implementado el código del Dataset, es posible visualizarlo, como muestra la siguiente figura:

WebServices con Autenticación Básica
Para consumir WebServices que utilizan la autenticación básica (WSS o WS-Security), es necesario utilizar el método getBasicAuthenticatedClient localizado en provider del servicio (el mismo que se obtiene vía ServiceManager). Este método proporciona un client autenticado.
Los parámetros que se deben informar en el método siguen el siguiente orden:
- Instancia del servicio
- Nombre de la clase del servicio
- Usuario para la autenticación
- Contraseña para la autenticación
Utilizando el ejemplo del servicio PeriodicTable presentado anteriormente, el código de la llamada tendría los siguientes cambios:
Once the Dataset code is implemented, you can view it, as shown in the figure below:
WebServices with Basic Authentication
In order to use WebServices that use basic authentication (WSS or WS-Security), you need to use the getBasicAuthenticatedClient method located in the service provider (the same obtained through the ServiceManager). This method provides an authenticated client.
The parameters that should be provided in the method follow this order:
- Service instance
- Service class name
- User for authentication
- Password for authentication
Using the example of the PeriodicTable service presented previously, the code of the call would have the changes below:
| Bloco de código | ||||||||
|---|---|---|---|---|---|---|---|---|
| ||||||||
| Bloco de código | ||||||||
| ||||||||
var serviceLocator = serviceHelper.instantiate('net.webservicex.Periodictable');
var service = serviceLocator.getPeriodictableSoap();
var authenticatedService = serviceHelper.getBasicAuthenticatedClient(service, "net.webservicex.PeriodictableSoap", 'usuario', 'senha');
var result = authenticatedService.getAtoms(); |
WebService
...
with customized client
...
| Nota | |||
|---|---|---|---|
| |||
This technique is valid for Esta técnica es válida para Fluig 1.3.7 o superior.or higher. In integrations that use services created with CXF with systems that do not support the En integraciones que utilizan los servicios creados con CXF con sistemas que no soportan el protocolo HTTP/1.1 protocol (Protheus, por ejemplo), se debe utilizar este método configurando el parámetro for example), you need to use this method by setting the "disable.chunking" con el valor parameter to "true". |
Para personalizar el client que accede al servicio se debe utilizar el método getCustomClient, localizado en provider del servicio (el mesmo que se obtiene vía ServiceManager). Esta configuración exige la creación de un mapa de parámetros con sus respectivos valores para pasar al método, según el siguiente snippet:
To customize the client that accesses the services, you need to use the getCustomClient method, located in the service provider (the same that is obtained via ServiceManager). This setting requires the creation of a map of parameters with their respective values to pass to the method, as show by the snippet below:
| Bloco de código | ||||
|---|---|---|---|---|
| ||||
| Bloco de código | ||||
| ||||
		var properties = {};
		properties["basic.authorization"] = "true";
		properties["basic.authorization.username"] = "username";
		properties["basic.authorization.password"] = "password";
		properties["disable.chunking"] = "true";
		properties["log.soap.messages"] = "true";

		var serviceLocator = serviceHelper.instantiate('net.webservicex.Periodictable');
		var service = serviceLocator.getPeriodictableSoap();
		var customClient = serviceHelper.getCustomClient(service, "net.webservicex.PeriodictableSoap", properties);
var result = customClient.getAtoms(); |
Los parámetros que se pueden configurar son los siguientes:
The following parameters can be set:
Property | Function |
|---|
Propriedad
basic.authorization |
When set to "true", |
it does the same as the getBasicAuthenticatedClient method, but allows you to apply authentication settings along with the other customizations below. In order to configure authentication, properties with "username" and "password" below must also be defined. |
basic.authorization.username |
| User to be used for basic authentication. |
basic.authorization.password |
| User password to be used for basic authentication. |
disable.chunking |
When set to "true", |
disables the sending of large requests in smaller "pieces". It can be useful when the service called does not support this type of request. |
log.soap.messages |
| When set to "true", |
| allows the SOAP messages used in requests made to services to be presented in the server log, making it easier to debug in case of failures. |
Progress® Open AppServer
Así como es posible invocar operaciones en WebServices, Fluig también permite realizar llamadas a programas en Progress® 4GL (o ABL) expuestos vía Thus since you can call operations in WebServices, Fluig also allows to make calls to programs in Progress® 4GL (or ABL) exposed through Progress® Open AppServer.
En los siguientes ejemplos, se crearán Datasets que a través de la capa de servicio, tendrán acceso a las lógicas en 4GL que realizarán la extracción de datos. Aunque los códigos 4GL, en este ejemplo, sean muy simples, abarcan los casos más comunes requeridos en el día a día, ya que la complejidad de la integración se encuentra en las interfaces (parámetros de entrada y salida) de cada procedure expuesto y no en su lógica interna.
Tenga en cuenta que los ejemplos que aquí se presentan pretenden demostrar la dinámica de la integración entre Progress® y Fluig sin entrar en detalles específicos de las tecnologías involucradas. La capa de servicios Progress® de Fluig crea una interfaz en JavaScript para la biblioteca Java Open AppServer Client, de Progress® y, por lo tanto, para más información sobre cómo integrar aplicaciones Java ™ y Progress® vea la documentación suministrada por Progress®.
Caso de Uso
Los ejemplos que se muestran a continuación, tienen como objetivo crear cuatro Datasets 1 en Fluig:
- Tipos de Centro de Costo, que deben devolver los tipos de centros de coste existente en la aplicación en Progress® (en este caso, EMS2).
- Naturaleza de los Centros de Costo, que debe devolver los tipos posibles de naturaleza, según la aplicación en Progress® (en este caso, EMS2).
- Centros de Costo, que debe devolver los registros en la tabla cuenta 2.
Usuarios Comunes, que debe generar una lista de usuarios comunes entre Fluig y la aplicación en Progress® (utilizando la tabla usuar_mestre)
Nota 1 - Los ejemplos utilizan una base de datos de EMS2 para consultar los centros de costo y los usuarios. No obstante, sólo dos tablas y seis campos se utilizan en total, lo que no debe perjudicar la comprensión de la lógica por parte del lector, ni impedir la creación de un esquema equivalente para pruebas, en caso de ser necesario.
2 - El código presentado para extracción de los centros de costo tiene fines puramente educativos y no puede considerarse para el uso en producción. Para obtener más información acerca de cómo extraer los centros de costos de EMS2, consulte su documentación técnica.
Para los tres primeros casos, la lógica de extracción de la información deseada estará expuesta en un programa con varios procedures, uno para cada necesidad que aquí se presenta:
In the following examples, we create Datasets that, through service layer, will access 4GL logic, which will extract data. Although the 4GL codes in this example are very simple, they comprise the most common cases required on a day-to-day basis, since integration complexity is in the interfaces (input and output parameters) of each exposed procedure, not in its internal logic.
Note that the examples presented here intend to demonstrate the integration dynamics between Progress® and Fluig without going into specific details of the technologies involved. The Fluig Progress® service layer creates a JavaScript interface for the Progress® Open AppServer Client Java library and, therefore, for more information on how to integrate Java™ and Progress® applications, refer to the documentation provided by Progress®.
Use Case
The examples shown below, intend to create four Datasets 1 in Fluig:
- Cost Center Types, which should return the cost center types existing in the application in Progress® (in this case, EMS2).
- Nature of Cost Centers, which should return the possible types of nature, according to the application in Progress® (in this case, EMS2).
- Cost Centers, you should return the records in the table conta 2.
Common Users, which should generate a list of common users for Fluig and the application in Progress® (using the table usuar_mestre).
Nota 1 - The examples use an EMS2 database for querying cost centers and users. However, overall, only two tables and 6 fields are used, which should not affect the understanding of the logic by the reader, nor prevent the creation of an equivalent scheme for testing, if required.
2 - The code presented for extracting cost centers has educational purposes only and cannot be considered for production use. For more information on how to extract cost centers from EMS2, see its technical documentation.
For the first three cases, the extraction logic of the desired information will be exposed in a program with several procedures, one for each need presented here:
| Bloco de código | ||||||||||
|---|---|---|---|---|---|---|---|---|---|---|
| ||||||||||
| Bloco de código | ||||||||||
| ||||||||||
/************************************************************************** ** UtilidadUtility quethat ofreceprovides procedures parafor la extracción de informaciónextracting information ** sobreon centroscost de costocenters. **************************************************************************/ DEFINE TEMP-TABLE ttCC NO-UNDO FIELD cuentaconta LIKE cuentaconta.ct-codigo /* CHARACTER */ FIELD naturalezanatureza LIKE cuentaconta.naturalezanatureza /* INTEGER */ FIELD tipo LIKE cuentaconta.tipo /* INTEGER */ FIELD titulo LIKE cuentaconta.titulo. /* CHARACTER */ /*------------------------------------------------------------------- Procedure: readCostCenters ObjetivoObjective: DevuelveReturns unaa temp-table conwith lathe listalist deof centroscost de costocenters. ----------------------------------------------------------------------*/ PROCEDURE readCostCenters: DEFINE OUTPUT PARAMETER TABLE FOR ttCC. FOR EACH cuentaconta: CREATE ttCC. ASSIGN ttCC.cuentaconta = cuentaconta.ct-codigo ttCC.naturalezanatureza = cuentaconta.naturalezanatureza ttCC.tipo = cuentaconta.tipo ttCC.titulo = cuentaconta.titulo. END. END. /*------------------------------------------------------------------- Procedure: readCostNatureTypes ObjetivoObjective: DevuelveReturns unaa string conwith lasthe naturalezasnatures deof los centros de costocost centers, separadasseparated porby comacomma. ----------------------------------------------------------------------*/ PROCEDURE readCostNatureTypes: DEFINE OUTPUT PARAMETER cNatureList AS CHARACTER NO-UNDO. cNatureList = {adinc/i01ad047.i 03}. END. /*------------------------------------------------------------------- Procedure: readCostTypes ObjetivoObjective: DevuelveReturns unaa string conwith losthe tipostypes deof centrocost de costocenters, separadosseparated porby comacomma. ----------------------------------------------------------------------*/ PROCEDURE readCostTypes: DEFINE OUTPUT PARAMETER cTypeList AS CHARACTER NO-UNDO. cTypeList = {adinc/i02ad047.i 3}. END. |
En el caso de la extracción de usuarios comunes a los dos productos, se utilizará un único programa, según el siguiente código:
In the case of extracting users that are common to both products, a single program will be used, as shown in the code below:
| Bloco de código | ||||||||||
|---|---|---|---|---|---|---|---|---|---|---|
| Bloco de código | ||||||||||
| ||||||||||
| ||||||||||
/************************************************************************** ** UtilidadUtility quethat recibereceives unaa temp-table conwith unaa listalist deof usuariosusers yand devuelvereturns ** otra,another sólowith cononly losthe usuariosusers defrom lathe listalist quethat existanare enin la base de datosthe database. **************************************************************************/ DEFINE TEMP-TABLE ttUsers FIELD cod_usuar AS CHARACTER FIELD nom_usuario AS CHARACTER INDEX principal IS PRIMARY UNIQUE cod_usuar. DEFINE TEMP-TABLE ttOutUsers LIKE ttUsers. DEFINE INPUT PARAMETER TABLE FOR ttUsers. DEFINE OUTPUT PARAMETER TABLE FOR ttOutUsers. FOR EACH ttUsers: IF CAN-FIND(usuar_mestre WHERE usuar_mestre.cod_usuar = ttUsers.cod_usuar) THEN DO: CREATE ttOutUsers. BUFFER-COPY ttUsers TO ttOutUsers. END. END. |
Los dos códigos presentados tienen diferencias significativas en la forma en la que se utilizan y en cómo van a ser expuestos por Progress®. En el primer caso, el programa se carga de manera persistente y sus procedures se pueden ejecutar de forma independiente. En el segundo, el programa se ejecuta de manera no persistente y la lógica principal se encuentra en el main-block. Los procedures internos, si existen, están destinados a mejorar la organización del código y no se pueden utilizar de manera aislada.
Configuración de AppServer
Algunas informaciones importantes en la configuración del AppServer:
- AppServer debe cargarse en el modo Stateless;
En la configuración del agente, en el campo Propath, se debe agregar el directorio donde están ubicados los archivos compilados (.r).
Nota Importante: Cuando se utiliza una ruta relativa (\\servidor\carpeta), el servicio Windows® de Progress® (AdminService) se debe iniciar con un usuario de la red que posea permiso para acceder al directorio informado.
Exponiendo códigos 4GL con ProxyGen
El primer paso para poder ejecutar rutinas en Progress® 4GL es crear la biblioteca cliente, que se realiza mediante la aplicación ProxyGen, que acompaña a la instalación de Progress®, como se muestra a continuación.
Utilice el paso a paso para visualizar el proceso de creación del proxy:
Both codes presented have significant differences in the way they are used and the way they will be exposed by Progress®. In the first one, the program is loaded persistently and its procedures can be run independently. In the second case, the program is run in a non-persistent way and the main logic is in the main-block. The internal procedures, if any, are intended to improve code organization and cannot be used in isolation.
AppServer Configuration
Some important information in the AppServer configuration:
- The AppServer should be loaded in Stateless mode;
In the agent configuration, in the Propath field, you should add the directory where compiled files are located (.r)
Nota Important: When a relative path (\\server\folder) is used, the Progress® Windows®service (AdminService) should be started with a network user that has access permission to the directory provided.
Exposing 4GL codes with ProxyGen
The first step to be able to run routines in Progress® 4GL is to create the client library, which is done by using the ProxyGen application, which is shipped with the Progress® installation, as shown in the example below.
Use the step-by-step to view the process of creating the proxy:
| Deck of Cards | |||||||||||||||||||||||||||||||||||||||||||||
|---|---|---|---|---|---|---|---|---|---|---|---|---|---|---|---|---|---|---|---|---|---|---|---|---|---|---|---|---|---|---|---|---|---|---|---|---|---|---|---|---|---|---|---|---|---|
| |||||||||||||||||||||||||||||||||||||||||||||
|


| Informações |
|---|
Dependiendo de la versión de Progress®, las pantallas pueden sufrir alguna variación en la cantidad y disposición de los campos. En caso de dudas consulte la documentación |
Configuración del Servicio en Fluig
El registro de un servicio se realiza a través de Fluig Studio, en la view Visualización de Servicios, en la opción Incluir Servicio. La siguiente pantalla muestra el asistente del nuevo servicio y los campos utilizados para el registro del servicio Progress®:

|
| Informações |
|---|
Depending on the version of Progress®, the screens can suffer some variation in the amount and placement of fields. See the documentation in case of doubt |
Service Configuration in Fluig
The registration of a service is performed through Fluig Studio, in the Services View through the Add Service option. The screen below shows the new service wizard and the fields used to register the Progress® service:
Where:
- Server: Fluig server where the service will be added;
- Code: Unique code that will identify the service in the system. This code will be used in the JavaScript codes to have access to this service;
- Description: Text that describes the data service;
- URL: Identifies the AppServer service access URL, such as AppServer://<server>/<service_name>;
In case you're not using the default NameServer, the NameServer access port must be provided. E.g.: AppServer://<server>:<NameServer_port>/<service_name>.
Note that depending on the service configuration and/or form of connection, the URL may change. Check the documentation of the Open AppServer for more information. - Type: Identifies the service type (Progress or WebService). Progress should be selected;
- Remote Object: Identifies the proxy access class. This class is usually formed by the package name used for generating Proxy classes, plus the ProxyGen project name.
Example: In the screens that present the ProxyGen, we used the package com.fluig.samples.ems, and the name given to the project in ProxyGen was EMSProxies. In this case, the class of the remote Object will beDonde:
- Servidor: Servidor de Fluig donde se agregará el servicio;
- Código: Código único que identificará el servicio en el sistema. Este código se utilizará en los códigos JavaScript para acceder a este servicio;
- Descripción: Texto que describe el servicio de datos;
- URL: Identifica la URL de acceso al servicio AppServer, como por ejemplo AppServer://<servidor>/<nome_serviço>;
En caso de que no esté utilizando el NameServer estándar se debe informar el puerto de acceso a NameServer Ej.: AppServer://<servidor>:<porta_NameServer>/<nome_serviço>.
Tenga en cuenta que dependiendo de la configuración del servicio y/o de la forma de conexión, la URL puede sufrir cambios. Verifique la documentación de Open AppServer para más información. - Tipo: Identifica el tipo de servicio (Progress o WebService). Se debe seleccionar Progress; Objeto Remoto: Identifica la clase de acceso de proxy. Esta clase generalmente está compuesta por el nombre del paquete utilizado para generar las clases Proxy, más el nombre del proyecto en ProxyGen.
- UsuarioUser: Usuario utilizado para conectarse al servicio, como se define en la configuración de User used when connecting to the service, as defined in the settings of the AppServer;
- ContraseñaPassword: Contraseña utilizada para conectarse al servicio, como se define en la configuración de AppServer;
- Parámetros Extras: Parámetros extras (y opcionales) utilizados para conectarse a AppServer. Verifique la documentación de Open AppServer para verificar las opciones disponibles en cada versión de Progress®;
- Directorio del archivo de Proxy: Archivo .JAR que contiene las clases generadas por ProxyGen. Se debe utilizar el botón Seleccionar Archivo para localizarlo.
Ejemplo: En las pantallas que presentan ProxyGen, se utilizó el paquete com.fluig.samples.ems, y el nombre que se dio al proyecto en ProxyGen fue EMSProxies. En este caso, la clase del objeto remoto será com.fluig.samples.ems.EMSProxies;
Cuando el servicio se haya agregado, se pueden ver las clases disponibles y los métodos existentes en cada una de ellas. Esta información es importante para guiar el desarrollo de los códigos de personalización que harán uso de este servicio. Para ver las clases y los métodos del servicio, utilice la opción Consulta Servicio en Visualización de Servicios, como muestra la siguiente pantalla:

Visión general de los objetos involucrados
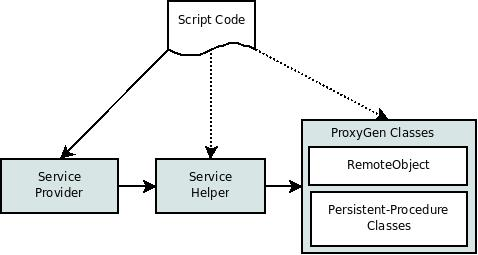
El acceso a los procedures expuestos en AppServer implica cuatro elementos que interactúan entre sí de acuerdo al siguiente diagrama:
Donde:
- Password used when connecting to the service, as defined in the settings of the AppServer;
- Extra Parameters: Extra (and optional) parameters used for connecting to the AppServer. Check the documentation of the Open AppServer to check the options available in each version of the Progress®;
- Proxy file directory: .JAR file containing the classes generated by ProxyGen; the Select File button should be used to find it.
Once the service has been added, you can view the available classes and the methods that exist in each one of them. This information is important to guide the development of customization codes that will use this service. To view the service classes and methods, use the Service Query option in Services View, as in the screen below:
Overview of Objects Involved
Access to procedures presented in the AppServer involves four elements that interact with each other, as shown in the diagram below:
Where:
- Script Code: is the JavaScript code that will make use of the procedures presented in the AppServer. As previously mentioned, this JavaScript can be of any nature, such as the implementation of a Dataset or the customization of a process event.
- Service Provider: Object retrieved through ServiceManager.getService method that provides access to service features. This object is responsible for managing the connection and resources allocated by the service during script execution.
- Service Helper: Object retrieved through the getBean method in the ServiceProvider and that provides a set of utility methods that allow, among other things, to create Progress® specific objects
- Script Code: es el código en JavaScript que hará uso de los procedures expuestos en AppServer. Como se mencionó anteriormente, este JavaScript puede ser de cualquier naturaleza, tales como la implementación de un Dataset o la personalización de un evento de proceso.
- Service Provider: Objeto recuperado a través del método ServiceManager.getService que proporciona el acceso a las funcionalidades del servicio. Este objeto se encarga de gestionar la conexión y los recursos asignados por el servicio durante la ejecución del script.
- Service Helper: Objeto recuperado a través del método getBean en ServiceProvider que pone a disposición un conjunto de métodos de utilidad que permiten, entre otras cosas, crear objetos específicos de Progress® (StringHolder, ResultSetHolder, etc.), tener acceso al objeto remoto de ProxyGen e instanciar clases. Para más información sobre Service Helper consulte aquí.
- ProxyGen Clases: Clases generadas por ProxyGen y serán utilizadas por el desarrollador para la ejecución de las rutinas en Progress®. La lista de las clases disponibles, así como sus métodos, se pueden ver en la Visualización de Servicios de Fluig Studio.
Procedures Persistentes y No Persistentes
Cuando se agrega un procedure al proyecto de ProxyGen, éste debe configurarse en dos listas: Procedures Persistentes o No Persistentes Esta decisión implica directamente en la forma en la que se accede a estos objetos por la biblioteca generada y, por consiguiente, en la forma en la que el desarrollador accederá a ella en los códigos JavaScript.
- to have access to the ProxyGen remote object and to instantiate classes. For more information about the Service Helper, query here.
- ProxyGen Classes: Classes generated by ProxyGen and that will be used by the developer for the Progress® routine execution. The list of available classes, as well as their methods, can be viewed in the Fluig Studio Service View.
Persistent and Non-Persistent Procedures
When a procedure is added to the ProxyGen project, it must be configured in two lists: Persistent or Non-Persistent Procedures This decision affects directly how these objects are accessed by the generated library and, consequently, how the developer will access them in JavaScript codes.
The procedures presented in a non-persistent way give rise to the methods in the class configured as Remote (or Proxy) object in the Service, and its execution is made by calling the corresponding method, for exampleLos procedures expuestos de forma no persistente dan origen a métodos en la clase configurada como Objeto Remoto (o Proxy) en el Servicio, y su ejecución se lleva a cabo llamando al método correspondiente, por ejemplo:
| Sem Formato |
|---|
serviceHelper.getProxy().verifyUsers(inputTT, holder). |
Los procedures expuestos de forma persistente dan origen a nuevas clases que pueden instanciarse a través de llamadas a métodos en el Objeto Remoto (a través de la Visualización de Servicios en Fluig Studio se pueden verificar los métodos disponibles en la clase), o por el método createManagedObject. La llamada a través del método createManagedObject permite que Fluig tenga control sobre el ciclo de vida de este objeto, liberándolo de forma automática al final del método. Si el objeto es instanciado de forma manual, el desarrollador debe codificar la liberación del objeto (método _release()), bajo pena de bloquear un nuevo agente de AppServer en cada invocación del método.
Parámetros de Entrada y Salida
The procedures presented in a persistent way give rise to new classes that can be instantiated through calls to methods in the Remote Object (through the Service View in Fluig Studio, you can check the available methods in the class) or through the createManagedObject method. The call through the createManagedObject method allows Fluig to have control over this object life cycle, freeing it automatically at the end of the method. If the object is instantiated, the developer must manually encode the object release (_ release () method), otherwise there is the risk of blocking a new AppServer agent at each call to the method.
Input and Output Parameters
Another important point in 4GL routine calls is to observe the input and output parameter types for each procedure or program. Depending on the data type Otro punto importante en la invocación de las rutinas en 4GL es observar cuales son tipos de parámetros de entrada y salida de cada procedure o programa. Dependiendo del tipo de dato (CHARACTER, INTEGER, TEMP-TABLE, etc.), del tipo de parámetro the parameter type (INPUT, INPUT-OUTPUT, BUFFER, etc.) y de la versión utilizada de Progress®, la forma de manipular estos parámetros puede variar.
Para los tipos más simples, como strings, datas o valores enteros, ProxyGen utiliza un mapeo directo para los tipos o clases estándares del lenguaje Java™. Para tipos complejos, como temp-tables y buffers, ProxyGen utiliza clases que forman parte de la biblioteca de runtime de estos servicios.
Cuando los parámetros son de entrada y salida (INPUT-OUTPUT) o de salida (OUTPUT), los tipos primitivos deben sustituirse por clases Holders, que contendrán el valor devuelto después de la ejecución del método. Los ejemplos más comunes son StringHolder o ResultSetHolder.
Los tipos de datos utilizados por cada método se pueden consultar a través de la Visualización de Servicios en Fluig Studio. Tenga en cuenta que dependiendo de la versión de Progress® puede existir variación en los tipos de parámetros utilizados y en la manera de utilizarlos. En caso de duda, consulte la documentación suministrada por Progress®.
Creación de los Datasets
Cuando el servicio Progress® se haya agregado en Fluig, es posible utilizarlo en los puntos donde el producto permite la personalización utilizando JavaScript, como en los scripts para eventos globales, eventos de procesos, eventos de definición de formulario o Datasets.
La forma de invocar las rutinas expuestas por el servicio es siempre la misma, independientemente de qué punto se está llamando. Sin embargo, para facilitar la comprensión del uso de servicios Progress® en Fluig y facilitar la reproducción de los ejemplos presentados en el entorno del lector, todos los siguientes ejemplos utilizarán Datasets como meta.
Como ya se ha visto anteriormente, los Datasets que se presentarán aquí son Tipos de Centro de Costo, Naturaleza de los Centros de Costo, Centros de Costo yUsuarios en Común.
Tipos de Centro de Costo
El siguiente código presenta la implementación del Dataset de Tipos de Centro de Costo. La explicación de cada paso de la implementación se presentará después del código:
and the Progress® version used, the way to handle these parameters may vary.
For the simplest types, like strings, dates or integer values, the ProxyGen uses a direct mapping to the Java™ language default types or classes. For complex types, such as temp-tables and buffers, ProxyGen uses classes that are part of the runtime library of these services.
When parameters are input and output (INPUT-OUTPUT) or output (OUTPUT), the primitive types need to be substituted by Holder classes, which will contain the value returned after the execution of the method. The most common examples are StringHolder or ResultSetHolder.
The data types used in each method can be consulted through the Fluig Studio Service View. Note that, depending on the Progress® version, there may be a variation in the types of parameters used and the way they are used. If in doubt, check the documentation provided by Progress®.
Dataset Creation
Once the Progress® service is added to Fluig, you can use it at the points where the product allows customization using JavaScript, such as in the scripts for global events, process events, form definition events or Datasets.
The way to call the routines presented by service is always the same, regardless of which point is being called. However, to make it easier to understand the use of the Progress® services in Fluig and to make it easier to reproduce the examples presented in the reader's environment, all of the examples below will use Datasets as target.
As previously seen, the Datasets that will be presented here are Cost Center Types, Nature of the Cost Centers, Cost Centers and Users in Common.
Cost Center Types
The code below shows the implementation of the Cost Center Types Dataset. The explanation of each step of the implementation will be presented after the code:
| Bloco de código | ||||||||||
|---|---|---|---|---|---|---|---|---|---|---|
| ||||||||||
| Bloco de código | ||||||||||
| ||||||||||
function createDataset(fields, constraints, sortFields) {

	//PasoStep 1 - CreaCreates elthe dataset
	var dataset = DatasetBuilder.newDataset();
    dataset.addColumn("id");
    dataset.addColumn("descripciondescricao");

	//PasoStep 2 - InvocaCalls elthe servicioservice registradoregistered enin Fluig
	var servico = ServiceManager.getService("EMS2");

	//PasoStep 3 - CargaLoads elthe objetoutility utilidadobject parafor integraciónintegration conwith Progress
    var serviceHelper = servico.getBean();

	//PasoStep 4 - CargaLoads el procedurethe persistente CostCenterUtils.p persistent procedure
    var remoteObj = serviceHelper.createManagedObject("CostCenterUtils");
	//PasoStep 5 - InvocaCalls elthe procedure quethat devuelvereturns unaa string conwith losthe tiposCC de CCtypes
    var types = serviceHelper.createStringHolder();
    remoteObj.readCostTypes(types);
	//PasoStep 6 - RompeBreaks lathe string eninto unan array conwith cadaeach unoof dethe los tipostypes
    var typeArray = types.getStringValue().split(",");

	//PasoStep 7 - AgregaAdd cadaeach tipotype devueltoreturned
    for(var pos = 0; pos < typeArray.length; pos++) {
        dataset.addRow(new Array(pos + 1, typeArray[pos]));
    }
    return dataset;
} |
DondeWhere:
- Paso Step 1: Crea el dataset y agrega los campos del mismo;
- Paso 2: La invocación del servicio registrada en Fluig se realiza por el método ServiceManager.getService, y el valor pasado como parámetro debe ser el código del servicio. Tenga en cuenta que en este punto no es necesario informar ningún parámetro de conexión al servicio, puesto que esto ya se realizó en su registro;
- Paso 3: Utiliza el método getBean para devolver un objeto utilidad para servicios Progress®. Esta utilidad proporciona una serie de métodos que facilitan la interacción con el proxy generado y sus métodos se presentarán con más detalle, más adelante en este documento;
- Paso 4: Realiza la carga del objeto CostCenterUtils de manera gestionada, a través del método createManagedObject de la utilidad creada anteriormente;
- Paso 5: Invoca el método deseado, en este caso readCostTypes, pasando un StringHolder que recibirá el valor de salida;
- Paso 6: Transforma la string recibida como parámetro en un array con las opciones. El carácter , (como) se utiliza para determinar los puntos de ruptura de string;
- Paso 7: Recorre el array creado, agregando una línea en el Dataset para cada ítem del array.
La siguiente pantalla presenta la visualización de los datos del Dataset creado:
Naturaleza de los Centros de Costo
El Dataset de Naturaleza de los Centros de Costo es muy similar al Dataset de tipo de centros de costo. En la práctica, el único cambio es que el procedure se llama:
- Creates the dataset and adds its fields;
- Step 2: The registered service invocation is made in Fluig through the ServiceManager.getService method, and the value passed as parameter should be the service code. Note that at this point there's no need to provide any connection parameter in the service, since this has already been done in your registration;
- Step 3: Use the getBean method to return a utility object for Progress® services. This utility provides a series of methods that facilitate interaction with the generated proxy and its methods will be presented in more details later in this document;
- Step 4: Loads the CostCenterUtils object in a managed way through the createManagedObject method of the previously created utility;
- Step 5: Invokes the method desired, in this case readCostTypes, passing a StringHolder which will receive the output value;
- Step 6: Transforms the String received by the parameter in an array with the options. The , (comma) character is used to determine the breaking points of the string;
- Step 7: Goes through the array created, adding a row in the Dataset for each item in the array.
The screen below shows the Dataset data view created:

Nature of Cost Centers
The Nature of Cost Centers Dataset is very similar to the cost center type Dataset. In practice, the only change is the called procedure:
| Bloco de código | ||||||||||
|---|---|---|---|---|---|---|---|---|---|---|
| ||||||||||
| Bloco de código | ||||||||||
| ||||||||||
function createDataset(fields, constraints, sortFields) {

	var dataset = DatasetBuilder.newDataset();
    dataset.addColumn("id");
    dataset.addColumn("descricao");

	var servico = ServiceManager.getService("EMS2");
	var serviceHelper = servico.getBean();
	var remoteObj = serviceHelper.createManagedObject("CostCenterUtils");

	var types = serviceHelper.createStringHolder();
	remoteObj.readCostNatureTypes(types);

    var typeArray = types.getStringValue().split(",");

    for(var pos = 0; pos < typeArray.length; pos++) {
        dataset.addRow(new Array(pos + 1, typeArray[pos]));
    }

    return dataset;
} |
Después del registro del Dataset, se puede ver su contenidoAfter Dataset registration, you can view its content:

Centros de Costo
El Dataset de Centro de Costo posee una estructura muy similar a la de los dos Dataset visto anteriormente. La principal diferencia es que, en este caso, el procedure devuelve una temp-table con los centros de costos, lo que cambia la forma en la que se manipulan los datos.
Dependiendo de la versión de Progress®, los objetos utilizados pueden variar. A continuación, se presentan ejemplos de la codificación para Progress® 9 y OpenEdge® 10, respectivamente. En ambos casos, el resultado presentado por Dataset será el mismo.
Codificación Progress® 9
Las temp-table en Progress® 9 son manejadas por los objetos que implementan la interfaz java.sql.ResultSet:
Cost Centers
The Cost Centers Dataset has a structure that is very similar to the two Datasets previously seen. The main difference is that, in this case, the procedure returns a temp-table with cost centers, which changes the way data is handled.
Depending on the Progress® version, the objects used may vary. The following are examples of encoding for Progress® 9 and OpenEdge® 10, respectively. In both cases, the result presented by the Dataset will be the same.
Progress® 9 Encoding
The temp-table in Progress® 9 are treated through objects that implement the java.sql.ResultSet interface:
| Bloco de código | ||||||||||
|---|---|---|---|---|---|---|---|---|---|---|
| ||||||||||
| Bloco de código | ||||||||||
| ||||||||||
function createDataset(fields, constraints, sortFields) {

	//CreaCreates the lastructure estructuraof delthe Dataset
    var dataset = DatasetBuilder.newDataset();
    dataset.addColumn("cuentaconta");
    dataset.addColumn("titulo");
    dataset.addColumn("naturalezanatureza");
    dataset.addColumn("tipo");

	//RecuperaRetrieves elthe servicioservice yand cargaloads elthe objetoremote remotoobject
    var servico = ServiceManager.getService("EMS2");
    var serviceHelper = servico.getBean();
    var remoteObj = serviceHelper.createManagedObject("CostCenterUtils");

    //LeeReads lasthe cuentascurrent corrientesaccounts
    var holder = serviceHelper.createResultSetHolder();
    remoteObj.readCostCenters(holder);

    //RecorreGoes through losthe registrosrecords, cargandoloading elthe Dataset conwith los datosdata
    var rs = holder.getResultSetValue();
    while (rs.next()) {
        var cuentaconta 	 = rs.getObject("cuentaconta");
        var naturalezanatureza = rs.getObject("naturalezanatureza");
        var tipo 	 = rs.getObject("tipo");
        var titulo   = rs.getObject("titulo");

        dataset.addRow(new Array(cuentaconta, titulo, naturalezanatureza, tipo));
    }

    return dataset;
} |
...
OpenEdge® 10 Encoding
En In OpenEdge® 10, las the temp-tables devueltas se encapsulan como objetos de la clase ProDataGraph. Esta clase también se utiliza cuando se usan parámetros del tipo DATASET:returned are encapsulated as objects of the ProDataGraph class. This class is also used when you use parameters of the DATASET type:
| Bloco de código | |||||||||||
|---|---|---|---|---|---|---|---|---|---|---|---|
| |||||||||||
| |||||||||||
function createDataset(fields, constraints, sortFields) {

	//CreaCreates the lastructure estructuraof delthe Dataset
    var dataset = DatasetBuilder.newDataset();
    dataset.addColumn("cuentaconta");
    dataset.addColumn("titulo");
    dataset.addColumn("naturalezanatureza");
    dataset.addColumn("tipo");

	//RecuperaRetrieves elthe servicioservice yand cargaloads elthe objetoremote remotoobject
    var servico = ServiceManager.getService("EMS2");
    var serviceHelper = servico.getBean();
    var remoteObj = serviceHelper.createManagedObject("CostCenterUtils");

    //LeeReads lasthe cuentascurrent corrientesaccounts
    var holder = serviceHelper.createProDataGraphHolder();
    remoteObj.readCostCenters(holder);

	//RecorreGoes through losthe registrosrecords, cargandoloading elthe Dataset conwith los datosdata
    var ttCC = holder.getProDataGraphValue().getProDataObjects("ttCC");
    for (var row_index = 0; row_index < ttCC.size(); row_index++) {
        var row = ttCC.get(row_index);
        dataset.addRow(new Array(row.get("cuentaconta"),
                                 row.get("titulo"),
                                 row.get("naturalezanatureza"),
                                 row.get("tipo")));
    }

    return dataset;
} |
...
Visualización del Dataset View:

Usuarios en Común
La primera diferencia entre el Dataset de usuarios comunes y los ejemplos anteriores, es que en este caso es necesario pasar una temp-table como parámetro al procedure invocado.
La segunda diferencia es que el código 4GL se implementa en un programa no persistente, lo que cambia la forma como la lógica se invoca desde el código JavaScript.
La tercera diferencia que se puede observar en este caso es que es posible transformar un Dataset en los tipos de datos requeridos por Progress® (ResultSet o ProDataGraph).
Codificación Progress® 9
Users in Common
The first difference between the users in common Dataset and the previous examples is that, in this case, you must pass a temp-table as a parameter to the procedure called.
The second difference is that the 4GL code is implemented in a non-persistent program, which changes the way the logic is called from the JavaScript code.
The third difference that can be observed in this case is that it is possible to transform a Dataset into the data types required by Progress® (ResultSet or ProDataGraph).
Progress® 9 Encoding
| Bloco de código | ||||||||||
|---|---|---|---|---|---|---|---|---|---|---|
| ||||||||||
| Bloco de código | ||||||||||
| ||||||||||
function createDataset(fields, constraints, sortFields) {

    //CreaCreates elthe nuevonew Dataset
    var dataset = DatasetBuilder.newDataset();
    dataset.addColumn("usuario");
    dataset.addColumn("nombrenome");

	//RecuperaRetrieves los usuarios de FluigFluig users
    var campos = new Array("colleaguePK.colleagueId", "colleagueName");
    var colleaguesDataset = DatasetFactory.getDataset("colleague", campos, null, null);

    //InstanciaInstantiates elthe servicioservice
    var servico = ServiceManager.getService("EMS2");
    var serviceHelper = servico.getBean();

    //TransformaTransforms elthe dataset enin una ResultSet (v9) yand creacreates holder for dethe salidaoutput
    var inputTT = colleaguesDataset.toResultSet();
    var holder = serviceHelper.createResultSetHolder();

    //InvocaCalls elthe procedure en elin Progress
    serviceHelper.getProxy().verifyUsers(inputTT, holder);

    var rs = holder.getResultSetValue();
    while (rs.next()) {
        dataset.addRow(new Array(rs.getObject("cod_usuar"), rs.getObject("nom_usuario")));
    }

    return dataset;
} |
...
OpenEdge® 10 Encoding
| Bloco de código | ||||||||||||
|---|---|---|---|---|---|---|---|---|---|---|---|---|
| ||||||||||||
function createDataset(fields, constraints, sortFields) {

	//CreaCreates elthe nuevonew Dataset
    var dataset = DatasetBuilder.newDataset();
    dataset.addColumn("usuario");
    dataset.addColumn("nombrenome");

	//RecuperaRetrieves los usuarios de FluigFluig users
    var campos = new Array("colleaguePK.colleagueId", "colleagueName");
    var colleaguesDataset = DatasetFactory.getDataset("colleague", campos, null, null);

    //InstanciaInstantiates elthe servicioservice
    var servico = ServiceManager.getService("EMS2");
    var serviceHelper = servico.getBean();

    //TransformaTransforms elthe dataset enin una ProDataGraph (v10) yand creacreates holder defor salidaoutput
    var inputTT = serviceHelper.toProDataGraph(colleaguesDataset);
    var holder = serviceHelper.createProDataGraphHolder();

    //InvocaCalls elthe procedure en elin Progress
    serviceHelper.getProxy().verifyUsers(inputTT, holder);

    var ttCC = holder.getProDataGraphValue().getProDataObjects("ttOutUsers");
    for (var row_index = 0; row_index < ttCC.size(); row_index++) {
        var row = ttCC.get(row_index);
        dataset.addRow(new Array(row.get("cod_usuar"), row.get("nom_usuario")));
    }

    return dataset;
} |
...
Visualización del Dataset:

Service Helper
La siguiente tabla presenta la A tabela abaixo apresenta a lista de métodos existentes en la clase utilidad para servicios na classe utilitária para serviços Progress®:
Devolución
y Descripción
Crea un
el
Crea un
el
Crea un
el
Crea un
el
Crea un
el
Crea un
el
Crea un
el
Crea un
el
Lee un archivo
o
haya sido expuesto a través de
A través de este método el proveedor del servicio puede administrar el
de estos
liberándolos al final de la ejecución del
Crea un
el
Crea un objeto de la clase
Crea un
el
Crea un objeto de la clase
Crea un objeto de la clase
Crea un
un
Crea un
el
Crea un
el
Crea un
el
Devuelve la instancia del
conexión a
ya
y disponible
su
El
es la principal clase generada por
un
una clase dentro de la biblioteca de
un
en un
Retorno | Método |
|---|
e Descrição | |
|---|---|
java.lang.Object | createBigDecimalHolder() |
Cria um objeto Holder para |
o tipo DECIMAL | |
java.lang.Object | createBooleanHolder() |
Cria um objeto Holder para |
o tipo LOGICAL | |
java.lang.Object | createByteArrayHolder() |
Cria um objeto Holder para |
o tipo RAW | |
java.lang.Object | createCOMHandleHolder() |
Cria um objeto Holder para |
o tipo COM-HANDLE | |
java.lang.Object | createDateHolder() |
Cria um objeto Holder para |
o tipo DATE | |
java.lang.Object | createHandleHolder() |
Cria um objeto Holder para |
o tipo WIDGET-HANDLE (Handle) | |
java.lang.Object | createIntHolder() |
Cria um objeto Holder para |
o tipo INTEGER | |
java.lang.Object | createLongHolder() |
Cria um objeto Holder para |
o tipo RECID | |
java.lang.Object | createManagedObject(java.lang.String objName) |
Lê um arquivo .p |
ou .r que |
tenha sido exposto via AppServer de forma persistente. |
Através deste método o provedor do serviço pode gerenciar o ciclo de vida |
destes objetos, |
liberando-os ao final da execução do script. | |
java.lang.Object | createMemptrHolder() |
Cria um objeto Holder para |
o tipo MEMPTR | |
java.lang.Object | createProDataGraph(java.lang.Object metadata) |
Cria um objeto da classe ProDataGraph | |
java.lang.Object | createProDataGraphHolder() |
Cria um objeto Holder para |
o tipo ProDataGraphHolder | |
java.lang.Object | createProDataGraphMetaData(java.lang.String name) |
Cria um objeto da classe ProDataGraphMetadata | |
java.lang.Object | createProDataObjectMetaData(java.lang.String tableName, int numFields, boolean bimageFlag, int numIndexes, java.lang.String multiIxCols, java.lang.String XMLNamespace, java.lang.String XMLPrefix) |
Cria um objeto da classe ProDataObjectMetadata. |
Cria um objeto para |
um dataset (Temp-table). | |
java.lang.Object | createResultSetHolder() |
Cria um objeto Holder para |
o tipo TABLE | |
java.lang.Object | createRowidHolder() |
Cria um objeto Holder para |
o tipo ROWID | |
java.lang.Object | createStringHolder() |
Cria um objeto Holder para |
o tipo CHARACTER. | |
java.lang.Object | getProxy() |
Retorna a instância do objeto de |
conexão ao AppServer, |
já conectado |
e disponível para |
uso. |
O objeto remoto |
é a principal classe gerada pelo ProxyGen. | |
java.lang.Object | instantiate(java.lang.String className)Instancia |
um objeto de |
uma classe dentro da biblioteca do proxy. | |
java.lang.Object | toProDataGraph(com.datasul.technology.webdesk.dataset.DefaultDataset d)Transforma |
um dataset |
em um ProDataGraph. |
Visão Geral
Import HTML Content
Conteúdo das Ferramentas
Tarefas