Index:
General Considerations
The information contained in this document is intended to demonstrate how to perform the integration between Fluig and external applications. In order to have a full understanding of this information, some knowledge is considered a prerequisite, including:
- Overview of Fluig product
- Overview of system integration
- JavaScript
- WebServices
- SOAP
Progress® 4GL
- Progress® Open App Server
- Progress® Open Client for Java
- Datasets (TOTVS Fluig Platform)
- Java™
- Apache Flex®
In several parts of this document, code snippets will be presented in different programming languages in order to show the use of TOTVS Fluig Platform integration resources. However, this document does not intend to empower the reader to use these technologies beyond the above-described purpose, the reader being responsible for searching for more detailed information on these languages.
With the intent of making it easier to understand the information presented and simulation of the concepts presented, the examples mentioned in this document use the Dataset feature as an example of the use of the product integration resources. However, it is important to note that other points of the product have the same integration characteristics available as those existing in Datasets, especially customizations of forms and processes.
Overview
Although empirical, every company has business processes that enable the company to fulfill its objective, whether it is the provision of a service, the production of products or trading goods. A company has a multitude of processes, with each person in the organization being part of at least one of these processes, and all of them exchange information with each other at some point. The processes can be formal (such as hiring a professional) or informal (such as an incentive to innovation), critical (billing) or satellite (birthday card send control).
With the advent of Information System technologies, several systems began to provide support for these business processes, especially those considered most critical to company operation. The best example of this is the use of ERP systems that support the processes in various company areas.
TOTVS Fluig Platform has the objective of being an agnostic platform that manages processes, documents and identities through one collaborative communication interface. This can be realized to a greater or lesser degree in every one of its features, from the most simple (such as collaboration) to the more complex (such as DM and BPM).
However, part of these processes have a high reliance on existing information systems in the company and, therefore, TOTVS Fluig Platform's architecture is designed to enable integration with these systems, allowing the modeled processes to have higher added value.
TOTVS Fluig Platform allows both access through the product to external systems (to query or feed information) and enables other systems to connect to query information or to run transactional operations.

The main product integration channel is through WebServices, which are becoming the most common standard for integration with any application. Through it, you can have access to TOTVS Fluig Platform features and provide access through the product to external applications. This document has a specific section on integration through WebServices.
The other form of integration is through calls to Progress® Open AppServer and is recommended for users who need to integrate TOTVS Fluig Platform with applications developed in that platform.
WebServices
Integration through WebServices uses the SOAP protocol and, since it is an open standard, allows systems developed in entirely different platforms, such as Java™, Microsoft® .Net, C, C++, PHP, Ruby, Pearl, Python, among others, to exchange information with each other in a seamless way.
Accessing Fluig WebServices
Fluig provides a set of WebServices that allow access to product information or running tasks, such as starting process requests. For the list of WebServices available, go to:
http://<host>:<porta>/webdesk/services
Each link provided directs the browser to the service WSDL URL. The WSDL (Web Service Description Language) has the service description in XML format and is used by development tools to create components that will represent this service.
Watch out for each type of attribute that is expected, for example, the expirationDate attribute of the DocumentDto[] object is a date, however, each language interprets it differently, see some examples below:
- C#: dateTime
- Java™: XMLGregorianCalendar
- Progress®: DATETIME-TZ
Via Apache Flex®
As the vast majority of development tools, Apache Flex® allows you to create stubs to access to web services. These stubs include all the packing and unpacking operations of XML standard information for the platform native types.
Use the step-by-step to view the process of creating stubs for a service provided by Fluig:
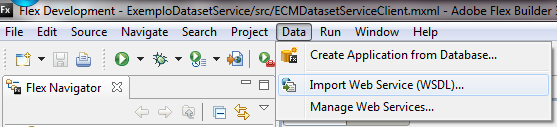
The creation of stubs in Flex® is done through the Data menu, Import WebService(WSDL) option, as shown in the image below.
In the first window, the folder within the current project where the stubs should be generated is requested.

In the following screen, you should provide the WSDL address where the service is found. It is also possible to define if it will be accessed from the LifeCycle Data Services client or server station.

In the last screen, you should provide the package that will be used and the name of the main class (already suggested by the Flex™ Builder™).

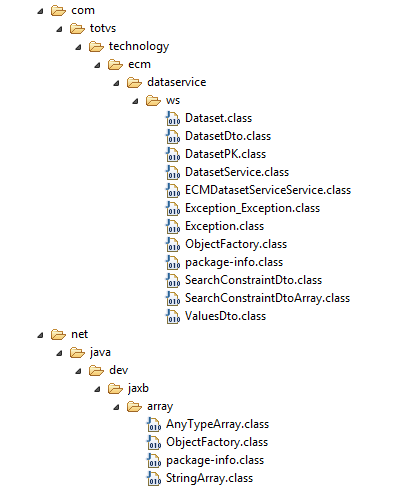
When the process is finished, Flex™ Builder™ will add to the project a set of classes that will be used by the programmer to invoke the services, as shown in the figure below:

For the example below, we used the IDE Adobe® Flex™ Builder™ 3.0 with Flex® SDK 3.2. For other versions of IDE and/or SDK, the process for creating stubs can undergo some variations.
The code snippet below shows an example of the Fluig Dataset access WebService being called:
ECMDatasetServiceClient.mxml
<?xml version="1.0" encoding="utf-8"?>
<mx:Application xmlns:mx="http://www.adobe.com/2006/mxml" layout="absolute" creationComplete="{this.start()}">
	<mx:Script>
		<![CDATA[
			import generated.webservices.ValuesDto;
			import generated.webservices.DatasetDto;
			import generated.webservices.GetDatasetResultEvent;
			import generated.webservices.SearchConstraintDtoArray;
			import generated.webservices.StringArray;
			import generated.webservices.ECMDatasetServiceService;
			import mx.rpc.events.FaultEvent;
			import mx.collections.ArrayCollection;

			//Creates an instance of the service access Stub
			private var ds:ECMDatasetServiceService = new ECMDatasetServiceService();
			public function start() : void {
				//Creates assistant types that will be used on the service called
				var fields:StringArray = new StringArray();
				var constraints:SearchConstraintDtoArray = new SearchConstraintDtoArray();
				var order:StringArray = new StringArray();
				//Defines the functions for treating return
				ds.addEventListener(GetDatasetResultEvent.GetDataset_RESULT, resultGetDataset);
				ds.addEventListener(FaultEvent.FAULT,faultGetDataset);

				//invokes the service getDataset method
				ds.getDataset("adm", 1, "adm", constraints, order, fields, "colleague");
			}

			//Treatment of data returned from the invoked service.
			public function resultGetDataset(ev:GetDatasetResultEvent) : void {
				//Recovers service return in the form of a DatasetDto
				var dataset:DatasetDto = ev.result as DatasetDto;
				//Mounts a string with all the dataset data
				var line:String = "";

				//Header with the name of the fields
				var columnsArray:ArrayCollection = new ArrayCollection(dataset.columns);
				for (var j:int = 0; j < columnsArray.length; j++) {
					line += columnsArray.getItemAt(j) + "\t";
				}
				//Data line
				var valuesArray:ArrayCollection = new ArrayCollection(dataset.values);
				for (var j:int = 0; j < valuesArray.length; j++) {
					var row:ValuesDto = valuesArray.getItemAt(j) as ValuesDto;
					line += "\n" + j + ":";

					for (var i:int = 0; i < row.length; i++) {
						line += row.getItemAt(i) + "\t";
					}
				}

				//Shows the string created in a textarea in the screen
				this.sysout.text = line;
			}

			public function faultGetDataset(ev:FaultEvent) : void {
				this.sysout.text = ev.fault.faultString;
			}
		]]>
	</mx:Script>
	<mx:TextArea id="sysout" name="sysout" width="100%" height="100%"
		paddingBottom="5" paddingLeft="5" paddingRight="5" paddingTop="5"/>
</mx:Application>
Flex® has a bug that prevents proper functioning of services that work with multidimensional arrays of data, as in the above example, where an array (of Dataset lines) of array (of the columns of each record) is returned.
To work around this problem, you must change the class generated by Flex™ Builder™, which will encapsulate the multidimensional array. In the above example, this class is the DatasetDto, which should be changed (line 11) as shown in the example below:
public class DatasetDto
{
	/**
	 * Constructor, initializes the type class
	 */
	public function DatasetDto() {}

	[ArrayElementType("String")]
	public var columns:Array;
	[ArrayElementType("ValuesDto")]
	public var values:Array = new Array(); //iniciando o array
}
Other services that do not work with multidimensional arrays do not require changes in the generated code.
Via Java™
There are many implementations of WebServices use in Java™ and, in this example, we will use the libraries available in Java™ 7.
As in the previous example, in Apache Flex®, the first step is to use the WSDL address for generating Java™ stubs. The command below provides an example of how to generate these stubs:
wsimport -d <output_directory> <wsdl_url>
Through this command, the stubs are generated in the target directory (output_directory), as described in the wsdl file (wsdl_url).
From the generated stubs, it is possible to consume the WebService as in the example below:
ECMDatasetServiceClient.java
package com.fluig.examples;
import javax.xml.ws.BindingProvider;
import net.java.dev.jaxb.array.StringArray;
import com.totvs.technology.ecm.dataservice.ws.DatasetDto;
import com.totvs.technology.ecm.dataservice.ws.DatasetService;
import com.totvs.technology.ecm.dataservice.ws.ECMDatasetServiceService;
import com.totvs.technology.ecm.dataservice.ws.SearchConstraintDtoArray;
import com.totvs.technology.ecm.dataservice.ws.ValuesDto;
/*
 * Class to invoke the DatasetService service
 */
public class ECMDatasetServiceClient {
	//Instantiates DatasetServiceService.
	private ECMDatasetServiceService ecmDatasetServiceService = new ECMDatasetServiceService();
	private DatasetService service = ecmDatasetServiceService.getDatasetServicePort();

	//Starts class execution
	public static void main(String[] args) {
		ECMDatasetServiceClient client = new ECMDatasetServiceClient();

		//Configures access to WebServices.
		BindingProvider bp = (BindingProvider) client.service;
		bp.getRequestContext().put(BindingProvider.ENDPOINT_ADDRESS_PROPERTY,
				"http://localhost:8080/webdesk/ECMDatasetService");
		try {
			client.getDataset();
		} catch (Exception e) {
			e.printStackTrace();
		}
	}
	public void getDataset() throws Exception {

		//Creates the parameters used in the call
		int companyId = 1;
		String username = "adm";
		String password = "adm";
		String name = "colleague";
		StringArray fields = new StringArray();
		SearchConstraintDtoArray constraints = new SearchConstraintDtoArray();
		StringArray order = new StringArray();

		//Invokes the dataset service
		DatasetDto result = service.getDataset(
				companyId, username, password, name, fields, constraints, order);

		//Displays the header
		for (String columnName : result.getColumns()) {
			System.out.print(columnName + "\t");
		}
		System.out.println();

		//Displays the dataset lines
		for (ValuesDto row : result.getValues()) {
			for (Object value : row.getValue()) {
				System.out.print(value + "\t");
			}
			System.out.println();
		}
	}
}
When using WebServices via Java™, you must pay attention to the type of each attribute and to the type of return of the WebService. For example, for values of the date type, you should use the XMLGregorianCalendar class:
DocumentDto document = new DocumentDto();

XMLGregorianCalendar date = DatatypeFactory.newInstance().newXMLGregorianCalendar();
date.setYear(2013);
date.setMonth(10);
date.setDay(16);
date.setHour(0);
date.setMinute(0);
date.setSecond(0);

document.setExpirationDate(date);
Via Progress® 4GL
So, as in the previous examples, the first step to use a Webservice in Progress® is to use a utility that will read the ESDL address and generate the required information for accessing it. Different from Java™ and Flex®, Progress® does not generate stub objects, but only a documentation on how to consume the services described in the WSDL file. Although in some situations you can use the Progress® native types as parameters, depending on the data type used, you need to handle the SOAP XML to extract or send information.
To generate the documentation for a service, you must use the bprowsdldoc utility as in the example below:
bprowsdldoc <URL_TO_WSDL>
With the execution of this utility, some HTML files will be generated with information on how to use the service. This documentation provides information and examples on how to perform the connection with the services and use the service methods and datatypes.
The code below shows an example of how to use the service:
wsECMDatasetService.p
/* Part I - Call WebService */
DEFINE VARIABLE hWebService     AS HANDLE NO-UNDO.
DEFINE VARIABLE hDatasetService AS HANDLE NO-UNDO.
DEFINE VARIABLE cFields  AS CHARACTER EXTENT 0 NO-UNDO.
DEFINE VARIABLE cOrder   AS CHARACTER EXTENT 0 NO-UNDO.
DEFINE VARIABLE cDataset AS LONGCHAR NO-UNDO.
DEFINE TEMP-TABLE item NO-UNDO
    NAMESPACE-URI ""
    FIELD contraintType AS CHARACTER
	FIELD fieldName     AS CHARACTER
	FIELD finalValue    AS CHARACTER
	FIELD initialValue  AS CHARACTER.

DEFINE DATASET dConstraints NAMESPACE-URI "http://ws.dataservice.ecm.technology.totvs.com/"
	FOR item.
CREATE SERVER hWebService.
hWebService:CONNECT("-WSDL 'http://localhost:8080/webdesk/ECMDatasetService?wsdl'").
RUN DatasetService SET hDatasetService ON hWebService.
RUN getDataset IN hDatasetService(INPUT 1,
                                  INPUT "adm",
                                  INPUT "adm",
                                  INPUT "colleague",
                                  INPUT cFields,
                                  INPUT DATASET dConstraints,
                                  INPUT cOrder,
                                  OUTPUT cDataset).
DELETE OBJECT hDatasetService.
hWebService:DISCONNECT().
DELETE OBJECT hWebService.
/* Part II - Parse XML and create a text file separated by tabs */
DEFINE VARIABLE iCount  AS INTEGER   NO-UNDO.
DEFINE VARIABLE iCount2 AS INTEGER   NO-UNDO.
DEFINE VARIABLE hDoc    AS HANDLE    NO-UNDO.
DEFINE VARIABLE hRoot   AS HANDLE    NO-UNDO.
DEFINE VARIABLE hValues AS HANDLE    NO-UNDO.
DEFINE VARIABLE hEntry  AS HANDLE    NO-UNDO.
DEFINE VARIABLE hText   AS HANDLE    NO-UNDO.
DEFINE VARIABLE cValue  AS CHARACTER NO-UNDO.
OUTPUT TO c:\dataset.txt.
CREATE X-DOCUMENT hDoc.
CREATE X-NODEREF hRoot.
CREATE X-NODEREF hEntry.
CREATE X-NODEREF hText.
CREATE X-NODEREF hValues.
hDoc:LOAD("longchar", cDataset, FALSE).
hDoc:GET-DOCUMENT-ELEMENT(hRoot).
/* Goes through the columns <columns> */
DO iCount = 1 TO hRoot:NUM-CHILDREN WITH 20 DOWN:
    hRoot:GET-CHILD(hEntry, iCount).
    IF hEntry:NAME <> "columns" THEN
        NEXT.
    hEntry:GET-CHILD(hText, 1).
    PUT UNFORMATTED hText:NODE-VALUE "~t".
    DOWN.
END.
PUT UNFORMATTED SKIP.
/* Goes through the records <values> */
DO iCount = 1 TO hRoot:NUM-CHILDREN WITH 20 DOWN:
    hRoot:GET-CHILD(hValues, iCount).
    IF hValues:NAME <> "values" THEN
        NEXT.
    /* Goes through the fields <value> */
    DO iCount2 = 1 TO hValues:NUM-CHILDREN:
        hValues:GET-CHILD(hEntry, iCount2).
        IF hEntry:NUM-CHILDREN = 0 THEN
            cValue = "".
        ELSE DO:
            hEntry:GET-CHILD(hText, 1).
            cValue = hText:NODE-VALUE.
        END.
        PUT UNFORMATTED cValue "~t".
    END.
    PUT UNFORMATTED SKIP.
END.
OUTPUT CLOSE.
DELETE OBJECT hValues.
DELETE OBJECT hText.
DELETE OBJECT hEntry.
DELETE OBJECT hRoot.
DELETE OBJECT hDoc.
Accessing WebServices from Fluig
Fluig allows call to third-party WebServices through the Fluig Studio Service View Service registration.
In order to add a new WebService, you need to click the Add Service option by opening the New Service wizard and providing the Fluig server where the service will be added, an identifier code for it, its description, the WSDL URL ans its type (in this case, WebService). In the example below, you will use a public WebService to query to the periodic table, whose WSDL address is http://www.webservicex.com/periodictable.asmx?wsdl.

Based on this information, Fluig will extract the provided WebService information and will finish the registration of this service.
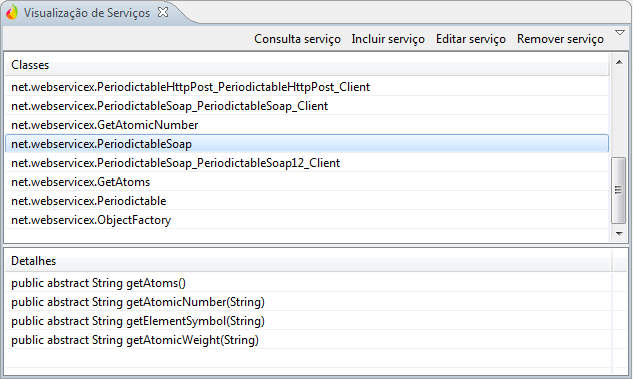
Once the service is registered, you can view the classes and methods available in this service and which will be used in the JavaScript code that will use it. The screen below shows an example of a WebService view.
Services added to Fluig can be instantiated and used where the product allows for customization using JavaScript, as in the scripts for global events, process events, form definition events or Datasets. In the following example, you will create a Dataset that will use this service to get the periodic table data.
The code below shows a sample implementation of the use of a service in the construction of a Dataset:
periodicTable.js
function createDataset(fields, constraints, sortFields) {
	//Creates the dataset
	var dataset = DatasetBuilder.newDataset();
	dataset.addColumn("elementName");
	// Connects the service and searches for the books
	var periodicService = ServiceManager.getService('PeriodicTable');
	var serviceHelper = periodicService.getBean();
	var serviceLocator = serviceHelper.instantiate('net.webservicex.Periodictable');
	var service = serviceLocator.getPeriodictableSoap();
	//Invokes the service
	try {
		var result = service.getAtoms();
		var NewDataSet = new XML(result);
		for each(element in NewDataSet.Table) {
			dataset.addRow(new Array(element.ElementName.toString()));
		}
	} catch(erro) {
		dataset.addRow(new Array(erro));
	}
	return dataset;
}
The first step to call the service is to request Fluig to load the service, from the ServiceManager.getService ('PeriodicTable ') method. The value passed as a parameter must be the code used when the services was registered.
Once the service has been loaded, the getBean() method is used to return a utility for access to the service classes through the instantiate method. Through this utility, it is possible to instantiate the classes available and that are listed in the Service registration (as in image above).
Once you have instantiated the service utility object, the classes that must be instantiated and the methods that should be invoked depend on each WebService used, and you must check its documentation for more information.
For the periodic table service, you need to perform the following steps:
var serviceLocator = serviceHelper.instantiate('net.webservicex.Periodictable');
var service = serviceLocator.getPeriodictableSoap();
var result = service.getAtoms();
Where:
Step 1: Instantiate the net.webservicex.Periodictable class to have access to the locator service;
- Step 2: Call the getPeriodictableSoap method to instantiate the service;
- Step 3: Call the getAtoms method to get the element list.
In the case of this service, the getAtoms method returns a string containing an XML with the list of all elements, according to the example below:
<NewDataSet>
	<Table>
		<ElementName>Actinium</ElementName>
	</Table>
	<Table>
		<ElementName>Aluminium</ElementName>
	</Table>
	...
</NewDataSet>
In order to go through the XML and extract the available data, the features for handling JavaScript XML are used, which makes it easier to handle this type of data. For more information on this feature, go to: http://www.ecma-international.org/publications/standards/Ecma-357.htm or http://www.xml.com/pub/a/2007/11/28/introducing-e4x.html.
The example below presents the code used to go through the XML returned:
var NewDataSet = new XML(result);
for each(element in NewDataSet.Table) {
	dataset.addRow(new Array(element.ElementName.toString()));
}
Once the Dataset code is implemented, you can view it, as shown in the figure below:

WebServices with Basic Authentication
In order to use WebServices that use basic authentication (WSS or WS-Security), you need to use the getBasicAuthenticatedClient method located in the service provider (the same obtained through the ServiceManager). This method provides an authenticated client.
The parameters that should be provided in the method follow this order:
- Service instance
- Service class name
- User for authentication
- Password for authentication
Using the example of the PeriodicTable service presented previously, the code of the call would have the changes below:
var serviceLocator = serviceHelper.instantiate('net.webservicex.Periodictable');
var service = serviceLocator.getPeriodictableSoap();
var authenticatedService = serviceHelper.getBasicAuthenticatedClient(service, "net.webservicex.PeriodictableSoap", 'usuario', 'senha');
var result = authenticatedService.getAtoms();
WebService with customized client
Attention
This technique is valid for Fluig 1.3.7 or higher.
In integrations that use services created with CXF with systems that do not support the HTTP/1.1 protocol (Protheus, for example), you need to use this method by setting the "disable.chunking" parameter to "true".
To customize the client that accesses the services, you need to use the getCustomClient method, located in the service provider (the same that is obtained via ServiceManager). This setting requires the creation of a map of parameters with their respective values to pass to the method, as show by the snippet below:
		var properties = {};
		properties["basic.authorization"] = "true";
		properties["basic.authorization.username"] = "username";
		properties["basic.authorization.password"] = "password";
		properties["disable.chunking"] = "true";
		properties["log.soap.messages"] = "true";

		var serviceLocator = serviceHelper.instantiate('net.webservicex.Periodictable');
		var service = serviceLocator.getPeriodictableSoap();
		var customClient = serviceHelper.getCustomClient(service, "net.webservicex.PeriodictableSoap", properties);
		var result = customClient.getAtoms();
The following parameters can be set:
Property | Function |
|---|---|
basic.authorization | When set to "true", it does the same as the getBasicAuthenticatedClient method, but allows you to apply authentication settings along with the other customizations below. In order to configure authentication, properties with "username" and "password" below must also be defined. |
basic.authorization.username | User to be used for basic authentication. |
basic.authorization.password | User password to be used for basic authentication. |
disable.chunking | When set to "true", disables the sending of large requests in smaller "pieces". It can be useful when the service called does not support this type of request. |
log.soap.messages | When set to "true", allows the SOAP messages used in requests made to services to be presented in the server log, making it easier to debug in case of failures. |
Progress® Open AppServer
Thus since you can call operations in WebServices, Fluig also allows to make calls to programs in Progress® 4GL (or ABL) exposed through Progress® Open AppServer.
In the following examples, we create Datasets that, through service layer, will access 4GL logic, which will extract data. Although the 4GL codes in this example are very simple, they comprise the most common cases required on a day-to-day basis, since integration complexity is in the interfaces (input and output parameters) of each exposed procedure, not in its internal logic.
Note that the examples presented here intend to demonstrate the integration dynamics between Progress® and Fluig without going into specific details of the technologies involved. The Fluig Progress® service layer creates a JavaScript interface for the Progress® Open AppServer Client Java library and, therefore, for more information on how to integrate Java™ and Progress® applications, refer to the documentation provided by Progress®.
Use Case
The examples shown below, intend to create four Datasets 1 in Fluig:
- Cost Center Types, which should return the cost center types existing in the application in Progress® (in this case, EMS2).
- Nature of Cost Centers, which should return the possible types of nature, according to the application in Progress® (in this case, EMS2).
- Cost Centers, you should return the records in the table conta 2.
Common Users, which should generate a list of common users for Fluig and the application in Progress® (using the table usuar_mestre).
1 - The examples use an EMS2 database for querying cost centers and users. However, overall, only two tables and 6 fields are used, which should not affect the understanding of the logic by the reader, nor prevent the creation of an equivalent scheme for testing, if required.
2 - The code presented for extracting cost centers has educational purposes only and cannot be considered for production use. For more information on how to extract cost centers from EMS2, see its technical documentation.
For the first three cases, the extraction logic of the desired information will be exposed in a program with several procedures, one for each need presented here:
CostCenterUtils.p
/**************************************************************************
** Utility that provides procedures for extracting information
** on cost centers.
**************************************************************************/
DEFINE TEMP-TABLE ttCC NO-UNDO
    FIELD conta    LIKE conta.ct-codigo /* CHARACTER */
    FIELD natureza LIKE conta.natureza  /* INTEGER   */
    FIELD tipo     LIKE conta.tipo      /* INTEGER   */
    FIELD titulo   LIKE conta.titulo.   /* CHARACTER */

/*-------------------------------------------------------------------
  Procedure: readCostCenters
   Objective: Returns a temp-table with the list of cost centers.
----------------------------------------------------------------------*/
PROCEDURE readCostCenters:
    DEFINE OUTPUT PARAMETER TABLE FOR ttCC.
    FOR EACH conta:
        CREATE ttCC.
        ASSIGN
            ttCC.conta    = conta.ct-codigo
            ttCC.natureza = conta.natureza
            ttCC.tipo     = conta.tipo
            ttCC.titulo   = conta.titulo.
    END.
END.
/*-------------------------------------------------------------------
  Procedure: readCostNatureTypes
   Objective: Returns a string with the natures of cost centers,
             separated by comma.
----------------------------------------------------------------------*/
PROCEDURE readCostNatureTypes:
    DEFINE OUTPUT PARAMETER cNatureList AS CHARACTER NO-UNDO.
    cNatureList = {adinc/i01ad047.i 03}.
END.
/*-------------------------------------------------------------------
  Procedure: readCostTypes
   Objective: Returns a string with the types of cost centers,
             separated by comma.
----------------------------------------------------------------------*/
PROCEDURE readCostTypes:
    DEFINE OUTPUT PARAMETER cTypeList   AS CHARACTER NO-UNDO.
    cTypeList = {adinc/i02ad047.i 3}.
END.
In the case of extracting users that are common to both products, a single program will be used, as shown in the code below:
verifyUsers.p
/**************************************************************************
** Utility that receives a temp-table with a list of users and returns
** another with only the users from the list that are in the database.
**************************************************************************/
DEFINE TEMP-TABLE ttUsers
    FIELD cod_usuar   AS CHARACTER
    FIELD nom_usuario AS CHARACTER
    INDEX principal	  IS PRIMARY UNIQUE cod_usuar.

DEFINE TEMP-TABLE ttOutUsers LIKE ttUsers.
DEFINE INPUT  PARAMETER TABLE FOR ttUsers.
DEFINE OUTPUT PARAMETER TABLE FOR ttOutUsers.
FOR EACH ttUsers:
   IF CAN-FIND(usuar_mestre WHERE usuar_mestre.cod_usuar = ttUsers.cod_usuar) THEN DO:
        CREATE ttOutUsers.
        BUFFER-COPY ttUsers TO ttOutUsers.
    END.
END.
Both codes presented have significant differences in the way they are used and the way they will be exposed by Progress®. In the first one, the program is loaded persistently and its procedures can be run independently. In the second case, the program is run in a non-persistent way and the main logic is in the main-block. The internal procedures, if any, are intended to improve code organization and cannot be used in isolation.
AppServer Configuration
Some important information in the AppServer configuration:
- The AppServer should be loaded in Stateless mode;
In the agent configuration, in the Propath field, you should add the directory where compiled files are located (.r)
Important: When a relative path (\\server\folder) is used, the Progress® Windows®service (AdminService) should be started with a network user that has access permission to the directory provided.
Exposing 4GL codes with ProxyGen
The first step to be able to run routines in Progress® 4GL is to create the client library, which is done by using the ProxyGen application, which is shipped with the Progress® installation, as shown in the example below.
Use the step-by-step to view the process of creating the proxy:
- In the first screen of ProxyGen, the main point that should be noted is the name of the Project (in this example, EMSProxies). The information in this field will be used by ProxyGen to name the service access class, which will be used to configure the service in Fluig. In this screen, you also need to correctly configure the PROPATH, so that you can search for the compiled files (.r).

- The second step consists in inserting which procedures will be exposed in a persistent or non-persistent way. The choice of each option to use depends on the way each exposed object was built. After the procedures are inserted, click the Generate option.

- During the process of generating the proxy, in the General tab, check the Java option in Client Proxy and enter the directory where the proxy is generated in the Output Dir. Also note the AppService field, it must be the name of the service posted in AppServer, otherwise it will be impossible to connect to the server.

- The last relevant information for the proxy generation is the name of the package where the classes will be created. This information is used during the configuration of the Progress® service in Fluig. Finally click on the OK button.

- After the classes are created, you need to package them in a .JAR file. This can be done in the command line using the command below:
jar -cvf <jar_file_name> <diretorio>
However note that, in the file generated, the classes need to be in the correct directories. In the example shown, the com directory must be included and be at the root of the JAR file. To be compatible with the ZIP format, another option is to generate a file with the generated classes (respecting the directories) and rename it to the .JAR extension.
Depending on the version of Progress®, the screens can suffer some variation in the amount and placement of fields. See the documentation in case of doubt
Service Configuration in Fluig
The registration of a service is performed through Fluig Studio, in the Services View through the Add Service option. The screen below shows the new service wizard and the fields used to register the Progress® service:

Where:
- Server: Fluig server where the service will be added;
- Code: Unique code that will identify the service in the system. This code will be used in the JavaScript codes to have access to this service;
- Description: Text that describes the data service;
- URL: Identifies the AppServer service access URL, such as AppServer://<server>/<service_name>;
In case you're not using the default NameServer, the NameServer access port must be provided. E.g.: AppServer://<server>:<NameServer_port>/<service_name>.
Note that depending on the service configuration and/or form of connection, the URL may change. Check the documentation of the Open AppServer for more information. - Type: Identifies the service type (Progress or WebService). Progress should be selected;
- Remote Object: Identifies the proxy access class. This class is usually formed by the package name used for generating Proxy classes, plus the ProxyGen project name.
Example: In the screens that present the ProxyGen, we used the package com.fluig.samples.ems, and the name given to the project in ProxyGen was EMSProxies. In this case, the class of the remote Object will be com.fluig.samples.ems.EMSProxies; - User: User used when connecting to the service, as defined in the settings of the AppServer;
- Password: Password used when connecting to the service, as defined in the settings of the AppServer;
- Extra Parameters: Extra (and optional) parameters used for connecting to the AppServer. Check the documentation of the Open AppServer to check the options available in each version of the Progress®;
- Proxy file directory: .JAR file containing the classes generated by ProxyGen; the Select File button should be used to find it.
Once the service has been added, you can view the available classes and the methods that exist in each one of them. This information is important to guide the development of customization codes that will use this service. To view the service classes and methods, use the Service Query option in Services View, as in the screen below:

Overview of Objects Involved
Access to procedures presented in the AppServer involves four elements that interact with each other, as shown in the diagram below:
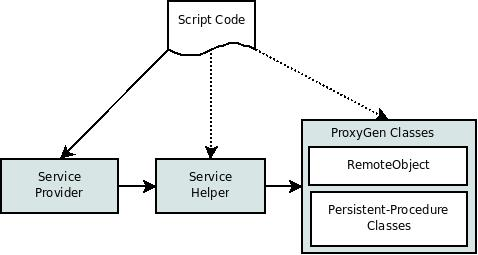
Where:
- Script Code: is the JavaScript code that will make use of the procedures presented in the AppServer. As previously mentioned, this JavaScript can be of any nature, such as the implementation of a Dataset or the customization of a process event.
- Service Provider: Object retrieved through ServiceManager.getService method that provides access to service features. This object is responsible for managing the connection and resources allocated by the service during script execution.
- Service Helper: Object retrieved through the getBean method in the ServiceProvider and that provides a set of utility methods that allow, among other things, to create Progress® specific objects (StringHolder, ResultSetHolder, etc.), to have access to the ProxyGen remote object and to instantiate classes. For more information about the Service Helper, query here.
- ProxyGen Classes: Classes generated by ProxyGen and that will be used by the developer for the Progress® routine execution. The list of available classes, as well as their methods, can be viewed in the Fluig Studio Service View.
Persistent and Non-Persistent Procedures
When a procedure is added to the ProxyGen project, it must be configured in two lists: Persistent or Non-Persistent Procedures This decision affects directly how these objects are accessed by the generated library and, consequently, how the developer will access them in JavaScript codes.
The procedures presented in a non-persistent way give rise to the methods in the class configured as Remote (or Proxy) object in the Service, and its execution is made by calling the corresponding method, for example:
serviceHelper.getProxy().verifyUsers(inputTT, holder).
The procedures presented in a persistent way give rise to new classes that can be instantiated through calls to methods in the Remote Object (through the Service View in Fluig Studio, you can check the available methods in the class) or through the createManagedObject method. The call through the createManagedObject method allows Fluig to have control over this object life cycle, freeing it automatically at the end of the method. If the object is instantiated, the developer must manually encode the object release (_ release () method), otherwise there is the risk of blocking a new AppServer agent at each call to the method.
Input and Output Parameters
Another important point in 4GL routine calls is to observe the input and output parameter types for each procedure or program. Depending on the data type (CHARACTER, INTEGER, TEMP-TABLE, etc.), the parameter type (INPUT, INPUT-OUTPUT, BUFFER, etc.) and the Progress® version used, the way to handle these parameters may vary.
For the simplest types, like strings, dates or integer values, the ProxyGen uses a direct mapping to the Java™ language default types or classes. For complex types, such as temp-tables and buffers, ProxyGen uses classes that are part of the runtime library of these services.
When parameters are input and output (INPUT-OUTPUT) or output (OUTPUT), the primitive types need to be substituted by Holder classes, which will contain the value returned after the execution of the method. The most common examples are StringHolder or ResultSetHolder.
The data types used in each method can be consulted through the Fluig Studio Service View. Note that, depending on the Progress® version, there may be a variation in the types of parameters used and the way they are used. If in doubt, check the documentation provided by Progress®.
Dataset Creation
Once the Progress® service is added to Fluig, you can use it at the points where the product allows customization using JavaScript, such as in the scripts for global events, process events, form definition events or Datasets.
The way to call the routines presented by service is always the same, regardless of which point is being called. However, to make it easier to understand the use of the Progress® services in Fluig and to make it easier to reproduce the examples presented in the reader's environment, all of the examples below will use Datasets as target.
As previously seen, the Datasets that will be presented here are Cost Center Types, Nature of the Cost Centers, Cost Centers and Users in Common.
Cost Center Types
The code below shows the implementation of the Cost Center Types Dataset. The explanation of each step of the implementation will be presented after the code:
dsTipoCentroCusto.js
function createDataset(fields, constraints, sortFields) {

	//Step 1 - Creates the dataset
	var dataset = DatasetBuilder.newDataset();
    dataset.addColumn("id");
    dataset.addColumn("descricao");

	//Step 2 - Calls the service registered in Fluig
	var servico = ServiceManager.getService("EMS2");

	//Step 3 - Loads the utility object for integration with Progress
    var serviceHelper = servico.getBean();

	//Step 4 - Loads the CostCenterUtils.p persistent procedure
    var remoteObj = serviceHelper.createManagedObject("CostCenterUtils");
	//Step 5 - Calls the procedure that returns a string with the CC types
    var types = serviceHelper.createStringHolder();
    remoteObj.readCostTypes(types);
	//Step 6 - Breaks the string into an array with each of the types
    var typeArray = types.getStringValue().split(",");

	//Step 7 - Add each type returned
    for(var pos = 0; pos < typeArray.length; pos++) {
        dataset.addRow(new Array(pos + 1, typeArray[pos]));
    }
    return dataset;
}
Where:
- Step 1: Creates the dataset and adds its fields;
- Step 2: The registered service invocation is made in Fluig through the ServiceManager.getService method, and the value passed as parameter should be the service code. Note that at this point there's no need to provide any connection parameter in the service, since this has already been done in your registration;
- Step 3: Use the getBean method to return a utility object for Progress® services. This utility provides a series of methods that facilitate interaction with the generated proxy and its methods will be presented in more details later in this document;
- Step 4: Loads the CostCenterUtils object in a managed way through the createManagedObject method of the previously created utility;
- Step 5: Invokes the method desired, in this case readCostTypes, passing a StringHolder which will receive the output value;
- Step 6: Transforms the String received by the parameter in an array with the options. The , (comma) character is used to determine the breaking points of the string;
- Step 7: Goes through the array created, adding a row in the Dataset for each item in the array.
The screen below shows the Dataset data view created:

Nature of Cost Centers
The Nature of Cost Centers Dataset is very similar to the cost center type Dataset. In practice, the only change is the called procedure:
dsNaturezaCentroCusto.js
function createDataset(fields, constraints, sortFields) {
	var dataset = DatasetBuilder.newDataset();
    dataset.addColumn("id");
    dataset.addColumn("descricao");
	var servico = ServiceManager.getService("EMS2");
	var serviceHelper = servico.getBean();
	var remoteObj = serviceHelper.createManagedObject("CostCenterUtils");
	var types = serviceHelper.createStringHolder();
	remoteObj.readCostNatureTypes(types);
    var typeArray = types.getStringValue().split(",");
    for(var pos = 0; pos < typeArray.length; pos++) {
        dataset.addRow(new Array(pos + 1, typeArray[pos]));
    }
    return dataset;
}
After Dataset registration, you can view its content:

Cost Centers
The Cost Centers Dataset has a structure that is very similar to the two Datasets previously seen. The main difference is that, in this case, the procedure returns a temp-table with cost centers, which changes the way data is handled.
Depending on the Progress® version, the objects used may vary. The following are examples of encoding for Progress® 9 and OpenEdge® 10, respectively. In both cases, the result presented by the Dataset will be the same.
Progress® 9 Encoding
The temp-table in Progress® 9 are treated through objects that implement the java.sql.ResultSet interface:
dsCentroCustoP9.js
function createDataset(fields, constraints, sortFields) {

	//Creates the structure of the Dataset
    var dataset = DatasetBuilder.newDataset();
    dataset.addColumn("conta");
    dataset.addColumn("titulo");
    dataset.addColumn("natureza");
    dataset.addColumn("tipo");

	//Retrieves the service and loads the remote object
    var servico = ServiceManager.getService("EMS2");
    var serviceHelper = servico.getBean();
    var remoteObj = serviceHelper.createManagedObject("CostCenterUtils");

    //Reads the current accounts
    var holder = serviceHelper.createResultSetHolder();
    remoteObj.readCostCenters(holder);

    //Goes through the records, loading the Dataset with data
    var rs = holder.getResultSetValue();
    while (rs.next()) {
        var conta 	 = rs.getObject("conta");
        var natureza = rs.getObject("natureza");
        var tipo 	 = rs.getObject("tipo");
        var titulo   = rs.getObject("titulo");

        dataset.addRow(new Array(conta, titulo, natureza, tipo));
    }

    return dataset;
}
OpenEdge® 10 Encoding
In OpenEdge® 10, the temp-tables returned are encapsulated as objects of the ProDataGraph class. This class is also used when you use parameters of the DATASET type:
dsCentroCustoOE10.js
function createDataset(fields, constraints, sortFields) {

	//Creates the structure of the Dataset
    var dataset = DatasetBuilder.newDataset();
    dataset.addColumn("conta");
    dataset.addColumn("titulo");
    dataset.addColumn("natureza");
    dataset.addColumn("tipo");

	//Retrieves the service and loads the remote object
    var servico = ServiceManager.getService("EMS2");
    var serviceHelper = servico.getBean();
    var remoteObj = serviceHelper.createManagedObject("CostCenterUtils");

    //Reads the current accounts
    var holder = serviceHelper.createProDataGraphHolder();
    remoteObj.readCostCenters(holder);

	//Goes through the records, loading the Dataset with data
    var ttCC = holder.getProDataGraphValue().getProDataObjects("ttCC");
    for (var row_index = 0; row_index < ttCC.size(); row_index++) {
        var row = ttCC.get(row_index);
        dataset.addRow(new Array(row.get("conta"),
                                 row.get("titulo"),
                                 row.get("natureza"),
                                 row.get("tipo")));
    }

    return dataset;
}
Dataset View:

Users in Common
The first difference between the users in common Dataset and the previous examples is that, in this case, you must pass a temp-table as a parameter to the procedure called.
The second difference is that the 4GL code is implemented in a non-persistent program, which changes the way the logic is called from the JavaScript code.
The third difference that can be observed in this case is that it is possible to transform a Dataset into the data types required by Progress® (ResultSet or ProDataGraph).
Progress® 9 Encoding
dsUsuariosComunsP9.js
function createDataset(fields, constraints, sortFields) {

    //Creates the new Dataset
    var dataset = DatasetBuilder.newDataset();
    dataset.addColumn("usuario");
    dataset.addColumn("nome");

	//Retrieves Fluig users
    var campos = new Array("colleaguePK.colleagueId", "colleagueName");
    var colleaguesDataset = DatasetFactory.getDataset("colleague", campos, null, null);

    //Instantiates the service
    var servico = ServiceManager.getService("EMS2");
    var serviceHelper = servico.getBean();

    //Transforms the dataset in a ResultSet (v9) and creates holder for the output
    var inputTT = colleaguesDataset.toResultSet();
    var holder = serviceHelper.createResultSetHolder();

    //Calls the procedure in Progress
    serviceHelper.getProxy().verifyUsers(inputTT, holder);

    var rs = holder.getResultSetValue();
    while (rs.next()) {
        dataset.addRow(new Array(rs.getObject("cod_usuar"), rs.getObject("nom_usuario")));
    }

    return dataset;
}
OpenEdge® 10 Encoding
dsUsuariosComunsOE10.js
function createDataset(fields, constraints, sortFields) {

	//Creates the new Dataset
    var dataset = DatasetBuilder.newDataset();
    dataset.addColumn("usuario");
    dataset.addColumn("nome");

	//Retrieves Fluig users
    var campos = new Array("colleaguePK.colleagueId", "colleagueName");
    var colleaguesDataset = DatasetFactory.getDataset("colleague", campos, null, null);

    //Instantiates the service
    var servico = ServiceManager.getService("EMS2");
    var serviceHelper = servico.getBean();

    //Transforms the dataset in a ProDataGraph (v10) and creates holder for output
    var inputTT = serviceHelper.toProDataGraph(colleaguesDataset);
    var holder = serviceHelper.createProDataGraphHolder();

    //Calls the procedure in Progress
    serviceHelper.getProxy().verifyUsers(inputTT, holder);

    var ttCC = holder.getProDataGraphValue().getProDataObjects("ttOutUsers");
    for (var row_index = 0; row_index < ttCC.size(); row_index++) {
        var row = ttCC.get(row_index);
        dataset.addRow(new Array(row.get("cod_usuar"), row.get("nom_usuario")));
    }

    return dataset;
}
Dataset:

Service Helper
A tabela abaixo apresenta a lista de métodos existentes na classe utilitária para serviços Progress®:
Retorno | Método e Descrição |
|---|---|
java.lang.Object | createBigDecimalHolder()Cria um objeto Holder para o tipo DECIMAL |
java.lang.Object | createBooleanHolder()Cria um objeto Holder para o tipo LOGICAL |
java.lang.Object | createByteArrayHolder()Cria um objeto Holder para o tipo RAW |
java.lang.Object | createCOMHandleHolder()Cria um objeto Holder para o tipo COM-HANDLE |
java.lang.Object | createDateHolder()Cria um objeto Holder para o tipo DATE |
java.lang.Object | createHandleHolder()Cria um objeto Holder para o tipo WIDGET-HANDLE (Handle) |
java.lang.Object | createIntHolder()Cria um objeto Holder para o tipo INTEGER |
java.lang.Object | createLongHolder()Cria um objeto Holder para o tipo RECID |
java.lang.Object | createManagedObject(java.lang.String objName)Lê um arquivo .p ou .r que tenha sido exposto via AppServer de forma persistente. Através deste método o provedor do serviço pode gerenciar o ciclo de vida destes objetos, liberando-os ao final da execução do script. |
java.lang.Object | createMemptrHolder()Cria um objeto Holder para o tipo MEMPTR |
java.lang.Object | createProDataGraph(java.lang.Object metadata)Cria um objeto da classe ProDataGraph |
java.lang.Object | createProDataGraphHolder()Cria um objeto Holder para o tipo ProDataGraphHolder |
java.lang.Object | createProDataGraphMetaData(java.lang.String name)Cria um objeto da classe ProDataGraphMetadata |
java.lang.Object | createProDataObjectMetaData(java.lang.String tableName, int numFields, boolean bimageFlag, int numIndexes, java.lang.String multiIxCols, java.lang.String XMLNamespace, java.lang.String XMLPrefix)Cria um objeto da classe ProDataObjectMetadata. Cria um objeto para um dataset (Temp-table). |
java.lang.Object | createResultSetHolder()Cria um objeto Holder para o tipo TABLE |
java.lang.Object | createRowidHolder()Cria um objeto Holder para o tipo ROWID |
java.lang.Object | createStringHolder()Cria um objeto Holder para o tipo CHARACTER. |
java.lang.Object | getProxy()Retorna a instância do objeto de conexão ao AppServer, já conectado e disponível para uso. O objeto remoto é a principal classe gerada pelo ProxyGen. |
java.lang.Object | instantiate(java.lang.String className)Instancia um objeto de uma classe dentro da biblioteca do proxy. |
java.lang.Object | toProDataGraph(com.datasul.technology.webdesk.dataset.DefaultDataset d)Transforma um dataset em um ProDataGraph. |
Visão Geral
Import HTML Content
Conteúdo das Ferramentas
Tarefas