 Tempo aproximado para leitura: superior a 15 minutos
Index
Statement <!DOCTYPE> HTML
When publishing a form definition, it is not recommended to use statements such as:
<!DOCTYPE>, Ex: <!DOCTYPE html PUBLIC "-//W3C//DTD XHTML 1.0 Transitional//EN" "http://www.w3.org/TR/xhtml1/DTD/xhtml1-transitional.dtd">
These statements may affect some features of the definition of the form or of the Workflow when using Microsoft® Internet Explorer® browser.
FormController
formController is the object that performs the communication between the form and the event customization. This object is available in each of the form customization events
through the form variable. The variable allows you to change the field values of a form record and also get their editing status, for example: if the
user is viewing or editing the form record. The following are the available methods for the form variable:
Method | Description |
|---|---|
| long getCompanyId() | Returns the company ID |
| int getDocumentId() | Returns the document ID (form record) |
| int getVersion() | Returns the document version (form record) |
| int getCardIndex() | Returns the form ID. |
| String getValue(String fieldName) | Gets the value of a form field |
| void setValue(String fieldName, String fieldValue) | Defines the value of a form field |
| boolean getEnabled(String fieldName) | Checks whether a field is enabled |
| void setEnabled(String fieldName, boolean enabled) | Defines whether or not a field should be enabled |
| String getFormMode() | Gets the form editing mode, and can return the following values: MOD: Form being edited VIEW: Form view NONE: No communication with the form. For example, it occurs at the moment form fields are being validated, where it is not being displayed. |
| void setHidePrintLink(boolean hide) | When set as true, it disables the form print button. |
| boolean isHidePrintLink() | Checks whether the print button is disabled. |
| Map<String, String> getChildrenFromTable(String tableName) | Returns a map containing the names and values of the child fields of a parent table. |
| void setHideDeleteButton(boolean hide) | When set as true, it disables the button to delete records in a parent-child form. |
| boolean isHideDeleteButton() | Checks whether the deletion of child records is disabled. |
| boolean getMobile() | Checks whether the form record is being accessed through a mobile device. |
Form Customization
The customization of form definition is accomplished by creating scripts in the JavaScript scripting language. The implementation code of each script is stored in a database and does not require the use of any other files, such as "plugin.p".
The customization events for form definition are created from Fluig Studio. To post a form, follow the steps according to the example below:
To create a form definition, go to the Package Explorer view and access the forms folder of the Fluig project, right click, and access New > Form Definition from the menu.
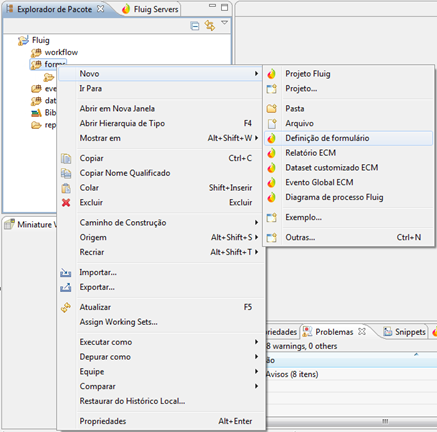
Figure 1 - New Form Definition.
In the form definition creation screen, enter the desired name and click finish.
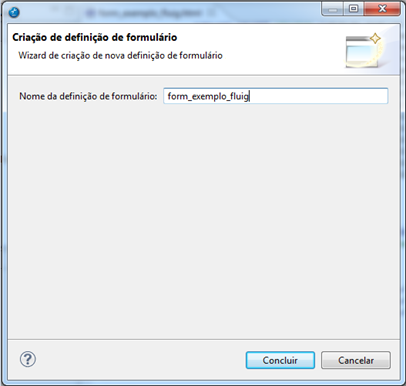
Figure 2 - New Form Definition.
When you finish, a package that refers to the form definition is created in the forms folder and the form editor is available for editing.

Figure 3 - New Form Definition.
From the editor, all the HTML content is developed. In the example, a simple registration form was developed.

Figure 4 - New Form Definition.
After creating a form definition, you can create scripts for customization. Form events are created through the following steps:
To create a form script in Fluig, go to the Package Explorer view and access the forms folder of the Fluig project, right click, and access New > Other from the menu.
Figure 5 – Creating a form definition event script.
Select the form definition Event Script option and click the Next button.
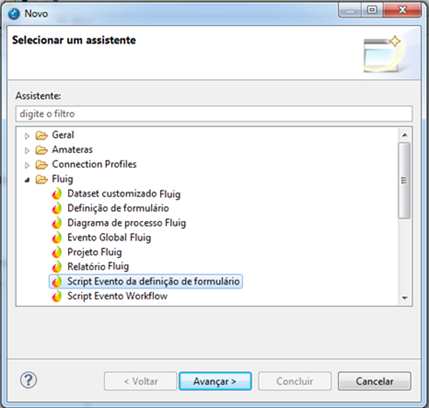
Figure 6 – Creating a form definition event script.
On this screen, enter the fields related to the event that you want to add and click the Finish button.
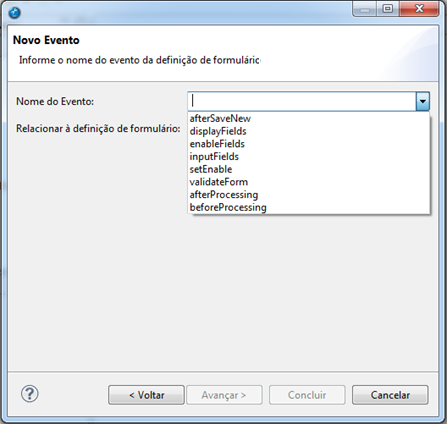
Figure 7 – Creating a form definition event script.
In the example, we have selected the event displayFields, and related it to the form definition form_exemplo_fluig.
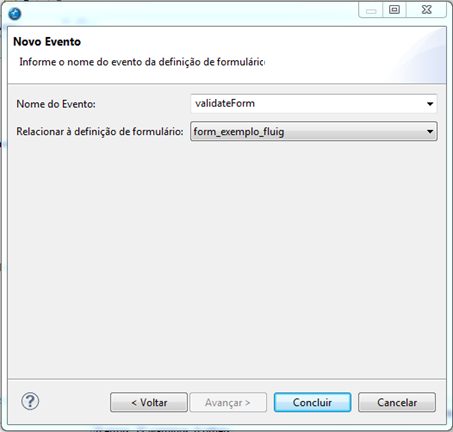
Figure 8 – Creating a form definition event script.
Upon completing the main structure of the method, it will be available in the editor.

Figure 9 – Creating a form definition event script.
The event used as example -validateForm, validates the completion of request and user fields.
The formController object was used to check the value of the fields, through the syntax 'form.getValue ("fieldname")'.
When you export the form definition, the events pertinent to these will also be exported to the Fluig server.

Figure 10 – Creating a form definition event script.
All events of the form definition receive the reference to the form. Through this reference, you can access the form fields, access/define the value of a field, and access/define the field presentation state. The details of each event are presented in the following sections of this document.
Fluig can use the execution log in the customization events. Through the global variable log, you can get feedback of the execution of each event. There are four log levels, namely:
- error: presentation of errors.
- debug: debug execution.
- warn: inform possible execution issues.
- info: presentation of messages.
The presentation of each log type is conditioned to the application server configuration. For example, in JBoss®, by default info and warn messages are displayed on the server console, and debug and error messages are displayed in the log file. Following is an example of the use of log in script:
log.info(“Testando o log info”);
At the server console we would see the message "Testing the log info".
Is it possible to know the form editing status via the form variable passed as a parameter to the form definition events. To access the edit status:
form.getFormMode()
Calling the function form.getFormMode() will return a string with the form editing mode. The following values exist for the form editing mode:
- ADD: indicating addition mode.
- MOD: indicating editing mode.
- VIEW: indicating view mode.
- NONE: indicating that there is no communication with the form. For example, it occurs at the moment form fields are being validated, where it is not being displayed.
Following are the details of events available for the customization of a form definition in Fluig.
AfterProcessing
This is the last event to be triggered for the card index. As a parameter, the event receives a reference to the form definition form.
Example:
function afterProcessing(form){
}
In the context of this event, the form variable can only be used to query the fields of the form definition, their values and presentation status.
AfterSaveNew
This event is triggered after the creation of a new form. As a parameter, the event receives a reference to the form definition form.
To get the value of a particular field of the form:
form.getValue("nome-do-campo")
Example:
 function afterSaveNew(form) {
  log.info("Colaborador de abertura: " + form.getValue("RNC_colab_abertura"));
}
The query to form fields is case insensitive. In the example above, we could get the field value using rnc_colab_abertura.
BeforeProcessing
This event is the first to be triggered. It occurs before any other form definition event. As a parameter, the event receives a reference to the form definition form.
Example:
function beforeProcessing(form){
}
In the context of this event, the form variable can only be used to query the fields of the form definition, their values and presentation status.
DisplayFields
This event is triggered when the form objects are presented. The event receives as a parameter a reference to the form definition form and the reference for the form presentation output.
In this event, you can change the values to be presented in the form field. To do this, simply use the following procedure:
form.setValue(“nome-do-campo”, “valor”);
Example:
 function displayFields(form, customHTML) {
   if ( form.getFormMode() == “MOD” ) {
     form.setValue('RNC_colab_abertura', new java.lang.Integer(1));
   }
}
Still in the DisplayFields event, you can use three methods independently or jointly to change the way the form rendering appears, delete lines of a child card index and hide the buttons "Print" and "Print in new Window".
To view the form in its original format with the disabled fields, you must use the method setShowDisabledFields.
To enable or disable the delete button on the lines of the child card index, which by default is enabled, you must use the method setHideDeleteButton.
To hide the buttons Print and Print in new window, you must use the setHidePrintLink method.
View example without using the methods:

Figure 11 – Example without using the methods.
Example using the methods setShowDisabledFields and setHidePrintLink:
function displayFields(form, customHTML) {
   form.setShowDisabledFields(true);
   form.setHidePrintLink(true);
}
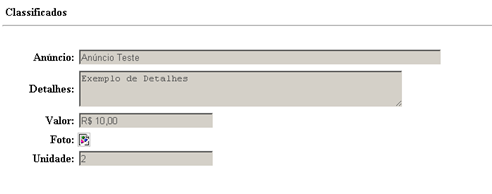
Figure 12 – Example using the methods.
View example without using the method setHideDeleteButton:
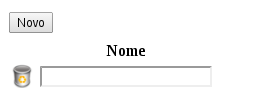
Figure 13 – Example without using the method.
Example using the method setHideDeleteButton:
function displayFields(form, customHTML) {
   form.setHideDeleteButton(false);
}
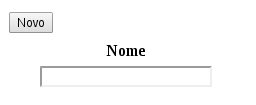
Figura 14 - Exemplo de utilização dos métodos.
It is important to note that this event is the only one that allows changing the values to be presented in form fields before rendering it.
Below is an example using the form presentation output:
if(form.getFormMode() != "VIEW")  {
    customHTML.append("<script>");
    customHTML.append("function MostraEscondeBtn_zoom()");
    customHTML.append("{");
    customHTML.append("document.getElementById(\'zoomUsuario\').className = \'show\';");
    customHTML.append("document.getElementById(\'zoomModulo\').className = \'show\';");
    customHTML.append("}");
    customHTML.append("</script>");
}
EnableFields
This event is triggered when the form objects are enabled, allowing you to disable some fields, if needed. The event receives as a parameter a reference to the form definition form.
To enable or disable a form field, run the following procedure:
form.setEnabled("nome-do-campo",true/false)
Where "true" enables the field and "false" disables the field.
Example:
function enableFields(form) {
    if ( form.getFormMode() != 'ADD' ){
		form.setEnabled("rnc_area",false);
        form. setEnabled("rnc_tipo_ocorrencia",false);
    }
}
Please note that the event occurs at the moment of rendering the form, and it is the only one that allows you to change the presentation status of the form fields.
Another way to disable the fields is using JavaScript commands implemented directly into the form functions. However, in this case, you are not allowed to use thedisabled property, because the fields will not be saved when you save the card. For this situation, you must use the readonly property, as in the example below:
document.forms['nomeForm'].nomeCampo.setAttribute('readonly',true);
InputFields
This event is triggered when the form data is passed to the BO responsible for Fluig form. The event receives as a parameter a reference to the form definition form. Example:
function inputFields(form){
}
SetEnable
This event can be executed in different form definition events. This event is not implemented automatically in the customization of the form definition.
Example:
function setEnable() {
  log.info(“Teste de chamada de função”);
}

function displayFields(form, customHTML) {
  setEnable();
}
ValidateForm
This event is executed before writing the form data in the database. The event receives as a parameter a reference to the form definition form. In case of validation errors of form data, this event will return an error message.
Example:
function validateForm(form) {
   if (form.getValue('RNC_colab_abertura') == null){
     throw "O colaborador de abertura não foi informado";
   }
}
Visual controls
In this chapter we will learn how to interact with some types of form controls that have special features, such as filling in the contents of a ComboBox using Datasets.
By default, Fluig imports the jQuery JavaScript library to all forms, except in cases where the form already does so. In these cases, Fluig will identify that jQuery is already defined and will not import it again. If the form uses another library that can conflict with jQuery, you must define in the form the javascript variable fluigjQuery with a false value, so that Fluig will no longer import it. However, some other features will also be disabled, such as the mask of Fluig fields.
Field Mask
Many fields in a form have a specific format to its content, such as dates, ZIP CODE, social security number, among others.
To assist the developer of forms, Fluig allows to enable masks by field, by providing the "mask" attribute and the mask you want for input objects of type text.
Exemplo de utilização de máscaras
<input name="cep" type="text" mask="00000-000">
To elaborate the mask, you can use:
Code | Description |
|---|---|
| 0 | Only Numbers. |
| 9 | Only numbers plus optional. |
| # | Only numbers plus recursive. |
| A | Numbers or letters. |
| S | Only letters from A-Z and a-z. |
Outros exemplos de utilização de máscaras
                     Data: "00/00/0000"
                  Horário: "00:00:00"
              Data e Hora: "00/00/0000 00:00:00"
                      CEP: "00000-000"
                 Telefone: "0000-0000"
            Telefone(ddd): "(00) 0000-0000"
Telefone(ddd + 9ºdígitos): "(00) 90000-0000"
           Placa de carro: "SSS 0000"
                      CPF: "000.000.000-00"
                     CNPJ: "00.000.000/0000-00"
                       IP: "099.099.099.099"
              porcentagem: "#00.000,00%"
				    Valor: "#00.000.000.000.000,00"
If the import of the jQuery library is disabled through the fluigjQuery variable, the mask feature will also be disabled.
ComboBox
It is often necessary to populate a ComboBox in a form with a certain group of values.
In Fluig, this is possible through the use of Datasets. Datasets are standard data services offered by Fluig, such as the product "Volumes" service.
To enable the Dataset in the ComboBox, simply use the following construction:
<select name="RNC_volume" id="RNC_volume" dataset="nome-dataset" datasetkey="chave" datasetvalue="valor" addBlankLine=”false”></select>
Where:
- dataset is the Dataset name.
- datasetkey is the record key.
- datasetvalue is the value of a particular record field.
- addBlankLine is what defines whether the first row of the combo will be a blank value.
Example:
<select name="RNC_volume" id="RNC_volume" dataset="destinationVolume" datasetkey="volumeID" datasetvalue="volumeDescription"></select>
In the above example we are listing in a ComboBox all the Volumes registered in Fluig.
If you need to order the data coming from an internal dataset, we indicate the creation of a customized dataset that runs inside and orders the data before feeding the combobox component.
To use a ComboBox with only one option, you should not use special characters and spaces in the value of the option tag.
Examples:
- Correct way
<select>
  <option value="te">Teste</option>
</select>
- Incorrect Way
<select>
  <option value="te te te">Teste</option>
</select>
Zoom
Allows querying entities and other forms created in Fluig so the user can select data.
Access to this component is conducted from a Javascript call in the HTML of the form definition.
"/webdesk/zoom.jsp?datasetId="+dataset+"&dataFields="+campos+"&resultFields="+resultFields+"$type="+"&title="+titulo
Where:
- title: is the title for the zoom window.
- datasetId: is the name of the dataset (Built-in, CardIndex or Customized).
- dataFields: are the names of the fields to be displayed.
- resultFields: are fields that should be returned to the record selected by the user.
- likeField: the name of the field to filter data (if required).
- likeValue: the value to be used in the data filter (if required).
PLEASE NOTE: This parameter is only valid for internal datasets. Customized Datasets do not allow the use of filters.
- To get the record selected by the user, we should add the following JavaScript function to the process form:
function setSelectedZoomItem(selectedItem) {
}
Where selectItem is the record selected by the user in the zoom screen.
Important
The same function "setSelectZoomItem" is used to receive the result of all calls to zoom. Thus, to distinguish each call, the type parameter was created. This parameter is returned in selectedItem and can be used to differentiate the calls to zoom.
- To access a field of the selected record:
selectedItem["fieldName"]
Where fieldName is the name of the field to return that was defined in the zoom call. To obtain the record , the Fluig Zoom component was developed to allow the zoom feature to be used in form definitions.
In order to be able to view and retrieve information from the "metadata" fields of the form, you must use the following naming convention:
metadata_id | Returns the card code |
medatata_version | Returns the card version |
metadata_parent_id | Returns the Parent folder code |
metadata_card_index_id | Returns the card index code |
metadata_card_index_version | Returns the card index version |
metadata_active | Active version |
Below is an example of code used for viewing and recovering these values:
function zoomFormulario(titulo, dataset, campos, resultFields, type){
	window.open("/webdesk/zoom.jsp?datasetId="+dataset+"&dataFields="+campos+
	"&resultFields="+resultFields+"&type="+type+"&title="+titulo, "zoom", "status , scrollbars=no ,width=600, height=350 , top=0 , left=0");
}
The use of PK in filters when using dataset of Group, Role or User is optional, however the same value used in the zoom URL should be used to obtain the selected value, as in the example below.
function setSelectedZoomItem(selectedItem) {
	alert("Grupo: " + selectedItem['groupId'] + " Colaborador: "+ selectedItem['colleagueGroupPK.colleagueId']);
}

<input type="button" class="btZoom" onclick="zoomFormulario('title', 'colleagueGroup', 'groupId,Codigo,colleagueGroupPK.colleagueId,Matricula','groupId,colleagueGroupPK.colleagueId', 'nofield');">
To use filters, the call is similar to that of dataFields.
For example:
window.open("/webdesk/zoom.jsp?datasetId=preCad&dataFields=codigo, Código, descricao, Descrição&resultFields=descricao&type=precad&filterValues=metadata_active, false","zoom" , "status, scrollbars=no, width=600, height=350, top=0, left=0");
In this example, the zoom will return only inactive cards.
External Zoom
In situations where the data of the elements external to Fluig are too bulky, it is recommended the construction of an external application to Fluig that will serve as zoom to the user. Below is described a JavaScript technique where you can call an external application and the same may return the data requested by the user to a field in the Fluig form.
The first step towards implementation of this technique is to create a logic in JavaScript that will open a new window by calling the external application that will behave like zoom onto the form. We will use and explain the command window.open in this example:
Window.open(URL Aplicação Externa, Nome da Janela que será aberta, comandos adicionais)
Where:
- External Application URL Is the url of the external application that will function as zoom for Fluig. E.g.: http://servidor/applications/forneczoom.asp.
- Window Name: Name of the window that will be used by the user's browser as an identifier. To avoid overlapping content in the window, it is recommended that a different name is added for each zoom called for the same form. E.g.: "ZoomFormec".
- Additional Commands: Additional commands used to create the window that will contain the zoom application. E.g.: “width=230, height=230”.
Note
Due to a browser restriction, the url of the zoom program external to Fluig must be located in the same domain as Fluig. Otherwise you will not be able to assign to the form field the value chosen for the zoom. This problem occurs because browsers prohibit the practice of cross-domain JavaScript coding.
The code below will schedule a Fluig form containing a field and a side button that will call an external application window.
<form name=”FornecedorForm”>
  Código do Fornecedor:
  <input name=”cod_fornec” size=’10” value=”” type=”text”>
  <input value=”lista” onClick=”mostraLista()” type=”button”>
</form>

<script language=”JavaScript”>
   Function mostraLista() {
     Window.open(“fornecedores.html”, “list”,”width=230,height=230”);
   }
</script>
The second step is to schedule within the external application a JavaScript function to return to the form field the value chosen for the user in the external application. This external application can be developed on any existing web development technology in the market that can carry out the execution of JavaScript scripts on the client side. Following is an example of a JavaScript function that passes the value to the form field:
<script language=”JavaScript”>
   function escolha(valor) {
       // The following line tests whether the fluig form window that opened the zoom window is still open
       if (window.opener && !window.opener.close) {
              // sets the value for the field
              window.opener.document.(form id in Fluig form).(field name).value = value;
       }
       // Closes the zoom application window
       window.close();
   }
</script>
Where:
- Form id in Fluig form: If any id has been defined for the tag <form> in the Fluig form, it should be referenced it in this command. You can also use the collection reference forms within the command (forms [position]).
E.g.: FornecedorForm, forms[0].
- Field Name: Name of the field that will receive the value passed to the function.
E.g.: cod_fornec. - Value: Data that will be passed to the Fluig form field.
The following example will set an external zoom made entirely in HTML with static data only for illustration. The zoom data can come from any source, whether it is internal or external to Fluig.
<html>
  <head>
  <title>List of suppliers</title>

<script language="JavaScript">
function escolha(valor) {
  // Opener validity test
  if (window.opener && !window.opener.closed) {
      // writing the value of the cod_fornec field
      window.opener.document.forms[0].cod_fornec.value = valor;
  }
   window.close();
}
</script>

  </head>
  <body>
  <!-- The data below are fixed but could be mounted from any source. -->
  <table border="1" cellpadding="5" cellspacing="0">
  <tbody><tr bgcolor="#cccccc"><td colspan="2"><b>ECM application example</b></td></tr>
  <tr bgcolor="#cccccc"><td><b>Code</b></td><td><b>NASDAQ</b></td></tr>
  <tr><td><a href="javascript:escolha('TOTVSv3')">TOTVS</a></td>
  <td><a href="javascript:escolha('TOTVSv3')">TOTVSv3</a></td></tr>
  <tr><td><a href="javascript:escolha('RM1')">RM</a></td>
  <td><a href="javascript:escolha('RM1')">RM1</a></td></tr>
  <tr><td><a href="javascript:escolha('DTS3')">Datasul</a></td>
  <td><a href="javascript:escolha('dts3')">Dts3</a></td></tr>
  <tr><td><a href="javascript:escolha('Lgx2')">Logix</a></td>
  <td><a href="javascript:escolha('Lgx2')">Lgx2</a></td></tr>
  </tbody>
  </table>
  <!-- End-of-data->
  </body>
</html>
To put the example in practice on the product, simply publish the definition of the following form informing the external zoom file as an attachment to the form definition.
When you click one of the items in the zoom screen, the JavaScript function of choice will be called, which will send the value to the cod_fornec field in the Fluig form.
Data Services
Fluig features integration with two types of data services, namely: Dataset and External Services. Both can be used in all events available for customization of form definition.
Dataset
It is a data service that provides access to information, regardless of the data source. Fluig provides internal Datasets that enable access to entities, such as Users, User Groups, among others. See the Fluig Dataset registration to obtain the complete list of available Datasets and their respective fields.
Note
The examples below use the getDatasetValues function, available only to the entity and form definition Datasets (when the number of the form definition is provided). Refer to the Dataset Customization Reference Guide to learn about how to use customized Datasets.
In getDatasetValues function, NOT all field values are returned for safety reasons. To obtain all the data, DatasetFactory is used, exemplified in Dataset Customization.
For example, to access the Dataset of Fluig users in the displayFields event of a form definition:
function displayFields(form,customHTML) {
     // Getting the user via dataset
     filter = new java.util.HashMap();
     filter.put("colleaguePK.colleagueId","adm");
     usuario = getDatasetValues('colleague',filter);
     form.setValue('RNC_colab_abertura',usuario.get(0).get("colleagueId"));
}
It is also possible to call the Datasets within the form definition through JavaScript functions.
Access to Datasets can also be performed directly in the form of the form definition. For example, to access the user’s Dataset and enter the values in the HTML fields:
  <html>
    <head>
        <title>
            Teste XMLRPC
        </title>
        <script language="javascript">
            function init(){
                var filter = new Object();
                filter["colleaguePK.colleagueId"] = "adm";
                var colleagues = getDatasetValues("colleague", filter);
                if(colleagues.length > 0){
					document.getElementById("colleagueName").value = colleagues[0].colleagueName;
                	document.getElementById("colleagueId").value = colleagues[0].colleagueId;
               	 	document.getElementById("login").value = colleagues[0].login;
               	 	document.getElementById("extensionNr").value = colleagues[0].extensionNr;
					document.getElementById("groupId").value = colleagues[0].groupId;
					document.getElementById("mail").value = colleagues[0].mail;
                }else{
                    alert("No User Found");
				}
            }
        </script>
    </head>
    <script src="../vcXMLRPC.js"></script>
    <body onload="init()">
    <form id="form1">
        <b> User Name: </b>
        <input type="text" name="colleagueName" id="colleagueName" />
	    <br><br>
		<b> User Registration: </b>
        <input type="text" name="colleagueId" id="colleagueId" />
		<br><br>
		<b>User Login:</b>
        <input type="text" name="login" id="login" />
        <br><br>
		<b> User Extension: </b>
        <input type="text" name="extensionNr" id="extensionNr" />
        <br><br>
        <b> User Group: </b>
        <input type="text" name="groupId" id="groupId" />
        <br><br>
        <b> User Email: </b>
        <input type="text" name="mail" id="mail" />
        <br><br>
    </form>
    </body>
</html>
The Dataset for form definition uses the same call from the entity Dataset, as in the case of the user. However, instead of passing the name of the Dataset as a parameter, we will pass the number of the form definition. For example:
function displayFields(form,customHTML) {
     // Getting the user via dataset
     filter = new java.util.HashMap();
     filter.put("RNC_nr_solicitacao",new java.lang.Integer(20));
     fichas = getDatasetValues(Number(676),filter);
	 log.info("Usuário de Abertura: "+ fichas.get(0).get("RNC_colab_abertura"));
}
Download of example of Form Combobox and Dataset: form.html.
DataService
It is a data service that allows access to third-party applications through Fluig. This data service supports two types of connections, namely: AppServer of Progress® and Web Services.
Data services are registered and configured from the Service View function of Fluig Studio.
For more information about the registration of services, refer to: Integration with External Applications And for information on the use of services in events, refer to:Workflow Customization.
Parent Child
The Parent X Child technique has been modified and now the position of the tag tablename is within the "table" tag in the html code.
In the new implemented model, the card index parser will apply the parent child changes as follows:
<table tablename="teste"> - The tablename property determines that Now below this table a parent child system will be implemented within the form definition. The <table> tag will have its parameters scanned in search of other parameters related to the technique that will be explained later in this text. Another <table> will be created around the main table which will contain a button that allows you to add new children. This does not occur only in cases where the property noaddbutton is also provided along with the property tablename.
<TR> (first below the table) - The first <TR> tag found within the table is viewed as a tag that will contain the labels from the parent child table A <TD> column will be added to this tag containing the icon and the function of eliminating existing children in the screen. This new column is the first column on the left of the table.
<TR> (Second below the table) - The parent child technique will hide the original <TR> line and transform it in its "master template" for creating the children of that table. Each time the button "new" is clicked, the entire set of existing fields within that second <TR> will be replicated in the screen with the initial data defined for these fields.
</table> - End of the scope of the technique.
The technique also supports new attributes that can be passed or used to customize the parent and child technique. They are:
noaddbutton - Removes the "add" button from the screen when the form is edited. This allows the developer to choose where he will place the function that will create the children in the screen, and can tie the function call to a text link or a figure, or to another html object.
<table tablename="teste" noaddbutton=true>
nodeletebutton - Removes the button "bin" from the screen when editing the card. This allows the developer to prevent the deletion of records or define another way of executing the function that will remove the children from the table.
<table tablename="teste" nodeletebutton=true>
addbuttonlabel - Determines what text will be put in the button to add children of the technique. If it is not provided, the button will come with the default text (new).
<table tablename="test" addbuttonlabel="Add new ingredient">
addbuttonclass - Allows you to define which css class will be used by the button. This css class should be available in the html document in the card index.
<table tablename="teste" addbuttonclass="wdkbuttonClass">
deleteicon - Allows you to determine what will be the image that will serve as the child deletion icon in the screen. This image should be an annex to the form definition and should be provided in the class as any image used as attachment in the form definition.
<table tablename="teste" deleteicon="teste.jpg">
customFnDelete - Allows customization of the function that is called when you click the button that deletes a child of the table. The custom function must be available in the html document of the form definition and must call the default function.
<table tablename="test" customFnDelete="fnCustomDelete(this)">
    function fnCustomDelete(oElement){
    //Customization
	alert ("Deleting child!");
    // Default function called, DO NOT REMOVE
    fnWdkRemoveChild(oElement);
    //Customization
    alert ("Child deleted!");
}
You can use the combination of one or more attributes in the same parent child table. However, if the noaddbutton property is used, the values of the propertiesaddbuttonlabel and addbuttonclass will be ignored. An error message will not be generated in the post or versioning of this form definition. However, when the form is edited, it will not present the default button that allows you to register new children in the form definition. The deleteicon property is not affected by the propertynoaddbutton. Example of combined use of parameters:
<table tablename="teste" addbuttonlabel="Adicionar novo ingrediente" addbuttonclass="wdkbuttonClass" deleteicon="teste.jpg">
- The Parent Child 2.0 technique is not backward compatible with the first implementation. Form definitions that were made with the first technique should be reworked to use this new technique.
The Parent Child 2.0 technique does not accept all html components, but accepts the main ones. The types of components approved by the product are: text, radio button, checkbox, select, select multiple, hidden, textarea, image and button. Download of Parent x Child Form example: form.htm.
Fields of a parent and child table are not available to be used as description of the cards in the form configuration.
Parent Child Radio Button
In order to use radio button fields, in addition to the standard definition of the html component, you must use the 'value' attribute for the data to be saved correctly.
<table border="1" tablename="test" addbuttonlabel="Add Child"  nodeletebutton="true">
	<thead>
		<tr>
			<td><b>Name</b></td>
			<td><b>Age</b></td>
			<td><b><font face =	"arial" size=5 color ="blue">Yes:</b></td>
		 	<td><b><font face = "arial" size=5 color ="blue">No:</b></td>
	 	</tr>
	</thead>
	<tr>
		<td><input type="text" name="nomefilho"></td>
		<td><input type="text" name="idadefilho"></td>
 		<td><input type="radio" name="nameradiofilho" id = "idsimfilho" value="ant_yes"></td>
	 	<td><input type="radio" name="nameradiofilho" id = "idnaofilho" value="ant_no"></td>
	</tr>
</table>
Parent Child Form Events
To facilitate data handling in a customized form that makes use of the technique Parent Child, the following methods are provided. Both are called from the form object that is passed as a parameter in the form customization functions.
getChildrenFromTable
This event returns a map with all the child fields of a Parent Child from its tablename.
getChildrenIndexes
This event returns the indexes of the records (rows) contained in a Parent Child from its tablename.
Example:
function validateForm(form){
    var indexes = form.getChildrenIndexes("tabledetailname");
    var total = 0;
    for (var i = 0; i < indexes.length; i++) {
        var fieldValue = parseInt(form.getValue("valor___" + indexes[i]));
        if (isNaN(fieldValue)){
            fieldValue = 0;
        }
        total = total + fieldValue;
        log.info(total);
    }
    log.info(total);
    if (total < 100) {
        throw "Request Total Value cannot be less than 100";
    }
}
Forms for mobile devices
With the addition of forms that support the view in mobile devices, you can move Workflow requests through these devices and fill in the HTML form definition information, ensuring greater mobility and agility to perform workflow request movements.
To include a new card index with support from mobile devices, perform the standard procedure to export the form definition and select the fields that will compose the mobile form in the screen before the conclusion of the export. After the export, another HTML file will be added and it will be marked as "mobile" in the forms folder of the Fluig project.
The following image shows the mobile selection screen at the export of a form definition:

Figure 15 - Mobile form definition.
After being exported, the form must be as follows:

Figure 16 - Mobile form result.
Parent Child pages for mobile devices
The fields that employ the parent and child technique are not inserted into the form generated automatically for mobile devices by Fluig. However, the product allows you to develop a customized form for mobile devices by querying these fields.
It is not possible to edit parent and child fields through mobile devices, even in customized forms. Only query.
The query to parent and child fields on mobile devices is performed by means of javaScript functions available within the masterList object when the form is displayed. They are:
getValue
Returns a string with the value of a parent and child field, receiving as parameters the sequence number of the child, and the name of the field.
masterList.getValue(sequence,field);
getValues
Returns an object with all the values of the parent and child fields, grouped by the sequence number. This method has no parameters.
masterList.getValues();
getValuesBySequence
Returns an object with all the values of the fields of a given sequence. Receives the sequence number as parameter.
masterList.getValuesBySequence(sequence);
getValuesByField
Returns all the sequences and values of a given field. Receives the name of the field as parameter.
masterList.getValuesByField(field);
Examples: Parent Child Forms + Events
Translation of forms
To translate forms, you need to use the function i18n.translate ("literal_da_tradução") in the sections of the HTML file that should be translated, as in the following example:
<label>i18n.translate("nm_cliente")</label>
<input name=”nm_cliente”>
<br>
<label>i18n.translate("contato_cliente")</label>
<input name=”contato_cliente”>
The literals and their corresponding values are provided in property files with the extension .properties for each desired language. The languages supported for translation are the same supported by Fluig:
- Portuguese (pt_BR);
- English (en_US);
- Spanish (es).
The files containing the literals have the following naming convention:
- Portuguese: nome_do_formulario_pt_BR.properties;
- English: form_name_en_US.properties;
- Spanish: nome_do_formulario_es.properties.
The property files are created according to the steps below:
To generate the property files in Package Explorer, you should access the form’s HTML file to be translated, right click it and access the option Externalize Strings.
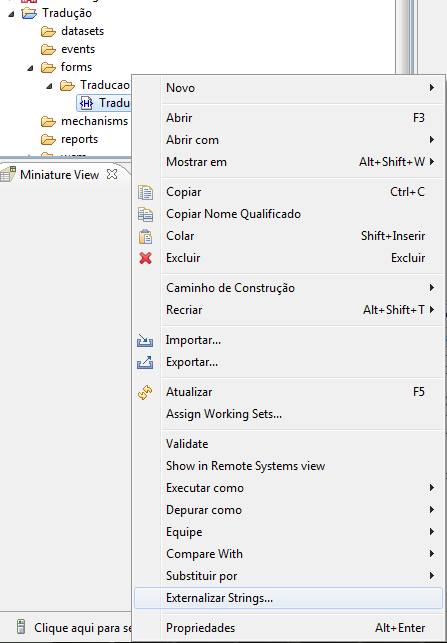
Figure 1 - Context Menu to Externalize Strings.
The files containing the literals are created in the form folder.
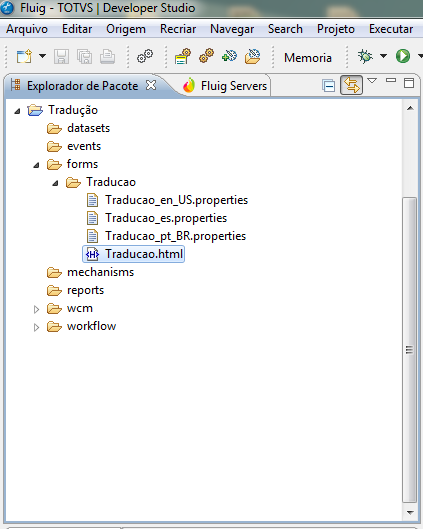
Figure 2 - Property Files in the Form Folder.
Provide the values corresponding to the literals to the language of each file.
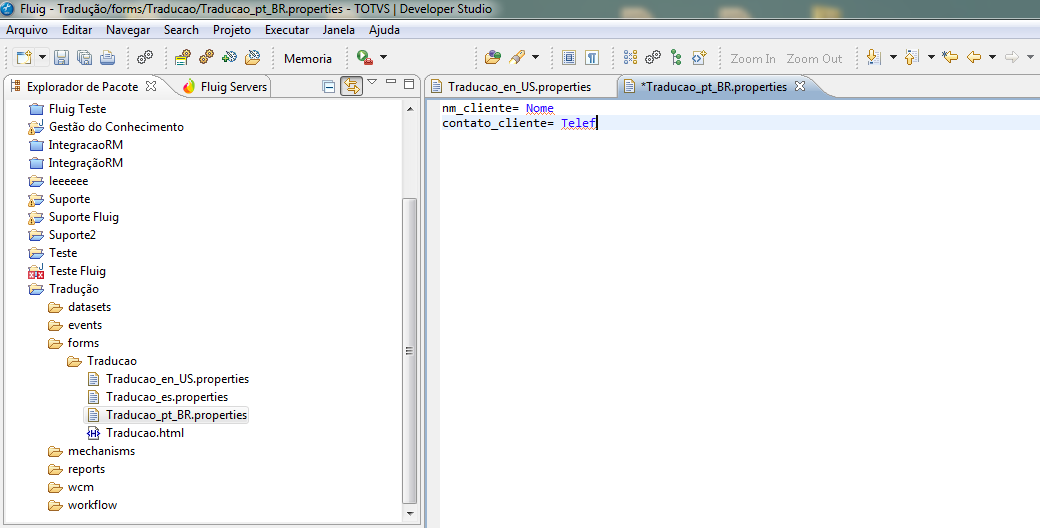
Figure 3 - Editing a Property File.
When you export a form to Fluig, the property files containing the literals are published as attachments.
The form is presented in the language configured for the current user.
Visão Geral
Import HTML Content
Conteúdo das Ferramentas
Tarefas