Index
Purpose
Enables the configuration of fields and their positions, filters and access of users to the processes search.
It also allows the user to validate the user selected.
The parameter MV_JCFGFIX enables you to define whether the configuration of the search has fixed or configurable fieds
Notification
Resolution nº 65, from December 16, 2008, in relation to Resolution nº 12 from the National Counsil of Justice, from February 14, 2006, which creates the Bank of Solutions of the Judicial Power,
standardizes the number os processes in the scope of the Judicial Power, aiming at enabling the access to process information, jurisdictiona provision.
This standardizing process unifies the process number to be kept in all courts, enabling the communication among the Judicial bodies, enabling the follow up of the process by the jurisdicional process.
The structure of the number composition has twenty digits, specific for the identification of the processes by source unit, the filling of the process, body or segment of Judicial Power,
Court of the respective segment or circuit court, providing major safety and celerity to the claimants, eliminating memorization of several numbers of processes of the same demand.
Definition of number CNJ is:
NNNNNNN–DD.AAAA.JTR.OOOO
Where:
NNNNNNN = sequence number of process in the year;
DD = verification digit;
AAAA = year;
JTR = identification of legal body;
OOOO = origin of process.
Configure parameter MV_JNUMCNJ with 1=Yes for validation of number of process or 2=No. The system assumes as standard value 2, which is, not validate.
Mind Map

In the main page of the routine, these options are available:
Enables to create typs of Legal Subjects based on types of standard subject of the System. Enables to add forms, fields and researches to this types
Note
Codes from 001 to 050 are configured as default, which is, you cannot change the forms.
The fields with the indication (*) are mandatory;
Fill out information according to guidelines described in Main Fields.
See also the functionalities available in Other Actions.
When entering the field Code the field Description is automatically filled out.
Use magnifier or F3 key to perform a standard query for field where it is placed
To edit it, find the item to be edited;
Some fields are shading, which means they cannot be edited;
Filled out information according to guidelines described in Main Fields.
See also the functionalities available in Other Actions.
After perfoming the adjustment, click:
- Close (to exit without saving edition);
- Save and Create New (save the change and keep the form for a new addition)
- Confirm (saves edition and returns to home page)
Access routine, and view registered data;
To view, place the item to see;
Click option View, the system displays the register screen.
This option does not enable to edit.
Enable the search for information with the use of filters ordering them, based on the selected index considering, for example, branch+code.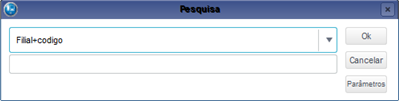
When accessing the routine, all existing registers are displayed;
To delete, first, place the item to delete;
Click option Other Actions / Delete;
On the top of the screen, view this shading message:
Do you really want to delete the item below?
This option can be undone after the confirmation of deletion.
Check it, then to confirm click:
- Close (to exit without saving deletion);
- Confirm (delete item and return to home page).
Select the desired table available in Forms tab, choose fields and add them. to the left, view the fields to add and to the right, view the fields already configured.
Note:
To the left, fields that may be added are displayed.
To the right, fields already configured are displayed.
Important
When a configured field for the source subject is no longer necessary in this subject, use tab Exception Fields to remove it.
When activating this option, view notification message indicating there is updating in the fields NAME TABLE and TERM of the tab Configure Field, so tables have their names according to Company/Branch.
To confirm, click Yes
The presentation of the Main tab is sub-divided in these grids
Place cursor in the field Table, click it to use the standard query.
Select desired table and confirm it.
The field Description is automatically filled out.
Place cursor in the field Search Code, click it to use the standard query.
Select desired table and confirm it.
The field Search is automatically filled out.
Posicione o cursor no Campo, clique F3 para utilizar a consulta padrão.
Selecione o campo desejado e confirme.
O campo Descrição é preenchido automaticamente.
Place cursor in the Field, click it to use the standard query.
Select desired field and confirm it.
The field Description is automatically filled out.
Place the cursor in the field Parameter, then enter parameter.
Enter the content for the fields Parameter Tp., Description and Content.
Place cursor in the field Report Search, click F3 to use the standard query.
Repeat this procedure for fields Config. Tp., Field Name. and in the field Visible defines with Yes or No
Select the desired contents, then confirm it.
We use this option to configure researches of processes, warranties, follow-up and progress, linking fields to execute filters.
It also has a grid configuration in which we can indicate the fields viewe as an answer to the research.
Requirement
There are fields registered for filter.
Follow these procedures to execute the configuration:
- Click option New placed to the left of the screen;
See the screen provides these sub-tabs:
- Add Field.
- Delete Field.
- Add All Fields.
- Delete All Fields.
2. In the first field, on the top left of the screen, enter the name of the research and in the list of options below, indicate whether it is a search of 1 - Process,2 - Follow-ups, 3 - Warranties or 4 - Progress.
3. Use these options:
- Add Field.
- Delete Field.
- Add All Fields.
- Delete All Fields.
4. Click Save.
5. Click Grid.
6. Add manually the configuration Start Config (this option is only executed when research in evidence is linked to only one type of legal subject).
In the option Grid Order, we can adjust the order of the configured fields so they are visible on screen as we indicate.
Note:
We can add all registered fields using the option Add All Fields.
To enable the fields for configuration of the search, you must register Configure Field.
This option enables the addition of filter fields for the configuration.
Tip:
You can enable the multiple research in the research fields when selecting the option F3 Multiple?
For the negative research (inverted), enter Term the expression <>. For example: AND NSZ010.NSZ_NUMCAS <> #DADO#
Note
Necessary fields to organize the researches are available.
If there are imported date and the fieldsTable Name and Term bring the reference of the table with different nomenclature, that is, in use, the company 01, but if the import data is company 99, then the reference is NSZ990, when the correct is NSZ010.
To execute this adjustment in Other Actions/Update table name to correct data of table in the fields quoted.
When activating this option, view notification message indicating there is updating in the fields NAME TABLE and TERM of the tab Configure Field, so tables have their names according to Company/Branch.
To confirm, click Yes.
Note:
- To add this configuration in this tab option, view from the left to the right:
- Tables;
- Fields;
- Field Details;
- Notes;
2. On the screen footnote distributed in columns, see:
- Code;
- Description;
- Table Name;
- Field Name;
- Term;
- Owner;
- F3 Diff.;
- F3 Query;
- Return F3;
- F3 multiple?
- Research Tp?
3. Select a table, according to the Tables list.
4. Select a field, according to table fields and double click it.
5. The details of the fields are filled out. Check whether you want to edit any configuration
6. Click Save.
Important:
In case of new table, add the fields, then view the Agreement tab in the Processes routine.
Multiple negative search
- Click Add, select the table and the field to be configured to filter queries.
2. Select the field using F3 with multiple return selecting the field Multiple F3?
3. When using this type of return, edit the field term, taking into account the return of the field is in the following format: (‘valor1’, ‘valor2’), so the term of this
field must have clause “IN” instead “=”. Example: AND NT0010.NT0_COD in (#DADO#)
4. Click Save.
5. To configure a field, and using it as negative/inverted value, run step n°2 and edit the term of the field so the query is different than the value enter.
Example:
AND NSZ010.NSZ_CCLIEN <> #DADO#
6. In the Tab Configure Research click New, select the type Process then add the configured fields.
7. Click Save.
Enables the relationship between users of created searches. In this relationship, we can execute the restrictions of the access to the routines, restriction of customers, groups of customers, office, area and correspondent.
Requirements
-
- Having a registered filter field;
- Having a created search configuration;
This screen shows the data displayed in columns.
1. To Edit, Add, View use options on the screen.
2. Select the search and view the presentation of the screen divided into two parts, of which, some fields for completion are on the top, and there is separation of tabs on the bottom, as follows:
-
- Restriction - Customers;
- Access Routines;
- Restriction - Customers Group;
- Restriction - Office;
- Restriction - Area;
Note
The Access and Restriction grids are used for configuration of web access.
3. The option Other Actions/Create how copy the selected configuration in the browser, open an addition screen with filled out data. Fill out and enter the fields according to the need.
4. After checking data, click Save.
5. The option Other Actions/Report, enables the Audit report of users access, with the presentation of all users accessing any search, through group or
direct connection with user and also the configuration/restriction of each search.
6. Wait until the generation and display of report.
Visão Geral
Import HTML Content
Conteúdo das Ferramentas
Tarefas