Objective
The objective of this document is to specify how to do the parameterization of Microsiga Protheus line to use Fluig Identity.
Minimum requirements
In order to use the integration with Fluig Identity, make sure that:
- TOTVS | AppServer is greater than or equal to build 7.00.121227P - August 12 2013
- The Lib update package from Microsiga Protheus applied in the environment is greater than August/2013
- TOTVS | AppServer is configured as the HTTP server, for more information see http://tdn.totvs.com.br/pages/viewpage.action?pageId=6064821.
* To update the environment, see our download center at the following address: http://www.totvs.com.br/suporte.
How to enable Fluig Identity
To enable Fluig Identity in Microsiga Protheus, access the Configurator module, 'Users\Policy' menu, making sure that is connected in Slave which has the HTTP configuration enabled.
When accessing the 'Policy' routine, go to the 'Security Policy' folder and, from inside that folder, select the 'Password rules' folder.
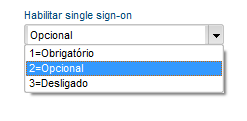
In the 'Password rules' folder enable Single Sign-On changing the value of the form field to Optional or Mandatory. When the 'Single Sign-On' field is configured as Mandatory, access to the system will only be allowed by IdP, except the Administration modules (Example: Configurator), which continue with the form of standard access enabled. If the 'Single Sign-On' field is configured as Optional, the access to the system may be performed by IdP or the traditional format.
After setting up the 'Single Sign-On' field you will need to configure the ‘Single Sign-On mode' by changing the value of the form field for the 2- Fluig Identity option.

Once it is configured, go to the 'SAML Integration' folder.
In the 'SAML Integration' folder, enter the URL of the Service Provider or SP identification in the 'Service Provider identification' form field. The URL of the SP identification is formed by:
http://<ip do appserver>:<porta http>/<EntityId>, where:
<IP do appserver>: It is the TOTVS | AppServer IP address that has the HTTP key configured.
<porta http>: It is the port entered in the HTTP key.
<EntityId>: It is the Service Provider identification key. It can be any valid text in a URL, for example: 'sp'
In the ‘List of URLs that are accepted for connection ' form field, enter the address list accepted for an Identity transaction. It is recommended to enter the list of SmartClientHTML URLs separated by the character '; ' (semicolon), example: 'http://localhost:8081;http://localhost'
The next step is to import metadata from IdM. Metadata can be provided in 3 different ways:
- File
- URL
- Text
Metadata is an XML format text that defines some security parameters between the IdP and SP, among which are the digital certificate and the IdP identification, as the example below:
<?xml version="1.0" encoding="UTF-8" standalone="no"?><md:EntityDescriptor xmlns:md="urn:oasis:names:tc:SAML:2.0:metadata" entityID="TotvsLabs"><md:IDPSSODescriptor protocolSupportEnumeration="urn:oasis:names:tc:SAML:2.0:protocol"><md:KeyDescriptor use="signing"><ds:KeyInfo xmlns:ds="http://www.w3.org/2000/09/xmldsig#"><ds:X509Data><ds:X509Certificate>MIICBjCCAW8CBgFAOxWDkDANBgkqhkiG9w0BAQsFADBJMSYwJAYDVQQLEx1Ub3R2c0xhYnMgUHJp
bWFyeSBDZXJ0aWZpY2F0ZTESMBAGA1UEChMJVG90dnNMYWJzMQswCQYDVQQGEwJVUzAeFw0xMzA4
MDExODEzMjBaFw0xODA3MzExODEzMjBaMEkxJjAkBgNVBAsTHVRvdHZzTGFicyBQcmltYXJ5IENl
cnRpZmljYXRlMRIwEAYDVQQKEwlUb3R2c0xhYnMxCzAJBgNVBAYTAlVTMIGfMA0GCSqGSIb3DQEB
AQUAA4GNADCBiQKBgQCrzk/d+HJR5iCQ4oOYPEm4Mc5TMq1NOYuxp2PmOZsNd99vIhUvnTS59blP
mz6AMLwOH20Z7nr0rog9RqiMCZLZBBnzPWprh1Hsz6bg9lrggvT8YTalUxr6ktfqp6gy08N6VSd4
jqvN5YeLllG5oeBYJA5R82vJKXBdxWIW8mex9wIDAQABMA0GCSqGSIb3DQEBCwUAA4GBADTQm7qa
+LoSu9iWb0F0THH4fX8ZaL8qDyuiVuXFBnpuw16X2Du0qmgJwM5Mp9su3w7CEdp6YGMtRJXwizSd
KsxiDEXs2aRY7pepKNRC/PEyI9lXj+nTrjL7q4mOT2V7NGxjjkzZTWWXtNJ+TEYi5pGcW4rBz+/s
w8Hbep+F6L/r</ds:X509Certificate></ds:X509Data></ds:KeyInfo></md:KeyDescriptor><md:SingleSignOnService Binding="urn:oasis:names:tc:SAML:2.0:bindings:HTTP-POST" Location="https://app.fluigidentity.com/cloudpass/SPInitPost/receiveSSORequest"/><md:SingleSignOnService Binding="urn:oasis:names:tc:SAML:2.0:bindings:HTTP-Redirect" Location="https://app.fluigidentity.com/cloudpass/SPInitRedirect/receiveSSORequest"/></md:IDPSSODescriptor></md:EntityDescriptor>
To import metadata, click the 'Import Metadata' button and follow the steps in the Import Wizard, entering the URL or the file provided by IdP. After metadata is imported, the 'Identity Provider (IdP) identification' form field will be filled in automatically.
After that, click the 'Update SP - Service Provider' button. Then you will be informed if the operation was successful or there was a problem, in case of problems, contact IdP. Lastly, the system will generate the metadata from the SP that is requested by IdM to complete the operation. If necessary, this file can be generated without having to perform the step of the metadata from IdM.
How to relate IdP user to Microsiga Protheus
Microsiga Protheus users can be related to IdP through user code, User login or user's email, and these data must be sent by IdP.
IdP/SP configuration video
Visão Geral
Import HTML Content
Conteúdo das Ferramentas
Tarefas