Histórico da Página
Index
| Índice | ||||||
|---|---|---|---|---|---|---|
|
Speaking of template classes...
Template classes aim to optimize the work of teachers. Topic and topic items (content, activities, evaluations, among others) are registered on them and all changes made in the template class are transferred to the classes that use them as a base.
...
Template class use examples:•
- When a teacher teaches the same subject in four classes, they can use a template class, so that all changes made in the template class are transferred to the classes that are based on this template without having the need to make changes in each class;
...
- The institution defines a content and evaluation template that all teachers from that subject need to follow, then the institution registers a template class and each teacher's class follows the template class proposal. All modifications in content and evaluations may only be performed in the template class and, automatically, are transferred to all the classes that follow the template.
It is possible to create multiple template classes for the same subject as well as deactivate topics and topic items of template classes. Changes in topics and topic items occurs in the same way as in independent classes and are transferred to the classes that follow the template.
Even with students studying the subject in a class, it is possible to include a template class for it, change the model class it uses or delete the template class and use its own topics.
| Nota | ||
|---|---|---|
| ||
It is important to note that when including, changing or deleting the template class, students who were using the current topic structure lose the progress on these items, and it is necessary to run new topics that will enter into force in the class due to these changes. |
| Estado | ||||
|---|---|---|---|---|
|
| HTML |
|---|
<a id="toggleAll" href="#" >Expand/hide additional information. </a>
 <script type="text/javascript">

 var abertos = 0;
 var fechados = 0;
 function contador() {
    abertos = 0;
    fechados = 0;
    jQuery(".expand-control").each( function() {
		if (document.getElementById(this.id).children[0].className != "expand-control-icon icon expanded") {
           	fechados++;
        } else {
        	abertos++;
        }
    });
 }
 AJS.toInit(function() {

    contador();
	var soma = abertos + fechados;
	$("#toggleAll").html('Expand/hide ' + soma  + ' additional information.');

    AJS.$('#toggleAll').click(function() {
        contador();
        if (abertos >= fechados) {
            jQuery(".expand-control").each(
                function() {
                    if (document.getElementById(this.id).children[0].className == "expand-control-icon icon expanded") {
                        jQuery(this).trigger("click");
                    }
                }
            )
        } else {
            jQuery(".expand-control").each(
                function() {
                    if (document.getElementById(this.id).children[0].className != "expand-control-icon icon expanded") {
                        jQuery(this).trigger("click");
                    }
                }
            )
        }
    });
});
</script> |
Basic Path
...
Create new template class
...
01. After clicking New, Template class in the subject in which to create the template class, enter the requested required information in the General information tab.
| Expandir | title | Learn more
|---|
| Painel |
Required information: Name Display inactive topics and inactive topic items in the catalog |
02. Click on the Security tab.
03. Define whether the template class should inherit the permissions of the subject to which it belongs.
| Painel | ||
|---|---|---|
Available options | ||
| Expandir | ||
| ||
The available options are: Inherits permissions Does not inherit permissions |
04. Under In Permissions, click Add to set define the access permissions to the template class, if desired.
05. Add In the pop-up window, find and select the user name, user group, class or course subject to which to assign permissions will be defined.
06. In the displayed list, select the user, user group, class or discipline to which you wish to assign permissions.
| Painel |
|---|
To find the item, use the search field – located in the upper right corner of the window – or page through the items – arrows located in the lower right corner. It is also possible to select more than one item at once. |
06. Click Add.
07. In the Level column – next to the added item –select the option that establishes 07. In the Level table, select the option that determines the permission level to be assigned to the selected itemit.
| Painel | ||
|---|---|---|
Available options:
| ||
| Expandir | ||
| ||
| The available options are: • Reading; • Execution; • Writing; • Modification; • Deletion; • Complete
For detailed information regarding each permission option, go to Catalog Permissions permissions and Restrictionsrestrictions. |
08. Click on Add.
| Expandir | ||
|---|---|---|
| ||
Users can add more than one item. When you are finished, close the window to continue the inclusion of the class. To change an item’s permissions, select the item and click Edit. To delete an item’s permissions, select the item and click Delete. |
09. Click Restrictions.
10. Click Add to include template class access restrictions, if desired.
To edit the permission on an added item, simply select the new option to be assigned to it in the Level column. To delete an added item, simply click the Delete icon –locatedin the line corresponding to the item and to the right of the Level column. |
08. In Restrictions, click Add to define restrictions to access the course subject.
09. In the pop-up window, find and select the user11. Enter the user name, user group, class or course subject to which you wish to assign restrictions.
12. In the displayed listing, select the user, user group, class or subject that you wish to assign restrictions.
13. In the Level table, select the option that determines the level of restriction assigned to the selected item.
| Painel |
|---|
To find the item, use the search field – located in the upper right corner of the window – or page through the items – arrows located in the lower right corner. It is also possible to select more than one item at once. |
10. Click Add.
11. In the Level column – next to the added item – select the option which establishes the restriction level to be assigned to it.
| Painel | ||
|---|---|---|
Available options:
| ||
| Expandir | ||
| ||
| The available options are: • Reading; • Execution; • Writing; • Modification; • Deletion; • Complete
For detailed information regarding each restriction option, go to Catalog Permissions permissions and Restrictionsrestrictions. |
14. Click on Add.
| Expandir | ||
|---|---|---|
| ||
Users can add more than one item. When you are finished, close the window to continue the inclusion of the class. To change an item’s restrictions, select the item and click Edit. To delete an item’s restrictions, select the item and click Delete. |
To edit the restriction on an added item, simply select the new option to be assigned to it in the Level column. To delete an added item, simply click the Delete icon –locatedin the line corresponding to the item and to the right of the Level column. |
12. Click 15. Click Save; or Cancel to quit the creation of creating the template class, if desired.
Alternative Paths
Edit template class
...
| Expandir | title | Learn more
|---|
| Painel |
Only users that have, at least, modification permission on the template class are allowed to perform this action. |
01. In the catalog, access the subject to which the template class belongs.
...
| title | Learn more |
|---|
...
.
02. In the Classes area, find the template class to be edited and click click the icon Edit, located in the lower-right corner of the table corresponding to the class.
03. Change the information of your choice.
...
| title | Learn more |
|---|
Information about the displayed fields can be obtained from the basic path.
04. Click Save; or Cancel to discard the changes made, if desired.
Copy template class
...
| Expandir | title | Learn more
|---|
| Painel |
Only users that have, at least, writing permission on the destination subject are allowed to perform this action. |
01. In the catalog, access the subject to which the template class belongs.
...
| title | Learn more |
|---|
...
.
02. In the Classes area, find the template class to be copied and click click the icon Copy, located in the lower-right corner of the table corresponding to the class.
...
06. Click Add and close the window.
07. Click Copy.
| Expandir | title | Learn more
|---|
| Painel |
When pressing this option, the template class copy is created in the defined location. |
Delete template class
...
| Expandir | title | Learn more
|---|
| Painel |
Only users that have, at least, deletion permission on the subject to which the template class belongs are allowed to perform this action. |
01. In the catalog, access the subject to which the template class belongs.
...
| title | Learn more |
|---|
...
.
02. In the Classes area, find the template class to be deleted and click click the icon Delete, located in the lower-right corner of the table corresponding to the class.
03. In the message displayed, click Yes to confirm the deletion of the template class or No to quit the action, if desired.
Create topic for template class
...
| Expandir | title | Learn more
|---|
| Painel |
Only users that have, at least, writing permission on the template class are allowed to perform this action. |
01. Access the template class for which the topic will be created.
...
| title | Learn more |
|---|
...
.
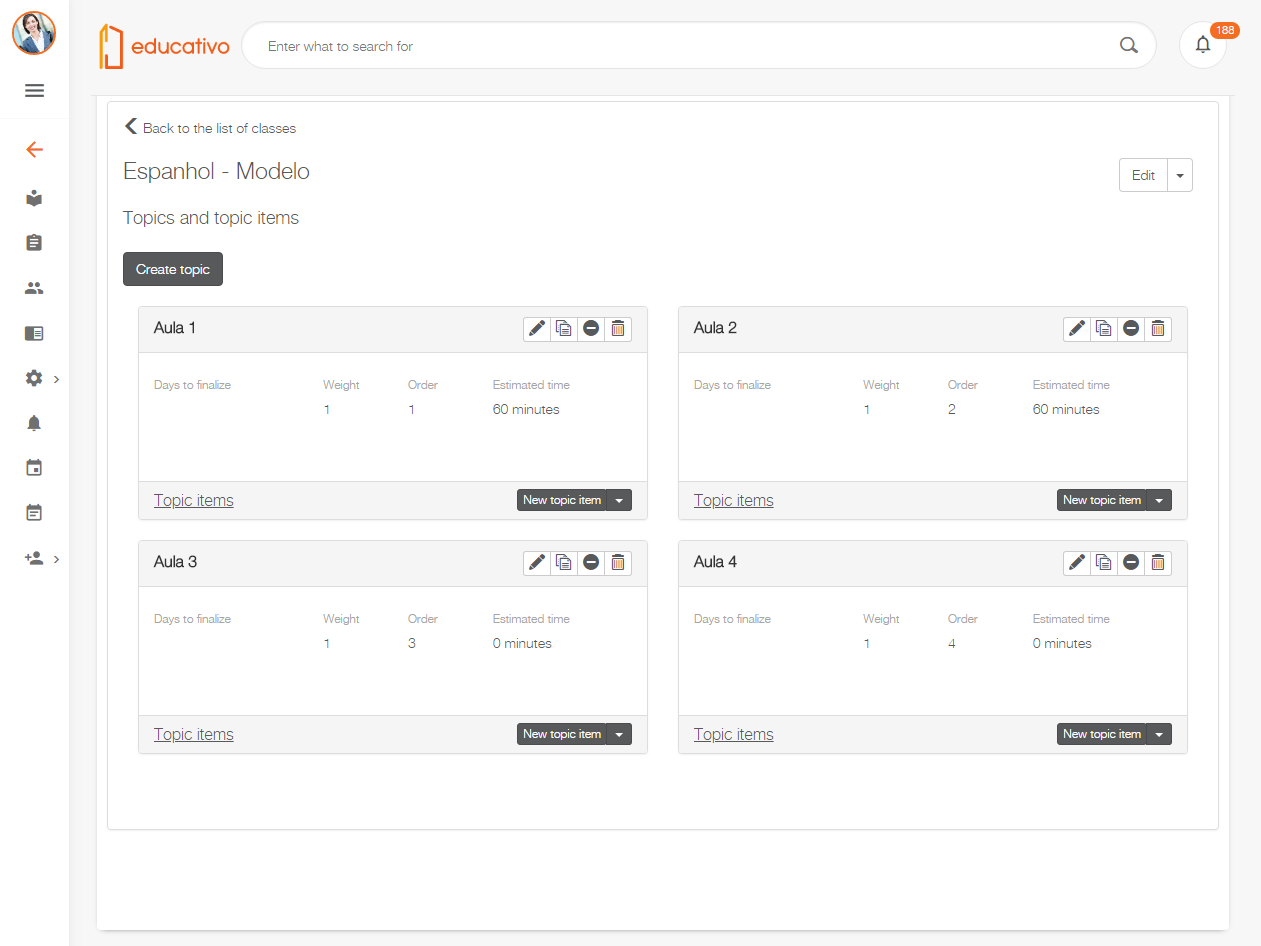
02. In the Topics and topic items area of the template class, click New topic.
| Expandir | title | Learn more
|---|
| Painel |
When pressing this option, the window to add topics is displayed. More information on available actions can be found in Topic. |
...
| Informações | ||
|---|---|---|
| ||
This documentation is valid as of the 1.56.11 2 update. If you use a previous update, it may contain different information than what you see on your platform. |
...
Visão Geral
Import HTML Content
Conteúdo das Ferramentas
Tarefas