Histórico da Página
Searches - JURA162 - Legal Management - P12
Index
Purpose
Use this routine to search:
...
Based on data returned by the research, you can edit or delete information, besides adding and adjusting values of lawsuits and issue reports.
Mind Map
Learn through this diagram the information contemplate the features of the routine: 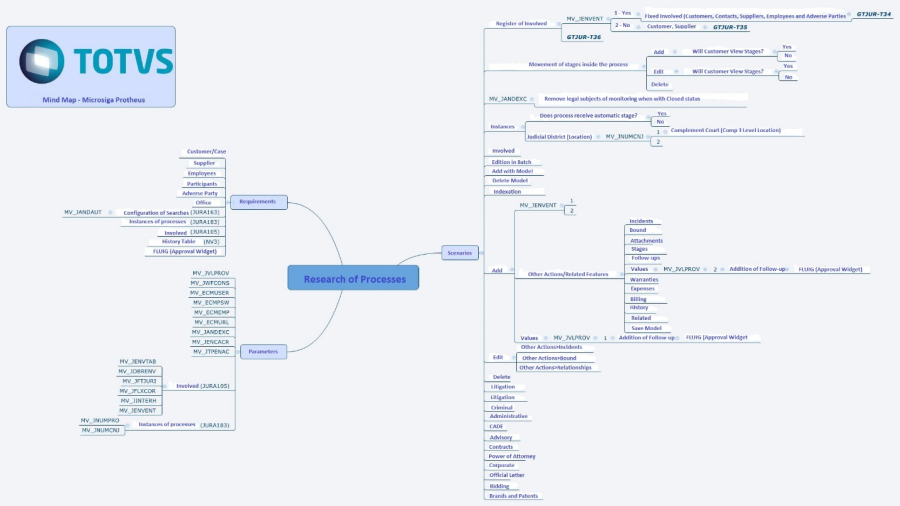
Âncora
In the main page of the routine, these options are available:
Âncora
Choose the type of Search of subject in the box of options, in the upper part of the screen.
Fill out the field(s) of filter for the search of the lawsuit and click option Search in the menu on the left of the screen;
In the grid, on the bottom part, view the lawsuit related to the applied filter. Click the record to select it;
Filled out information according to guidelines described in Main Fields.
See also the functionalities available in Other Actions.
See also the features available in Other Actions.
Clean
Exit
Âncora
Add
Configure routines:
- Index,
- Index Values,
- Adjustment Method and
- Updating Values
...
- Legal Subjects,
- Search and
- Fields.
Note
Configure parameter MV_JPROCFW to enable the addition of follow-up after registering a Lawsuit.
With this configuration, the system displays the question Do you want to register a follow-up for this lawsuit? and when confirming, the system directs to the routine:
...
Configure parameter MV_JPESPEC to enable General Search to filter information in the search of the lawsuits.
When parameter MV_JNUMCNJ is enabled and the class indicates the use of CNJ when filling out the lawsuit in the instance, if the From/To record, identify the mask, the Judicial District, location from 2nd level and 3rd level not automatically filled out.
View the distribution of the fields on the screen, divided in tabs, according to the selection of the item in the Configuration f the Search:
Fill out the Configurations and filter.
Click Search.
The system returns the records found.
Note
- The addition of the Origin Branch field is available to generate reports, when the Legal Subject is not from Corporate or Trademarks and Patents.
- Choose lawsuit, right click the mouse, view options, the select Add lawsuit in the printing queue.
- In the opened grid on the right side, right click the mouse, then select option Print lawsuit of the printing queue.
- View message Has the Adjustment of Values routine already been executed?, then confirm Yes.
- Check that there are combos on Parameters of Report screen.
- In the Config.Report field, select the option among the ones made available by the system, fill out data and confirm.
Edit
Delete
Edition in Batch
- Enter any filter on the search screen
- Select the Legal Subject then click Edition in Batch;
- View screen requesting the completion of fields that must be edited.
- Fill out, confirm, then click OK.
- After viewing the system processing screen, the confirmation screen with the amount of edited records is displayed.
- To exit, click Close.
Note
In case of any inconsistency, the system generates a message requesting the user a confirmation to proceed with manual edition. When selecting Yes, a screen to continue with edition is opened.
Âncora
Add as Model - Fill out the fields, and to confirm the addition of model, access Other Actions/Save Model, attribute a name, then confirm OK.
The lawsuit for the substitution of model is the same, then the system asks whether to overwrite file, when the same type and name are used.
Delete Model
Delete Model - Select one among the models already created, then confirm OK.
Indexation
Resend WF
Survey
Bills
Âncora
Printing Queue
To print reports or export data in Excel, right click the search grid and choose option:
...
View a new grid of Printing Queue, on the right side of the search.
Right click, then we will have options:
...
When adding records in the printing queue, the System validates whether they are different types of subjects; if positive, it informs that operation is not possible, otherwise, they are added to the queue.
When selecting Printing Concessions of Printing Queue, view the screen to select report, then wait printing. This option is only available in the Corporate subject and for users with right to access.
When issuing the lawsuit report, the System displays in the Config. Report field, only the configurations for that type of legal subject.
This configuration is performed in the Auxiliary Register Report Configuration.
Export Results
Select the Legal Subject then click Export Results;
View screen to perform configurations;
Once configure, click Print.
When option Spreadsheet option, view the screen of Generation of Spreadsheet;
Select one of the view options, conclude it, then click Confirm
Customized Export
Query this option with access atCustomized Export - JURA108 - Legal Management - P12
Stages
Follow-ups
Commitments Agenda
Warranty Statements
Configure
In the search of follow-ups, use this resource to view the commitments of all team on screen, including the use of filter.
The commitments are displayed with different background colors per result:
- Concluded -> Yellow
- Canceled -> Blue
- Pending -> Orange
Note
Teams are respectively registered with leaders and subordinates.
For a better view, add follow-ups for the participants of the team.
When not selecting a team, only the Follow-ups of the participant linked to the current user is viewed.
View the Configure option option on screen, and accessing view Wizard for the configuration of the Work Area;
The screen is explicative, then enter the possible divisions as follows:
...
Enter the amount of sections and to proceed, click Next, then start the completion of sections by indicating the vertical proportion and data of columns;
Fill out the fields, only remembering that WebBrowser option is only available in the configuration of the WebBrowser option.
The View View field and Type fields are made available when the option is Chart then proceed the configuration, click Next;
According to the amount of defined sections. Then, see the screen for configuration displayed in columns. Continue in the configurations, and to conclude, click Finalize;
Now, a well-succeeded screen of configuration is displayed, and the view of the configuration is seen on screen.
Parameter MV_JENVENT enabled
When the parameter MV_JENVENT has content 1 (enabled), place the cursor in the Entity field, and press F3 key to access the Selection of Entities screen, with the purpose of indicating the type of Entities among :-
...
After selecting the Entity click button ? to access the screen of standard query of the selected type;
Select Entity press OK to return to Involved grid;
Filled out information according to guidelines described in Main Fields.
See also the functionalities available in Other Actions.
See also the features available in Other Actions.
Parameter MV_JENVENT disabled
When MV_JENVENT parameter parameter has content entered in 2 (disabled);
...
Filled out information according to guidelines described in Main Fields.
See also the functionalities available in Other Actions.
See also the features available in Other Actions.
Incidents
When accessing Other Actions/Incidents select among:
...
Select the incident and click in one of the available option on the footer of the page, where: View, Edit, Bind, Add, Delete and/or Unbind and Exit.
Select the Contract Code and click in one of the available option on the footer of the page, where: View, Edit, Bind, Add, Delete and/or Unbind and Exit.
Related
When accessing Other Actions/Bound, the system displays the screen to select the
- Select the Legal Matter code and click in one of the available option on the footer of the page, where: View, Edit, Bind, Add, Delete and/or Unbind and Exit.
- When choosing Bind option, see the screen with fields to be filled out in the upper part.
- Fields with a magnifying glass next to it allow to query registered data.
- When finishing the registration, confirm in Binding.
Related
When accessing Other Actions/Related, the process relationships screen is accessed.
In this option, add, edit or delete relationships
Select the Destination code code and click one of the available option on the footer of the page, where: View, Edit, Bind, Add, Delete and/or Unbind and Exit.
When choosing Bind option, see the screen with fields to be filled out in the upper part. Fields with a magnifying glass next to it allow to query registered data. When finishing the registration, confirm in Binding.
Objects
When accessing Other Actions/Objects, the Objects register screen is accessed.
In this option, add, edit or delete Objects.
Warranties
When accessing Other Actions/Warranties, the Warranties register screen is accessed.
In this option, add, edit or delete Warranties.
- In concept, nor all warranties involve values in Financials, however, when an asset is pledged, configure the integration with Financials module (SIGAFIN), as follows:
- Configure parameter MV_JINTVAL with 1=Yes, to enable the integration and availability of the Fin. Integ. field on screen.
- If content of parameter is 2=No, the field is not viewed.
- Besides, configure MV_JALCADA parameter with 2 not to use the control of jurisdictions of Purchases module (SIGACOM);
- Fill out the fields of the routine and in the Fin.Integ. field, enter Yes.
Billing
When accessing Other Actions/Billing select among:
...
The completion of the Fin. Integration (item 4) with No, prevents the view of the bill, when the option is activated, upon displaying the following message Bill not found for view..
The Type Code and Currency Code fields are not editable any longer cannot be edited.
Save Model
This option is available in Other Actions/Save Model when the option is add. You can save a model with information of the process, to use the main data next registration.
Expenses
When accessing Other Actions/Expenses the following screen is accessed: Expense/Fee
In this option, add, edit or delete Expenses.
Find the Payment Term field, then select one among the options available and confirm it.
Attachments
Access Other Actions/Attachments
Configure MV_JDOCUME parameter to view the access to this feature in the routine.
anchor
History
Data presented refers to History of Legal Subject Values.
This option enables you to view the edition in closed processes.
Access Other Actions/History, view and select:
- Corresponding - presents the edition in the Correspondent register.
- Process - presents the edition in the proceeding, closed or not, because it can be reopened.
Configure [ MV MV_JTVENPH|http://tdn.totvs.com/pages/viewpage.action?pageId=239030162] parameter to block operations when the process is closed.
The MV_JFLXCOR parameter configured with 1 does not allow Corresponding in the instance, but in the Follow-ups register.
When registering Role at Workand configure the User Profile , you can define the access to records, fields, and features for trainees and lawyers.
Related Contents
- Searches - Processes
- Customized Export
- Attachments
- Search
- Legal Subject x Fields
- Brand Type
- Brand Status
- Brand Nature
- Action Type
Visão Geral
Import HTML Content
Conteúdo das Ferramentas
Tarefas