Index
| Índice |
|---|
| maxLevel | 5 |
|---|
outline | true |
|---|
| indent | 8.1.1 |
|---|
| exclude | .*ndice |
|---|
| style | none |
|---|
Purpose
Use this routine to search:
...
...
- Number of Lawsuits, through
...
- the Main or the Breakdown options, by Class, Resource or Incident, Date, Group,
...
- Customer and Store
- Stages, such as: Date, Procedural Act, Number of Lawsuit.
- Follow-ups, such as: Date, Type, Number of Lawsuit, Result.
- Warranties, such as: Date, Type, Number of Lawsuit, Value
Based on data returned by the research, you can edit or delete information, besides adding and adjusting values of lawsuits .Based on the lawsuits returned by the search, you can edit or delete information. You can also add and correct lawsuit values and issue reports.
...
Mind Map
In the following diagram, you can find information on Learn through this diagram the information contemplate the features of the routine:
 Image Removed
On 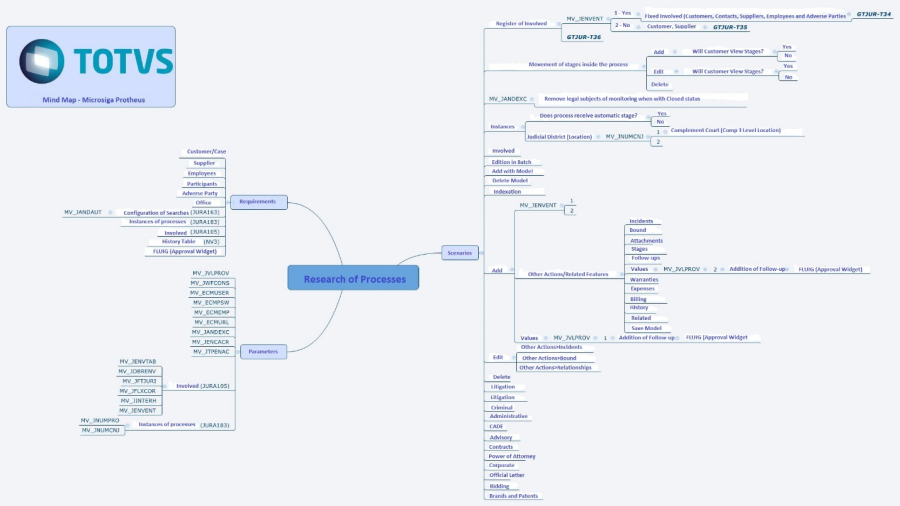 Image Added
In the main page of the routine, find the following these options are available:
| Deck of Cards |
|---|
effectDuration |
|---|
| 0.5 | | history | false |
|---|
| id | samplesAcoes |
|---|
| effectType | fade |
|---|
|
| Card |
|---|
| default | true |
|---|
| id | 1 |
|---|
| label | Configure |
|---|
| See the option Configure on screen, and when you access it, check the wizard to set up the Work Station; It is an explicative screen and displays possible divisions, which are: - Grid;
- Fields;
- Calendar;
- Graph and
- WebBrowser;
- Enter the number of sections and click Next to continue, then fill the sections, indicating vertical proportion and the data on the columns;
- Complete the fields, but keep in mind that the option WebBrowser is available only in the setup of option WebBrowser.
- Options Field of view and type are available when option is Graph, and to continue with the setup, click Next;
- According to the number of sections define. Once you do this, see the configuration screen, which appears in columns. Carry on with configurations and then click Finish;
- You will se a configuration successful notification message and you can view the settings on screen
Use this resource to view the commitments of the entire team onscreen. You may even use a filter. The commitments are displayed with background colors differentiated by result: - Completed -> Yellow
- Canceled -> Blue
- Pending -> Orange
| Informações |
|---|
| Teams are registered respectively with leaders and led. For better viewing, add follow-ups for the team participants. If you do not select a team, the calendar only displays the Follow-ups of the participant linked to the current user. |
View the option Configure onscreen, then view the Configuration Wizard. The screen is self-explanatory and shows the possible divisions, as follows: - Grid.
- Fields.
- Calendar.
- Chart.
- Web Browser.
Enter the quantity of sections and, to continue, click Next. Start filling out the sections, indicating the vertical proportion and column data. Fill out the fields, keeping in mind that option Web Browser is only available when you configure option Web Browser. Options Field of Vision and Type are available when option is Chart and, to continue configuring, click Next. Then, view the configuration screen displayed in columns. Continue configuring and, to finish it, click Finalize. At this point, the system displays a configuration successful screen and displays the configuration onscreen- .
|
| Card |
|---|
| default | true |
|---|
| id | 21 |
|---|
| label | Search |
|---|
| Actions / Seaches - Choose the type of Search of subject
Search type - in the box of options
box- ,
at - in the
top - upper part of the screen.
The only Legal Matter that has no parties involved is the Advisory one. Fill out the filter field-
- Fill out the field(s)
to - of filter for the search of the lawsuit and click
option - option Search
in - in the menu
to - on the left of the screen
.- ;
- In the grid,
at - on the bottom part, view the lawsuits
that match - related to the applied filter
applied- .
- Click the on
a lawsuit - record to select it
.Click Create and/or Edit to access the lawsuit. After you fill out the required fields and the other fields, you can view the grid. The completion process takes place in accordance with the option of parameter MV_JENVENT. Fill out the data in accordance with the instructions found in Main Fields. See also the features available in Other Actions.- ;
- Enter information according to guidelines described in Main Fields.
See also the features available in Other Actions. See also the features available in Search - Lawsuits. |
| Card |
|---|
| defaultnextAfter | true1 |
|---|
| id | 32 |
|---|
| label | Parameter MV_JENVENT Enabled |
|---|
| When the content of parameter MV_JENVENT is set to 1 (enabled), place the mouse cursor on field Or Entity and press the F3 key to access the Entities Selection screen, in order to select the Entity type from the following options: - Clients.
- Contacts.
- Suppliers.
- Employees.
- Opposing Parties.
Select the Entity and click button ? to access the default query screen of the type selected. After selecting the Entity, press OK to return to grid Parties Involved. Fill out the data in accordance with the instructions found in Main Fields. See also the features available in Other Actions. See also the features available in Search - Lawsuits. |
| Card |
|---|
| default | true |
|---|
| id | 4 |
|---|
| label | Parameter MV_JENVENT disabled |
|---|
| When the content of parameter MV_JENVENT is set to 2 (disabled): - Fill out field Client? with Yes, if the party involved is a client.
- Fill out field Main? with Yes, if the party involved is the main actor of the lawsuit.
- Fill out field Supplier? with Yes, if the party involved is a supplier.
- Fill out the other fields in accordance with the information available.
Fill out the data in accordance with the instructions found in Main Fields. See also the features available in Other Actions. See also the features available in Search - Lawsuits. |
|
| Deck of Cards |
|---|
| effectDuration | 0.5 |
|---|
| history | false |
|---|
| id | samples |
|---|
| effectType | fade |
|---|
|
| Card |
|---|
| default | true |
|---|
| id | 1 |
|---|
| label | Operations |
|---|
|
- Choose the subject Search type in the options box, at the top of the screen.
- The only Legal Matter that has no parties involved is the Advisory one.
- Fill out the filter field(s) to search the lawsuit and click option Search in the menu to the left of the screen.
- In the grid, at the bottom, view the lawsuits that match the filter applied. Click on a lawsuit to select it.
- Click Create and/or Edit to access the lawsuit.
- After you fill out the required fields and the other fields, you can view the grid. The completion process takes place in accordance with the option of parameter MV_JENVENT.
|
| Card |
|---|
|
Use this to view the information registered. - After selecting the information you wish to view, click Ok.
- Fill out the data in accordance with the instructions found in Main Fields.
- See also the features available in Other Actions.
- See also the features available in Search - Lawsuits.
|
| Card |
|---|
|
Configure the routines: - Index.
- Index Values.
- Correction Methods.
- Values Updatable.
Configure the types of: - Legal Matters.
- Search.
- Fields.
In the fields of the routine, register the following: - Date of Case.
- Currency of Case (code and description).
- Value of Case.
- Updated Value of Case.
- Correction Method (code and description).
- Date of Last Update.
Click Search for a Lawsuit: | Informações |
|---|
| Configure parameter MV_JPROCFW to enable the addition of follow-up after registering a Lawsuit.
With this configuration, the system displays the question Do you wish to register a follow-up for this lawsuit? and, when you confirm it, the system takes you to routine: Configure also parameter MV_JPESPEC to enable field General Search to filter lawsuit search information. When parameter MV_JNUMCNJ is enabled and the class indicates the use of the CNJ, upon entering the lawsuit number in the court level, if the register From/To identifies the mask, the system automatically fills out fields Judiciary District and the locations of the 2nd level and the 3rd level. |
View the distribution of the fields onscreen, divided in tabs, in accordance with the selection of the item found in Search Configurations: Fill out field Configurations and create a filter. Click Search. The system returns the record(s) found. | Informações |
|---|
| The completion of field Sales Group in routine Clients validates manual addition for fields Client Code and Client Store. |
Fill out the data in accordance with the instructions found in Main Fields. See also the features available in Other Actions. See also the features available in Search - Lawsuits. | Informações |
|---|
| - You can add the number of the Branch of Origin to create reports, when the profiles Corporate or Trademarks and Patents do not originate the Legal Matter.
- Choose the lawsuit, right-click it, view the options and select Enter Lawsuit in Printing Queue.
- In the open grid to the right, right-click to select option Print Lawsuit from Printing Queue.
- View message Did You Already Run the Values Correction Routine? Confirm in Yes.
- Check for the existence of combos on the Report Parameters screen.
- In field Report Config. select an option from those offered by the system, fill out the data and confirm it.
|
|
| Card |
|---|
|
- Select a Legal Matter Code and click Edit.
- Access tab Values and fill out fields Case (date, currency and value) and Lawsuit Correction Method.
- Click Edit.
- The system saves the changes.
- Fill out the data in accordance with the instructions found in Main Fields.
- See also the features available in Other Actions.
- See also the features available in Search - Lawsuits.
- Click Close and the system returns to the search screen.
|
| Card |
|---|
|
- Select a Legal Matter Code and click Edit.
- Access tab Values and fill out the fields of the Case (date, currency and value) and Lawsuit Correction Method.
- Click Delete.
- The system saves the changes.
- Click Close and the system returns to the search screen.
|
| Card |
|---|
|
- Select the Legal Matter and click Batch Editing.
- View the screen requesting the completion of the fields you wish to edit.
- Fill them out, confirm and click Ok.
- After viewing the system-processing screen, the system displays the confirmation screen with the quantity of records edited.
- To exit, click Close.
| Informações |
|---|
| If any inconsistency occurs, the system issues a message requesting your confirmation to continue editing manually. If you select Yes, the system opens a screen for you to continue editing. |
|
| Card |
|---|
| id | 7 |
|---|
| label | Multiple Responsible Parties |
|---|
|
Access throughOther Actions / Multiple Responsible Parties.| Informações |
|---|
|
When you cancel the Multiple Responsible Parties maintenance form, all variables are restored to their original state. |
- Use a process with multiple responsible parties registered.
- When you click Edit with the lawsuit open, access Related Features / Multiple Responsible Parties.
- Once you edit one of the records of this register and confirm view message: Multiple Responsible Parties Have Been Edited, you need to fill out the history information. Confirm Operation? and the options are Yes and No.
- In No, cancel the edit in the history register. View the following message onscreen: Operation Canceled and edit not confirmed.
- Click Ok in this message screen to cancel the editing of the data in this register, keeping them in their original form.
- In Yes, fill out field Edit Reason with an explanation / justification.
- Once you edit the register, view the register screen of the history.
- If you choose Close to exit, you cancel the history register and the system displays a message: Operation Canceled and editing not confirmed.
- Click Ok in the message screen to cancel the editing of the data in the Multiple Responsible Parties register, keeping them in their original form.
- Click Confirm in the history register to save the data edited in the Multiple Responsible Parties register as well.
| Card |
|---|
|
Ao acessar Outras Ações / Incidentes selecione entre: - Abrir lista de incidentes ou
- Abrir Processo de Origem
Selecione o incidente e clique em uma das opções disponíveis no rodapé desta página, sendo: Visualizar, Alterar, Vincular, Incluir, Excluir e/ou Desvincular e Sair.
Selecione o Código do Contrato e clique em uma das opções disponíveis no rodapé desta página, sendo: Visualizar, Alterar, Vincular, Incluir, Excluir e/ou Desvincular e Sair. |
| Card |
|---|
|
Ao acessar Outras Ações / Vinculados o sistema apresenta a tela para selecionar os vínculos do processo. - Selecione o código do Assunto Jurídico e clique em uma das opções disponíveis no rodapé desta página, sendo: Visualizar, Alterar, Vincular, Incluir, Excluir e/ou Desvincular e Sair.
- Ao optar pela opção Vincular observe a tela com os campos para preenchimento na parte superior.
- Aqueles com uma lupa ao lado do campo, permitem a consulta a dados já cadastrados.
- Ao concluir o registro, confirme em Vincular.
|
| Card |
|---|
|
Ao acessar Outras Ações / Objetos é acessada a tela de cadastro de Objetos. Nesta opção é possível incluir, alterar ou ainda excluir Objetos. |
| Card |
|---|
|
Ao acessar Outras Ações / Garantias é acessada a tela de cadastro de Garantias. Nesta opção é possível incluir, alterar ou ainda excluir Garantias. - Conceitualmente nem todas as garantias envolvem valores no financeiro, no entanto quando um bem é dado em garantia é necessário configurar a integração com o módulo Financeiro (SIGAFIN), conforme descrevemos:
- Configure o parâmetro MV_JINTVAL com 1=Sim, para habilitar a integração e disponibilização do campo Integ.Financ na tela.
- Se o conteúdo do parâmetro for 2=Não, o campo não é visualizado.
- Além disso configure o parâmetro MV_JALCADA com 2 para não utilizar o controle de alçadas do módulo Compras (SIGACOM);
- Preencha os campos da rotina e no campo Integ.Financeiro informe Sim.
|
| Card |
|---|
|
Ao acessar Outras Ações / Faturamento selecione entre as opções: - Contrato. Neste acesso é exibida a tela de Contratos do Faturamento.Nesta opção é possível incluir, alterar ou ainda excluir Contratos do Faturamento.
- Lanc.Tab. Neste acesso é exibida a tela de Lançamentos Tabelados. Nesta opção é possível apenas visualizar ou pesquisar.
- Lanc.Tab.Lote. Neste acesso é exibida a tela de Lançamentos Tabelados em Lote. Nesta opção é possível apenas visualizar ou pesquisar.
O preenchimento do campo Integ.Financeiro (item 4) com Não, impede a visualização do título quando acionada a opção, exibindo a mensagem Título não encontrado para visualização. Os campos Cód.Tipo e Cód.Moeda não são mais editáveis e portanto não podem ser alterados. |
| Card |
|---|
|
Ao acessar Outras Ações / Relacionados é acessada a tela de relacionamentos do processos. Nesta opção é possível incluir, alterar ou ainda excluir relacionamentos Selecione o código Destino e clique em uma das opções disponíveis no rodapé desta página, sendo: Visualizar, Alterar, Vincular, Incluir, Excluir e/ou Desvincular e Sair.
Ao optar pela opção Vincular observe a tela com os campos para preenchimento na parte superior. Aqueles com uma lupa ao lado do campo, permitem a consulta a dados já cadastrados. Ao concluir o registro, confirme em Vincular. |
| Card |
|---|
|
Esta opção está disponível em Outras Ações / Salvar Modelo quando a opção é de incluir. |
| Card |
|---|
|
Ao acessar Outras Ações / Despesas é acessada a tela de Despesa/Honorário Nesta opção é possível incluir, alterar ou ainda excluir Despesas. Localize o campo Cond.Pagamento e selecione uma entre as opções disponíveis e confirme. |
Utilize a opção Pesquisa com as opções:
Anexo / Andamento / Follow-up.
| Deck of Cards |
|---|
| effectDuration | 0.5 |
|---|
| history | false |
|---|
| id | samples |
|---|
| effectType | fade |
|---|
|
| Card |
|---|
| default | true |
|---|
| id | 1 |
|---|
| label | Outros - Incluir como Modelo |
|---|
| Incluir como Modelo - Preencha os campos e para confirmar a inclusão do modelo, acesse Outras Ações/Salvar Modelo, atribua um nome e confirme em Ok. O processo para substituição de modelo é o mesmo, sendo que o sistema pergunta se deseja sobrescrever o arquivo, quando utilizado o mesmo tipo e nome. |
| Card |
|---|
| Excluir Modelo - Selecione um entre os modelos já criados e confirme em Ok. |
| Card |
|---|
| default | true |
|---|
| id | 3 |
|---|
| label | Correção Monetária |
|---|
| - Selecione novamente o registro alterado e clique em Correção Monetária.
- O sistema emite uma mensagem para confirmação da atualização dos valores.
- Confirme em Sim.
- O sistema faz a atualização e emite mensagem.
- Clique em Alterar, acesse a aba Valores e verifique que o campo Valor da Causa está atualizado.
- Clique em Não e o sistema cancela a operação.
|
| Card |
|---|
| default | true |
|---|
| id | 4 |
|---|
| label | Histórico |
|---|
| Os dados apresentados referem-se ao Histórico dos valores dos Assuntos Jurídicos. Esta opção permite visualizar as alterações em processos encerrados. Acesse Outras Ações / Histórico, visualize e selecione entre: - Correspondente - Apresenta as alterações ocorridas no cadastro de correspondente.
- Processo - Apresenta as alterações de processo encerrado ou não, pois, ele pode ser reaberto.
Configure o parâmetro MV_JTVENPH para bloquear operações quando o processo está encerrado. O parâmetro MV_JFLXCOR configurado com 1 não permite incluir Correspondentes. Ao cadastrar os Papéis de Trabalho e configurar o Perfil de Usuário podemos definir o acesso a cadastros, campos e funcionalidades para os estagiários e advogados. |
|
| Deck of Cards |
|---|
| effectDuration | 0.5 |
|---|
| history | false |
|---|
| id | samples |
|---|
| effectType | fade |
|---|
|
| Card |
|---|
| Para a impressão de relatório ou exportação de dados em Excel, clique com o botão direito no grid de pesquisa e escolha a opção: - Inserir o processo na fila de Impressão,
- Inserir todos os processos na fila de Impressão ou
- Inserir Concessões na Fila de Impressão.
Visualiza-se um novo grid, de Fila de Impressão, ao lado direito da pesquisa. Clique novamente com o botão direito e teremos as opções: - Excluir todos os processos da fila de impressão,
- Impressão de relatório e Exportação Personalizada (Excel),
- Imprimir processos da fila de impressão ou ainda
- Imprimir Concessões da Fila de Impressão.
Ao inserir os registros na fila de impressão, o Sistema valida se estes são de tipos de assuntos diferentes e ao ser, informa que não é possível realizar a operação, caso contrário, inserem-se na fila. Ao selecionar Imprimir Concessões da Fila de Impressão, visualize a tela para selecionar o relatório e aguardar a impressão. Ao emitir o relatório de processo, o Sistema exibe no campo Config. Relatório apenas as configurações para aquele tipo de assunto jurídico. Esta configuração é feita no Cadastro auxiliar Configuração Relatório. |
| Card |
|---|
| id | 2 |
|---|
| label | Fila de Impressão |
|---|
| Clique em Fila de impressão do browse, o Sistema abre uma sessão para configuração do relatório. Selecione a opção Imprimir processos da fila de impressão. Escolha, no campo Config. Relatório, o tipo de documento que deseja imprimir. Visualize as opções pela seta indicativa à direita. Se necessário, preencha os demais campos. Clique em OK. Será exibida uma tela para selecionar o diretório em que será salvo o arquivo gerado. Selecione o local para salvar o arquivo. O documento gerado segue uma nomenclatura própria do Sistema. O relatório é apresentado em formato de texto (Word®). A opção Imprimir Documento é habilitada quando selecionada a configuração para arquivos .DOT e pode-se enviar para a impressora. Todas as outras opções desta tela ficam desabilitadas para este tipo de relatório. Ao selecionar a configuração para arquivos .PRW ocorre o inverso, ou seja apenas o campo Imprimir Documento fica desabilitado para edição e os demais habilitados. |
| Card |
|---|
| id | 3 |
|---|
| label | Exportar Resultado |
|---|
| Selecione o Assunto Jurídico e clique em Exportar Resultados; Visualize a tela para efetuar as configurações; Uma vez configurado clique em Imprimir. Quando selecionada a opção Planilha, visualize a tela de Geração da Planilha; Marque uma das opções de visualização e para concluir, clique em Confirmar |
|
...
Campo: | Descrição |
| Número do Processo | Informe o número do processo. |
| Polo Ativo | Informe o polo ativo. |
| Polo Passivo | Informe o polo passivo. |
| Comarca | Informe a comarca. Exemplo: São Paulo |
| Natureza | Exemplo: Judicial |
| Tipo de Ação | Exemplo: Indenizatória. |
| Config. Relatório | Apenas as configurações para aquele tipo de assunto jurídico. Esta configuração é feita no Cadastro auxiliar Configuração Relatório. |
| Cliente | As opções disponíveis são: 1-Sim ou 2-Não. |
| Principal | As opções disponíveis são: 1-Sim ou 2-Não. |
| Fornecedor | As opções disponíveis são: 1-Sim ou 2-Não. |
| Data da Causa | Informe a data da causa. |
| Moeda da Causa | Informe o código que representa a moeda e também a descrição desta moeda. |
| Valor da Causa | Informe o Valor da Causa. |
| Valor da Causa Atualizado | Informe o valor da causa atualizado. |
| Forma de Correção | Informe o código e a descrição para a forma de correção utilizada. |
| Data Última Atualização | Informe a data que corresponde à útlima atualização. |
| Configurações | Acesse este campo e efetue um filtro. |
| Grp.Venda | Informe o grupo de venda. |
| Cód.Cliente | Informe a descrição para o código do cliente. |
| Loja Cliente | Informe a descrição para a loja do cliente. |
| Causa | Descreva a descrição do código da moeda para o valor da causa. |
| Forma de Correção do processo | Descreva uma descrição relacionado com a forma de correção do processo. |
| Motivo Alter | Informe o motivo da alteração. |
| Realizado | Nas opções Incluir ou Alterar, quando há mais de um registro com este campo informado com SIM, e o parâmetro MV_JENCACR tem o conteúdo informado com 1-Automático, o campo Situação é gravado com o conteúdo 2-Encerrado e o Sistema emite a mensagem de permissão para apenas um acordo. |
| Situação | As opções de preenchimento são: 1- Em andamento ou 2- Encerrado. |
| Dt.Reabert | Utilize para gravar a data da última reabertura do processo. |
| Código motivo | Este campo recebe o conteúdo registrado no parâmetro MV_JTPENAC. |
| Detalhe do encerramento | Este campo apresenta a data em que o acordo foi realizado. |
| Subárea | O preenchimento deste campo está disponível apenas após informar o campo Área. |
| Loja | Ao preencher este campo, o preenchimento do campo Grupo é automático quando o Cliente / Loja estão vinculados ao grupo. |
| Sistema | Ao preencher este campo, o preenchimento do campo Grupo é automático quando o Cliente / Loja estão vinculados ao grupo. |
| Cliente | Ao alterar este campo o sistema altera automaticamente o campo Grupo com o valor vinculado ao novo Cliente informado. |
| Loja | Ao alterar este campo o sistema altera automaticamente o campo Grupo com o valor vinculado ao novo Loja informado. |
| Grupo | O preenchimento deste campo não preenche nem sugere automaticamente nenhum campo. |
| Caso | O preenchimento do parâmetro MV_JCASO1 informado com 1 (numeração única habilitada) habilita este campo ainda que os campos Cliente e Loja não estejam preenchidos. Nesta situação ao informar este campo, o sistema preenche automaticamente os campos Grupo, Cliente e Loja quando este não esteja preenchidos com os valores relacionados ao caso escolhido. Tanto se forem digitados como se utilizada a consulta padrão (F3). Quando o parâmetro MV_JCASO1 está informado com 2 (numeração por cliente habilitada) este campo permanece desabilitado até que os campos Cliente e Loja sejam informados. Nesta situação ao preencher os campos Cliente e Loja este campo fica desabilitado. |
| Cód.Tip.Ação | Utilize a lupa ou a tecla F3 para acessar a consulta padrão. Informações disponibilizadas de CNJ. |
Related Contents
...
| Action / Clear - Enter a filter in the search screen;
- Click Clear;
- Filters removed;
|
| Card |
|---|
| Action / Exit Click Exit to leave the routine. |
|
| Deck of Cards |
|---|
|
| Card |
|---|
| Operation / View - Enter a filter in the search screen;
- Select record in grid and click View;
- View the screen with registered information;
Confirm or Close the screen.
|
| Card |
|---|
| Operation / Add Configure types of: - Legal Subjects,
- Search and
- Fields.
| Informações |
|---|
| Configure parameter MV_JPROCFW to enable the addition of follow-up after registering a Lawsuit.
With this configuration, the system displays the question Do you want to register a follow-up for this lawsuit? and when confirmed, the system directs to the routine: Configure parameter MV_JPESPEC to enable General Search to filter information in the search of the lawsuits. When parameter MV_JNUMCNJ is enabled and the class indicates the use of CNJ when filling out the lawsuit in the instance, if the From/To record identify the mask, the Judicial District, location from 2nd level and 3rd level not automatically filled out. |
View the distribution of fields on screen, divided in tabs, according to the selection of the item in the Search Configuration: Complete the Configurations field and apply a filter. Click Search. The system returns the records found. | Informações |
|---|
| - The addition of the Origin Branch field is available to generate reports, when the Legal Subject is not from Corporate or Trademarks and Patents.
- Choose lawsuit, right click the mouse, view options, then select Add lawsuit to printing queue.
- In the grid opened on the right side, right click the mouse, then select option Print lawsuit of printing queue.
- View message Has the Adjustment of Values routine already been executed?, confirm in Yes.
- Check if there are combos on the Report Parameters screen.
- In the Config.Report field, select the option among the ones made available by the system, fill out data and confirm.
|
|
| Card |
|---|
| Operation / Edit - Enter a filter in the search screen;
- Select record in grid and click Edit;
- View the screen, editing the intended information;
Check information and click Confirm to finish.
|
| Card |
|---|
| Operation / Delete - Enter a filter in the search screen;
- Select record in grid and clickDelete;
- View screen with the information;
- Check the record and Confirm to delete.
|
| Card |
|---|
| nextAfter | 4 |
|---|
| id | 5 |
|---|
| label | Edition in Batch |
|---|
| Operation / Edition in Batch - Enter a filter in the search screen;
- Select record in grid and click Edition in Batch;
- View the screen requesting the completion of the field used in the filter to edit information;
- Complete and click OK to confirm;
- After viewing the system processing screen, the confirmation screen with the amount of edited records is displayed;
- To exit, click Close.
| Informações |
|---|
| In case of any inconsistency, the system generates a message requesting the user a confirmation to proceed with manual edition. By selecting Yes, a screen to continue editing opens. |
|
| Card |
|---|
| default | true |
|---|
| id | 6 |
|---|
| label | Add with Model |
|---|
| Others / Add as Model Fill the fields, and to confirm the addition of the Legal Subject data model, access Other Actions/Save Model, attribute a name, then click OK to confirm. The process to replace the model is the same, and the system asks if you want to overwrite the file when the same name and type are used. |
| Card |
|---|
| nextAfter | 1 |
|---|
| id | 7 |
|---|
| label | Delete Model |
|---|
| Others / Delete Model Select one among the models already created, then confirm clicking OK. |
| Card |
|---|
| nextAfter | 2 |
|---|
| id | 8 |
|---|
| label | Indexation |
|---|
| Others / Indexation / Indexation Configure routines: - Index;
- Index Values;
- Forms of Indexation and
- Ugradeable Values.
- Enter Date, Currency, Value and Form of Indexation in Legal Subject;
- Select record in grid and click Indexation;
- Confirm the operation.
Others / Indexation / Recalculation Configure routines: - Index;
- Index Values;
- Forms of Indexation and
- Ugradeable Values.
- When you activate this option, the system generates the recalculation.
|
| Card |
|---|
| default | true |
|---|
| id | 9 |
|---|
| label | Printing Queue |
|---|
| Reports / Printing Queue To print reports or export data in Excel, right click the search grid and choose option: - Add process to Printing Queue,
- Add all processes to Printing Queue or
- Add Concessions to Printing Queue.
View a new grid of Printing Queue on the right side of the search. Right click and you get the following options: - Delete all processes from printing queue,
- Report printing and Custom Export (Excel),
- Print processes on printing queue or even
- Print Concessions on Printing Queue.
When adding records to the printing queue, the System validates whether they are different types of subjects; if positive, it informs that the operation is not possible, otherwise, they are added to the queue. When selecting Printing Concessions on Printing Queue, view the screen to the select report, then wait for printing. This option is only available in the Corporate subject and for users with access right. When issuing the report, the System displays in the Config. Report field only the configurations for that type of legal subject. This configuration is made in the Auxiliary Register Report Configuration, JUR0048_Configuração_do_novo_relatorio_SIGAJURI. |
| Card |
|---|
| nextAfter | 1 |
|---|
| id | 10 |
|---|
| label | Export Results |
|---|
| Reports / Export Results - Select record in grid and click Export Results;
- View screen to perform configurations;
- Once configured, click Print;
- When option Spreadsheet is selected, view the Spreadsheet Generation screen;
- Select one of the viewing options and click Confirm to finish.
|
| Card |
|---|
| Access Other Actions/Incidents The system enables the following options: - Open list of incidents or
- Open Origin Process
See instrutions and/or parameter settings to get the intended result.  Image Added Image Added
|
| Card |
|---|
| Access Other Actions / Bound - When you activate this option, the system displays the process bond screen.
- This actions allows you to Edit or Add.
|
| Card |
|---|
| default | true |
|---|
| id | 13 |
|---|
| label | Attachments |
|---|
| Access Other Actions / Attachments / Lawsuit - View the screen to select documents.
- Use Other Actions / Wizard, click Select, locate the document and click Next.
- Click Finish.
Access Other Actions / Attachments / Instances - Follow the steps described in the previous item.
|
| Card |
|---|
| nextAfter | 3 |
|---|
| id | 14 |
|---|
| label | Stages |
|---|
| Access Other Actions / Stages - Click on this option and use the one that suits you best: Add a new stage or Edit to adjust the item selected.
|
| Card |
|---|
| nextAfter | 4 |
|---|
| id | 15 |
|---|
| label | Follow-ups |
|---|
| Access Other Actions / Follow-ups - Click on this option and use the one that suits you best: Add a now follow-up or Edit to adjust the selected item.
|
| Card |
|---|
| default | true |
|---|
| id | 16 |
|---|
| label | Objects |
|---|
| Access Other Actions / Objects - Activate this option and view the screen with the existing objects.
- The top menu enables actions such as Add, Edit, View or Delete.
|
| Card |
|---|
| default | true |
|---|
| id | 17 |
|---|
| label | Warranties |
|---|
| Access Other Actions / Warranties - Click on this option and use the one that suits you best: Add a warranty item or Edit to adjust the selected item.
|
| Card |
|---|
| default | true |
|---|
| id | 18 |
|---|
| label | Corr.Contr. |
|---|
| Access Other Actions / Corr.Contr. - To view this option, you must complete the fields Instance and Corresponding Code of the instance registration.
|
| Card |
|---|
| default | true |
|---|
| id | 19 |
|---|
| label | Billing |
|---|
| Access Other Actions / Billing / Contract - Access this option and select either Add a new Billing Agreement or Edit to adjust the selected item.
Other Actions / Billing / Tab. Entry - Access this option and select either View to see information on Tabulated Entry or Search.
Other Actions / Billing / Batch Tab. Entry - Access this option and select either View to see information on Batch Tabulated Entry or Search to locate a new item.
|
| Card |
|---|
| default | true |
|---|
| id | 20 |
|---|
| label | History |
|---|
| Access Other Actions / History / Corresponding - View the corresponding lawsuit history screen.
- This option is for Viewing only.
Other Actions / History / Lawsuit - View the Justification of Change screen.
- This option is for Viewing only.
Other Actions / History / Values - View the lawsuit history value screen.
- This option is for Viewing only.
|
| Card |
|---|
| default | true |
|---|
| id | 21 |
|---|
| label | Related |
|---|
| Access Other Actions / Related - The system displays the lawsuit relation screen.
- Use options Add, Edit, View, Bind, Delete.
|
| Card |
|---|
| default | true |
|---|
| id | 22 |
|---|
| label | Save Model |
|---|
| Access Other Actions / Save Model - The ability to save the model is available only for option Add; the option Edit does not enable this.
|
| Card |
|---|
| default | true |
|---|
| id | 23 |
|---|
| label | Expenses |
|---|
| Access Other Actions / Expenses - View the Expenses / Fees screen and use menu options such as Add, Edit, View or Delete to confirm the action.
|
|
Main Fields
| Deck of Cards |
|---|
| effectDuration | 0.5 |
|---|
| history | false |
|---|
| id | samples |
|---|
| effectType | fade |
|---|
|
| Card |
|---|
| default | true |
|---|
| id | 1 |
|---|
| label | Summary |
|---|
| | Fields | Description |
|---|
| Code | Enter code of legal subject. Example: 0000000047 | | Active Pole | Enter when active pole applies. Example: Client WS | | Passive Pole | Enter when passive pole applies. Example: | | District | Enter description of district. Example: São Paulo | | Jurisdiction / Court | Enter which is the jurisdiction and/or court involved. Example: São Paulo | | Court / District | Enter which is the court and/or district involved. Example: São Paulo | | Nature | Enter the description of the legal nature. Example: Default | | Type | Enter the type of lawsuit.
Example: Incident | | Lawsuit Number | Enter the number of the lawsuit. Example: 514862542016655542 | | Status | Select: 1 - In progress or 2- Closed. Example: Closed | | Incidents | Enter the number of incidents. Example: 0 | | Bound | Number of lawsuits bound. Example: 0 | | Related | Enter the number of related lawsuits. Example: 0 |
|
| Card |
|---|
| default | true |
|---|
| id | 2 |
|---|
| label | Detail |
|---|
| | Fields | Description |
|---|
| Customer Code | Use the default search and enter a description for the customer code. Example: 000001 | | Store | Use the default search and enter the store. Example: 01 | | Case Number | Use the default search and enter the number of the case. Example: 000018 | | Inclusion Date | Enter the date of inclusion Example: 01/10/2017 | | Inclusion User | Enter the name of the user who made the inclusion. Example: Leandro | | Litisconsorc | Select: 1- Yes or 2-No. Example: 2-No | | Office Code | Use the default search and enter the Office Code. Example: São Paulo | | Office Code | Field filled automatically after entering Office Code. | | Legal Area Code | Use the default search and enter the code of legal area. Example: 001 | | Legal Area Desc. | Field filled automatically after entering Legal Area Code. Litigation: Litigation. | | Partner Acronym | Use the default search and enter the acronym for the coordinator in charge. Example: LPS | | Partner | Field filled automatically after entering the Partner Acronym. | | Attorney Acronym | Use the default search and enter the acronym that identifies the attorney. Example: JNS | | Attorney | Field filled automatically after entering the Attorney Acronym. | | Intern Acronym | Use the default search and enter the acronym that identifies the intern. Example: MRC | | Intern | Field filled automatically after entering the Intern Acronym. | | Rite Code | Use the default search and enter the Rite Code. Example: 001 Default | Subject Code | Use the default search and enter the subject code. Example: 002 Federal Level | | Subject | Field filled automatically after entering the Subject Code. | | Subject Detail | Memo field for adding details of the subject. | | Notes | Memo field for adding information. | | Lawsuit Mode | Use the arrow and select: 1- Electronic or 2-Physical. | | Legal Secrecy | Use the arrow and select: 1-Yes or 2-No. | | Contingency Type | Use the arrow and select 1-Active or 2-Passive. |
|
| Card |
|---|
| default | true |
|---|
| id | 3 |
|---|
| label | Values |
|---|
| | Fields | Description |
|---|
| Prognosis Code | Use the default search and enter the code of the prognosis. Example: 02 Probable. | | Prognosis Des. | Field filled automatically after entering the Prognosis Code. | | F.Correction | Use the default search and enter the code for form of correction. Example: 08 - TST | | Description | Field filled automatically after entering the F. Correction. | Cause val. dt. | Enter date for the value of cause. | | Cause curr. code | Use the default search and enter the code for the currency related with the cause. Example: 01 | | Cause curr. sym. | Field filled automatically after entering the Cause Currency Code. Example: R$ | | Cause value | Enter the value of the cause. Example: 500.00 | | Current Cause Vl. | Enter the current value of the cause. Example: | | Inv. Val. Dt. | Enter date related with the amount involved. | | Inv. Curr. Code | Use the default search and enter the code for the currency of the amount involved. Example: 01 | | Inv. Curr. Sym. | Field filled automatically after entering the Involved Currency Code. Example: Real | | Involved Amt. | Enter the amount involved. | | Current Inv. Amt. | Enter the current amount involved. | | Pro. Amt. Dt. | Enter the date that corresponds to the provision amount. | | Pro. Curr. Code | Use the default search and enter the code of the currency used for provision. Example: 01 | | Pro. Curr. Sym. | Field filled automatically after entering the Provision Currency Code. Example: Real | | Provision Amt. | Enter amount of provision. | | Curr. Pro. Amt. | Enter the current amount of provision. | | Pro. Index. Amt. | Enter indexation amount of provision. | | Pro. Int. Amt. | Enter the amount that corresponds to interests for provision. | | Last Upg. Dt. | Enter date of last upgrade. | | Balance in Court | Enter amount of balance in court. |
|
| Card |
|---|
| default | true |
|---|
| id | 4 |
|---|
| label | Closing |
|---|
| | Fields | Description |
|---|
| Status | Select: 1-In progress or 2-Closed. Example: Closed | | Closing Date | Enter date of closing. | | Final Amt. | Enter final amount. | | Clos. Reas. Code | Use the default search and enter the code for the reason of closing. Example: 002 | | Clos. Reas. Desc. | Field filled automatically after entering the Closing Reason Code. Example: Closing | | Closing Det. | Enter description to detail the closing. |
|
| Card |
|---|
| default | true |
|---|
| id | 5 |
|---|
| label | Involved |
|---|
| | Fields | Description |
|---|
| Orig. Entity | By default search, select an origin entity. Example: SA1 | | Entity Code | Field filled automatically after entering Orig. Entity. | | Entity Desc. | Field filled automatically after entering Orig. Entity. | | Main? | Use the arrow to select Yes or No. | | Pole | Use the arrow to select: 1-Active Pole; 2-Passive Pole; 3- Interested Third Party; 4-Involved Partnership; 5-Partner Participation; 6- Administration. Example: Active Pole | | Inv. Type Code | Use the default search and select the code for the type involved. Example: 01 | | Inv. Type Desc. | Field filled automatically after entering Inv. Type Code. Example: Defendant | | Customer | This field is filled automatically after including the search. Example: JUR001 | | Store | This field is filled automatically after including the search. Example: 01 | | Name | This field is filled automatically after including the search. Example: Company US | | Supplier Code | This field is filled automatically after including the search. | | Supplier Store | This field is filled automatically after including the search. | | Person Type | Select: 1- Individual or 2- Company Exemplo: 2-Company | | CNPJ/CPF | Enter CNPJ number if company or CPF if individual. | | C Pt Att Code | Field used to describe the code of the attorney of the opposing party. Example: 001 | | C Pt Att Des | Field filled automatically after entering C Pt Att Code. Example: Jose Marcos Mendes | | Telephone | Enter phone number. | | Observation | Use this field to add related information. | | Cust Wrk Plc Code | Use the default search to select the code for the customer's workplace. Example: 001 | | Cust Wrk Plc Desc | Field filled automatically after entering Cust. Wrk. Plc. Code. | | Customer Address | Example: Rua Afonso | | District | Example: Jau | | State | Example: SP | | Price | Example: 1,000.00 |
|
| Card |
|---|
| default | true |
|---|
| id | 6 |
|---|
| label | Instances |
|---|
| | Field | Description |
|---|
| Instance | Enter the content of this field for the proper view of Correspondent Contact information (in Other Actions). Example: 1st instance | | Current Instance | Use the search to define if this is the current Instance. 1=Yes or 2=No. Example: Yes | | Nature Code | Use the default search to select the code of Nature. Example: 001 | | Nature Des. | Field filled automatically after entering Nature Code. Example: Default Nature. | | Lawsuit Number | Enter the number of the lawsuit. Example: 00010201-49-2011.5.01.0203 | | Prev. Lawsuit No. | Enter the number of the previous lawsuit, if any. | | Action Type Code | Use the default search to select the code of the type of action. Example: 001 | | Action Type Des. | Field filled automatically after entering Action Type Code. Example: Compensatory | | State | Use the default search to select the State. Example: SP | | District Code | Use the default search to select the State. Example: 0001 | | District Des. | Field filled automatically after entering District Code. | | 2nd lvl loc Code | Use the default search to select the code of second level location. Example: 00001 | | 2nd lvl loc Des. | Field filled automatically after entering 2nd lvl loc Des. | | 3rd lvl loc Code | Use the default search to select the third level location code. Example: 00006 | | 3rd lvl loc Des. | Field filled automatically after entering the 3rd lvl loc Code. | | Correspondent Code | Use the default search to select the code of the correspondent. Important: The content of this field is related to the proper viewing of the Correspondent Contract information (in Other Actions). | | Store | Enter the name of the store related with this register. | | Correspondent Name | Field used to enter the name of the correspondent after entering the Correspondent Code. | | Attorney Code | Field to enter the code of the attorney. | | Attorney Name | Field filled automatically after entering the Attorney Code. | | Decision code | Use the default search to select and/or add a decision code. Example: 001 | | Decision Des. | Field filled automatically after entering the Decision Code. Exemplo: Conclusive | | Descision Date | Enter date for decision. | | Note | This field is for adding relevant information and that correspond to this instance. | | | Use the arrow to select: 1-Yes or 2-No. Example: 2-No | | Execution Date | Enter the date of execution, when applicable. | | Distribution | Enter the date of distribution, when applicable. Example: 01/20/2017 | | Automatic And. | Use the arrow to select 1-Yes or 2-No. Example: Yes |
|
| Card |
|---|
| default | true |
|---|
| id | 7 |
|---|
| label | Negociations |
|---|
| | Field | Description |
|---|
| Code | Use the default search to select the code. Example: 0000000019 | | Date | Enter the date of negotiation. Example: 12/20/2016 | | Currency | Use the dafult search and select the currency. Example: 01 | | Currency Symbol | Field filled automatically after entering the Currency. Example: Real | | Amount | Enter the amount of negotiation in the selected currency. Example: 580.00 | | Payment Term | Use the default search to select the payment term. Example: 001 cash payment | | No. Installments | Enter the number of installments. Example: 3 | | Bank Code | Use the default search to select the code of the bank used in negotiation. Example: 001 | | Branch Code | Field filled automatically after entering the code of the Bank. | | Account Code | Field filled automatically after entering the code of the Bank. | | Bank Name | Field filled automatically after entering the code of the Bank. | | Branch Name | Enter the name of the branch. Example: Pça da República | | Due Date | Enter the due date concerning to the negotiation. Example: 02/28/2017 | | Type | Use the arrow to select 1- Proposal or 2- Counter-proposal Example: 1-Proposal | | Done? | Use the arrow to select 1-Yes or 2-No. Example: 1-Yes | | Note | This field is for adding data relevant to the negotiation. | | Contact Code | Use the default search and select the code of the contact. Example: 000001 | | Contact Name | Field filled automatically after entering Contact Code. | | Telephone | Enter phone number of contact. Example: 3988.33.44 | | E-mail | Enter e-mail of contact. Example: [email protected] | | Status Code | Use the default search and enter the status code. Example: 002 | | Status Desc. | Field filled automatically after entering Status Code. | | Inclusion Dt. | Enter date of inclusion. | | Inclusion User | Field filled automatically according to system login. | | Edition User | Field filled automatically according to system login. | | Edition Date | Field filled automatically by the date of access to the system. Example: 02/10/2017 |
|
| Card |
|---|
| default | true |
|---|
| id | 8 |
|---|
| label | Root Causes |
|---|
| | Field | Description |
|---|
Root Cause
| Use the default search to select the code for the root cause that best applies. Example: 0001 | Description of root cause
| Field filles automatically after selecting the code for the Root Cause. Example: Harassment |
|
|
Related Contents
...